How to Make Cookie Cutter Floating Candles
 I had a blast making these candles…I can’t wait to go to the dollar store to buy more cookie cutters! These will make a perfect gift for mom. How about buying a pretty bowl to take a stack of the homemade candles, wrapped in some scrap silk material with ribbon tied around?
by Twila Lenoir
Supplies:
- metal cookie cutters
- play dough or any inexpensive clay
- wick
- wax (you could recycle old candles, as I did, for this project)
- tin can
- popsicle sticks or pencils (with my kids around, I can never find a pencil or a pen)
Instructions:
1. Start by taking a tin 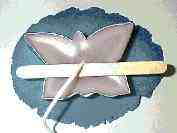 can and squeezing the can in a little so you will form a spout to pour out the wax. Place in some chunks of wax. I used some wax from a collection of used candles. Take a pot of water (just a little bit of water is needed), and then place the can in the pot of water and start melting until all the chunks are melted.
2. While you’re waiting for the wax to melt, take the clay and roll it out flat, about a 1/2 inch thick and wide enough that you can place your cookie cutter in the middle.
3. Place a cookie cutter in the center of the clay. Press it in, so that indents the clay but doesn’t go all the way throught it. Take a piece of wick and stick it in the middle of the cookie cutter so that the wick sticks in the clay a little. Now place the popsicle over the cookie cutter (see photo), near the wick, so it will prop the wick up straight.
4. Pour the wax in the cookie cutter on top of the clay, almost to the top.
5. The hardest part now is to wait for the wax to set, which takes about 45 minutes. When set, remove the cookie cutter from the clay – the cool thing is it doesn’t stick to the clay. I was so excited, I couldn’t wait to get them out of the metal cookie cutter, so I popped them in the freezer. This was great, because they shrank a little and popped right out. Now get your glass bowl, fill with water, and enjoy your floating candles!
Caution:
Wax is a flammable substance and, as such, should be handled with care. Do NOT reheat or melt wax if doing so poses a fire hazard for you. Never leave a child alone with a lit candle or hot melted wax. A lit candle is potentially very dangerous; never leave a lit candle unattended. We are not responsible for any accidents or mishaps that occur if you choose to do this craft. Please be alert, use common sense, and keep yourself and others safe from harm!


Rose says
Nice! Wanted a way to make this easier for me to do this.. I do something a Lil different maybe another idea for you to try.. I use a mason jar stick the molds (cookie cutter shaded wax) & stick them on inside of jar & fill it with a different color of wax… Looks pretty cool… Also FYI you shouldn’t put candles in the freezer it makes the wax crack.. Try the fridge instead.