Last updated on March 4th, 2024 at 02:14 pm

Three Crocheted Outfits for Ten Inch Dolls
Ten Inch Teen Doll Clothes to Fit Bratz™ Dolls
By Fran Goreham
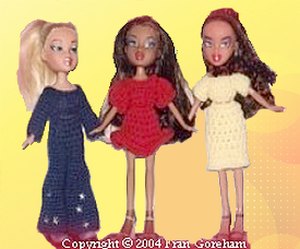
Crochet a wardrobe of clothes for ten inch dolls such as Bratz™ dolls; free patterns to crochet a mini skirt, sleeveless and puffy sleeved top, long skirts, shorts, straight leg and bell-bottomed pants and poncho.
Used here with permission.
Copyright 2004 – Strictly enforced. Do not sell this pattern.
Here are some basic instructions using simple crochet stitches and a cache of yarn bits to create a new wardrobe for your Bratz™ dolls.
The mini skirt pattern is the basic design for both skirts and pants. The sleeveless top is used for various shirts with different sleeve lengths.
Size
Fits 10″ doll such as the Bratz™ dolls
Materials
- Small amounts of sport weight and light worsted weight yarn
- Size 00 steel crochet hook or size needed to obtain gauge
- For pants or skirts – 2 small (approximately 2″ diameter) rubber bands or thin ponytail holders without metal clasps. A 3″ piece of 1/4″ elastic may be used instead, overlapping the ends 1/4″ and sewing them together.
- 2 #4 snaps or velcro for each top
- Needle and thread to match yarn
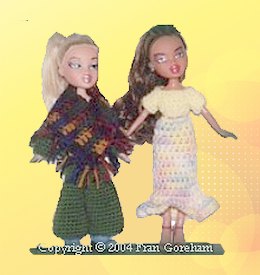
- Embellishments such as beads, small buttons, lace, bits of novelty yarns or rickrack. Iron-on “Jazzy Jeans” stars were used on the blue bell-bottom outfit. An embossing heat tool was used to apply the stars to avoid flattening the yarn fibers with an iron. But use caution; this tool is very hot and can scorch the yarn.
Gauge
Varies with different yarns but averages 4 – 5 sc = 1 inch; 4 – 5 rows or rnds = 1 inch.
Pattern Notes
It may be necessary to add a row or two to the length of the garment to allow for the difference in yarn weights.
Join rounds with slip stitch in top of beginning ch. Count as 1 stitch.
Mini Skirt
Rnd 1: Sc 14 around waistband rubber band or elastic. Ch 2
Rnd 2. Hdc in each st around. Ch 2
Rnd 3: Repeat rnd 2
Rnd 4: (3 hdc, inc in next st) three times. Inc in last st–17 sts. Join with sl st in top of beginning ch. Ch 2
Rnd 5: Hdc in ea st around. Join with sl st in top of beginning ch. Ch 2
Rnd 6: Repeat rnd 5. Join and end off. Weave in end.
Variations
School Length Skirt
Rnd 7-9: 3 Hdc, inc around. Join with sl st in top of beginning. End off. If desired, work 1 round of contrast crochet stitches around bottom.
Long Skirt with Flounce
Rnd 7: (Hdc 4, inc) 3 times, 2 hdc in last hdc
Rnd 8 – 10: Hdc in each hdc around
Rnd 11: (Hdc 2, inc) 6 times, hdc to end of rnd
Rnd 12: Hdc in each hdc around
Rnd 13: Repeat rnd 10
14 – 15: Sc in each hdc around. End off.
Shorts
Work mini skirt pattern through round 6
Rnd 7: hdc in ea hdc around. Join with sl st in top of beginning ch
Rnd 8: Ch 1, sk 8 (this makes division for legs), sl st in next st, ch 1, sc in same st, sc 10 around, sl st in first ch1. Break off. (For longer shorts make additional rounds of sc)
Second leg: Attach yarn to dividing stitch (sl st) of legs. Ch 1, sc around (10 sts). Join with sl st in first st. End off or make longer to match first leg.
Bell Bottom Pants
Work mini skirt pattern through round 6
Rnd 7: Ch 1, sk 8 (this makes division for legs), sl st in next st, ch 1, sc in same st, sc 10 around, sl st in first ch1
Rnds 8-10: Sc in each sc (10 sts)
Rnd 11: Ch 1 (3 sc, inc 1) 2 times, 2 sc, inc 1 in last sc – 12 sts
Rnd 12: Ch 1 (3 sc, inc 1) 3 times – 16 sts
Rnd 13: Ch 1, sc in each sc around. Join with sl st in beginning ch
Rnd 14: Ch 1, (3 sc, inc 1) 4 times – 20 sts. Join
Rnd 15-19: Ch 1, sc in each sc around
Rnd 20: Ch 1, (2 sc, inc 1) 6 times and in last sc – 27 sts
Rnd 21-24: Ch 1, sc in each sc around to desired length.
Straight-leg Pants
Work as for the bell-bottom pants but delete increases in legs.
Sleeveless Top
Row 1: Ch 15, ch 1, turn
Row 2: Sc across, ch 1, turn – 14 sts
Row 3: 5 sc, 3 sc in next sc, 2 sc in next 2 sc, 3 sc in next sc – 5 sts to end of rnd., 20 sts, ch 1, turn
Row 4: Sc across, ch 1, turn
Row 5: Sc 4, ch 4, sk 2, sc in next st, sc dec, sc in next st, ch 4, sk 2, sc in next st, sc to end of row. Ch 1, turn
Row 6: (Neckline) Sc in ea st of back, over inside loop of ch sts for shoulder straps, across the front, over the inside loop of ch sts for the other shoulder strap and across the back. End off.
Sleeves for Top
Follow instructions for sleeveless top through row 5
Rnd 6: Attach in any underarm st, with sc, sc in remaining underarm sts, side of armhole, outside loops of shoulder sts, and back side sts. Join in 1st sleeve st.
Rnd 7: Ch 1, sc around. Continue adding rounds for longer sleeves. Repeat for other sleeve.
Puff Sleeves
Follow instructions for sleeveless top and sleeves through rnd 6
Rnd 7: 2 hdc in each 2 sc sts. Join, ch 2
Rnd 8: Dec in each 2 hdc sts. Join. End off.
Headband
Ch 26. Join in 1st ch. Ch 1, sc in each ch around. Join in 1st st. End off.
Poncho
Ch 11, turn, dc in 2nd ch from hook and in ea st across, 9 sts. Ch 2, turn. Repeat for 8 rows. Make 2. Sew short end of one rectangle against the long side of the other. Sew other two short ends together for the center back. Fringe if desired with 2 pieces of 3″ lengths of yarn hooked into every other stitch.


Leave a Reply