Last updated on December 13th, 2024 at 01:15 am

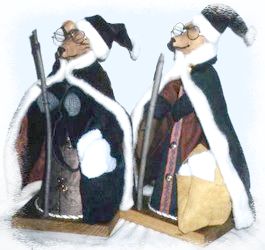
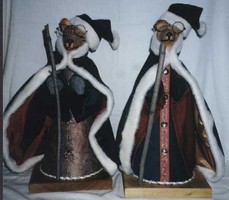
Charming Greyhound Santa Dressed in a Nature Theme
Supplies:
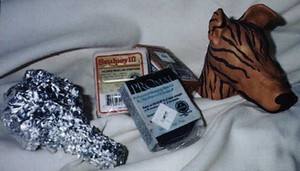
- Bit of aluminum foil for head base
- 3 small blocks of polymer clay (such as Sculpey, Fimo or Primo) for the head.
- 1 small block of black polymer clay (such as Sculpey, Fimo or Primo) for the nose and mouth.
- Wooden based made of an 8″ square of wood and a 14″ long 1-inch dowel (broom handle)
- Large piece of poster board
- Doll glasses
- Assorted velvet, satin, brocade, ribbon and faux fur scraps for cloaks and hat.
- Buttons to match.
- Bit of stuffing for arms
- Scrap of leather, suede or canvas to make into satchel
- Twig for a walking stick
- Assorted Christmas greenery, ornaments or mini dog toys to put in sack
- Hot glue gun and glue sticks
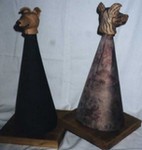
Directions:Step 1 – Make the Head
We used a piece of aluminum foil wadded into a basic head shape for the core of the head, as shown in the photo. Use your hands to soften 2 1/2 blocks of polymer clay and form them over the core. Be sure to provide at least 2 inches of neck beyond the core. This is necessary to attach to the dowel. Make sure the opening for the neck is big enough to allow the dowel to be inserted. Use a scrap piece of dowel as a guide if necessary.
For brindle (as shown), form the head with the base color, then add the stripes afterward, squishing them into the head to flatten them.
Add the ears using as much of the remaining one half block of polymer clay as necessary. Using the black, make a nose and lips. Apply to head. If you’d like, insert eyes (not shown). Place on baking sheet and bake 20 minutes at 275 degrees.
Step 2: Make the Base
The base is an 8″ square with a 14″ dowel attached to it. The connection point won’t show, so you can screw and glue the dowel to the base. We like to drill a 1/4″ deep, 1-inch hole and glue the dowel into place, but that requires a drill press. As long as the dowel is connect to the base square, you’re fine. Doesn’t even have to be too sturdy because of later steps. The square will show, so paint or stain as you’d like.
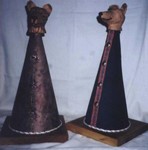
Step 3: Form Body Cone and Cover
On a piece of posterboard, draw a quarter circle with a 14″ radius. Cut the shape out. Cut a second curve about 1 inch in to allow for dowel.
Cover the posterboard with the fabric for the inner gown. Be sure to leave an extra 1/2″ to allow for folding the fabric around the edges of the posterboard. I affix the fabric to the posterboard using fusible web (like UltraBond). However, glue will also work. Affix the fabric and fold extra around edges. Affix the folded edges to the back of the posterboard.
Step 4: Attach Body Cone and Head to Base
Roll the covered posterboard to form a cone. Place over dowel and squish to get the right sized cone.
Hot glue overlapping edges. Hot glue bottom of cone to wooden base.
Hot glue head to top of dowel. Your Santa will have more personality if you slightly tilt the head.
Step 5: Adorn Inner Gown
Add a strip of ribbon down front of inner gown and adorn with buttons or bows. Hot glue a piece of trim to the bottom of the cone.
Step 6: Make Inner Cloak and Arms
Use mitten-like fabric to make the arms and hands. I like woolens for this. Use a piece 10″ x 4″. Fold it in half longwise and stitch a basic hot dog shape, leaving an opening for turning right side out. Trim around the seams and turn right side out. Stuff the arms and stitch the hole closed.
Hem three sides of the fabric to be used for the inner cloak. (Use a big rectangle. The longer the rectangle, the longer the inner cloak.) Make a fold that allow the arms to be inserted and stitch the fourth side.
Fold the arms and cloak around the body cone and stitch the hands together. Add a bit of glue near the back of the cloak to affix it to the cone.
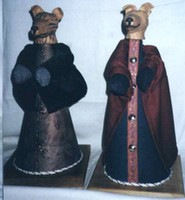
Step 7: Construct Outer Cape and Hat
Construct an outer cape. The inside of the cape shows, so I like to line it with satin. They also look great with faux fur edging. I draw a shape with rounded edges and cut pieces of the cape fabric and satin. Then a fold a long, thin piece of faux fur and stitch all of them together at once. Then I turn the cape right side out and attach around the neck. This hides where the neck meets the cone. I use decorative buttons here.
The hat is a simple triangle folded and stitched. It looks best when edged with faux fur. I also add a faux fur yo-yo (small circle of fabric drawn into a ball shape) to the end of the hat. Attach the doll glasses (if you’re using them) with a bit of glue. Attach the hat with glue.

Step 8: Construct Satchel
I use bits of leather to make a simple satchel with a long strap. Canvas will also work. Sew three sides to form the satchel. Add the straps.
Step 9: Attach Satchel and Walking Stick
Use a few stitches to attach the walking stick to one of the hands. I also add some glue for extra assurance.
Attach the satchel to the base with a bit of glue. Drape the strap over an arm or let it drop loose. Fill the satchel with dog toys.
Contributed by Greyhound Manor Crafts
Greyhound Manor Crafts is a nonprofit group that promotes greyhound adoption by providing free craft patterns related to greyhounds.


Leave a Reply