Last updated on November 19th, 2019 at 05:41 pm
Use Miniature Wooden Shapes for Homemade Toy Soldier Ornaments
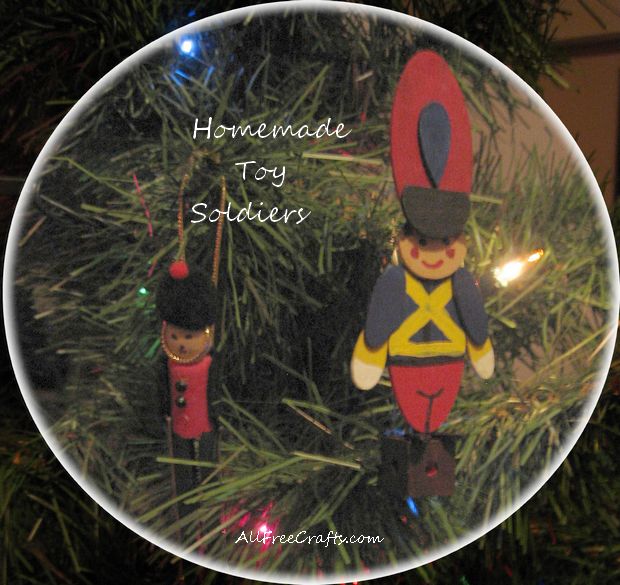
Brightly colored toy soldiers are traditional Christmas decorations that you can easily recreate using pre-made, miniature wooden shapes such as ovals and teardrops.
This Christmas craft project is simple enough for children to do with a little guidance. They can enjoy painting with bright, primary colors and also practice fine motor skills while sorting, placing and gluing the small wooden shapes. Only one piece requires cutting, which can usually be done by scissors.
See Clothespin Toy Soldier for instructions on painting and assembly the smaller toy soldier, on the left, made from a clothespin.
by Jane Lake
» Assorted miniature wooden shapes: 2 medium circles (face and hat brim); 2 medium ovals (body and hat); 2 small ovals (arms); 3 small teardrops (hands and hat decoration)
» Optional: 1 small wooden building block and one post to support soldier standing up
» acrylic craft paint in red, black, flesh tone, blue and yellow
» black permanent marker
» craft glue (I used Aleene’s Tacky Glue)
» assorted tools: one or two paint brushes; scissors; water for cleaning brushes
Project Instructions:
Preparation and Painting:
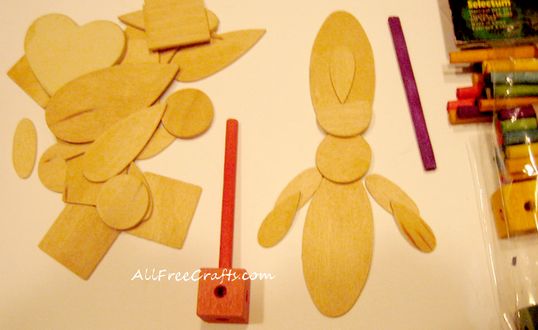
Arrange ovals, circles and teardrops into the basic toy soldier shape.
Select the wood shapes that you will use for your toy soldier and set them out on your work surface. This will give you a good idea of how your toy solider will look when finished.
Cut a slice off one of the medium wooden circles to make the hat brim. You can score the cut line with a knife first, if desired, or simply cut, going the same way as the wood grain, with scissors. Take the smaller piece that you just cut off, and cut it again down the center, going against the grain, to make two boot shapes, as shown below (on top of the block).

Paint the back of each wooden piece, let dry, then turn over and paint the front.
Paint the hat brim and boots black or color them black with permanent marker.
Begin painting the back of the remaining shapes; check photo for colors and placement. Lay the pieces separately to dry.
Paint the hat oval red; the two upper arm ovals blue; the face circle in flesh tone, and one teardrop for the hat in blue.
Paint the two teardrops for the lower arms in yellow. Let dry, then paint the hand areas in white to represent white gloves.
Paint the upper half of the body oval in blue and the lower half in red. When the paint dries on the body front, paint criss-crossed yellow bands over the upper section as well as a yellow belt. Use permanent marker to make a black belt at the top of the red section and also a “Y” shape, as shown on the photo, to indicate the leg shape.
If necessary, paint the small supporting craft block and dowel stick in brown or black.
For the soldier’s face, place two black dots in the middle of the circle for eyes. Use a permanent red marker, or paint and a small paint brush, to create a smiling mouth and two dots for red cheeks. Above the eyes, paint brown hair.
Wait for all pieces to dry before gluing together.
Assembly and Gluing
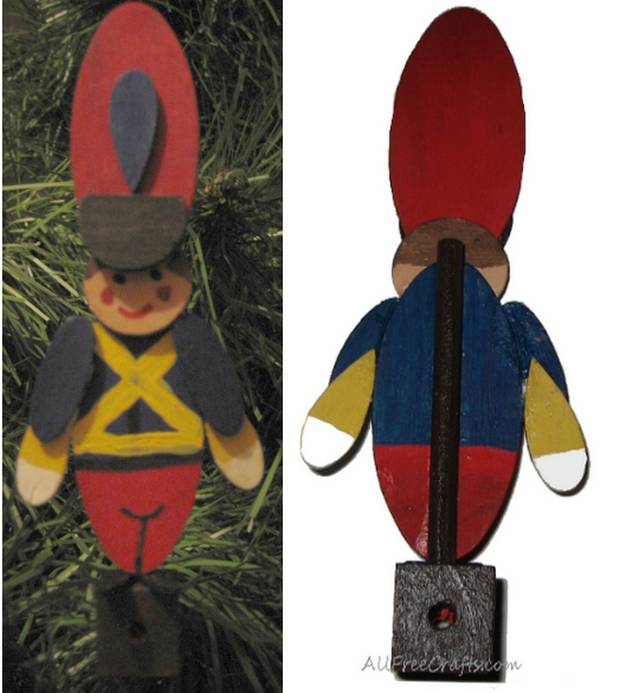
Assembly of the toy soldier, showing the front and back placement of the wooden shapes.
Begin assembling your soldier by first inserting the dowel into one of the pre-existing holes in the craft block. These blocks and dowels are commonly sold as toy building supplies in craft departments and dollar stores. They usually come prepainted, in many colors, with holes drilled through the center of each side.
Note: if you don’t have a block and dowel, you can assemble the soldier without it. Just follow the directions as follows, and add a string to the back for hanging the toy soldier on your Christmas tree.
Glue the two black boots on top of the block, centered in front of the dowel (see photo for detail). Run a line of glue along the dowel then press the body oval into place, on top of the boots.
Next, glue a yellow and white teardrop to a blue arm oval, with the pointed end about half way up the oval. Repeat for the other arm.
Glue the black, semi-circle hat brim to the bottom of the red hat oval. Glue a blue teardrop, point down, above the brim. Glue the hat to the top of the head, referring to the photo above for placement.
When dry enough to handle, glue the head to the top of the body oval, then glue the arms to the front of the body, just below the head.
Displaying Your Homemade Toy Soldier
I found that the convenient holes in the block allowed me to push the block onto the end of a Christmas tree branch. My toy soldier stood to attention very nicely and was in no danger of falling down. Adding a small string to the back is easy though too, and then you can hang this handsome fella anywhere you like.


Leave a Reply