Last updated on November 28th, 2025 at 04:25 pm
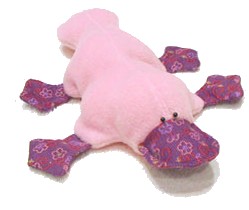
Plattie the Pink & Purple Platypus
By Pauline McArthur of www.funkyfriendsfactory.com
Here you will learn the basics of how to sew your own soft toys and pick up a few tips and tricks to make it easy and fun!
This simple pattern is great for beginners. It is suited to most stretchy materials but using fleece will give your toy a warm fuzzy feel! Once you’ve got the hang of it with your first platypus, experiment with different fabrics – look how great Plattie looks in pink!
Follow the picture instructions below – you can’t go wrong.
MATERIALS
FREE PRINTABLE PATTERN plus:
Pink fleece material (38x32cm / 15x13inch)
Purple patterned corduroy material (38x21cm / 15x8inch)
Plastic pellets (about 35g/1 ounce)
5mm black beads for eyes
Strong thread for sewing on eyes
General sewing supplies (thread, pins, needles, scissors, etc)
Craft glue and firm card for templates
Fine tipped permanent marker pen
Toy stuffing
INSTRUCTIONS
You can sew your platypus on machine, over locker or by hand. I like to use fleece for the body as it makes the platypus so cute and cuddly, but you can use any scraps of fabric for the feet and bill. Start by printing the pattern and enlarging it 40% (from A4 – A3 on a photocopier) Some people have used the pattern pieces the size they are and plattie turns out small enough for a cute little Key-Ring Toy.
Glue the pattern page onto card or thick paper and cut out the pattern pieces to make your templates.
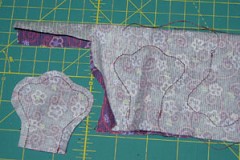
Lay the fabric right side down and place templates onto the wrong side of the fabric following the layout guide. Trace the templates with permanent marker and cut out your pieces. (Press lightly or the ink will smudge and may show through your material on the right side.)
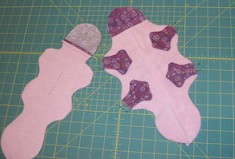
* Always sew pieces with right sides together and use a 5mm/¼inch seam allowance. Sew the FEET pieces together on the sewing line. Cut around the sewing line with a 5mm/¼inch seam and turn right sides out. I like to use an old wooden chopstick as my turning tool!
Cut the BILL and FEET pieces from purple patterned corduroy, and cut the UPPER BODY and UNDERBELLY pieces from pink fleece.
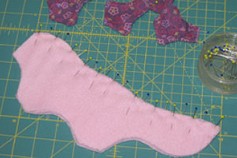
Sew the UPPER BODY pieces together from A to B. I use lots of pins and pin from one side then put pins in between from the other side. This stops the fleece from slipping as you sew.
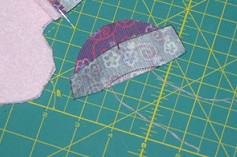
Sew the dart in the UPPER BILL piece, and then sew this to the UPPER BODY pieces from E to F. Sew the BILL BASE piece to the UNDERBELLY PIECE from C to D.
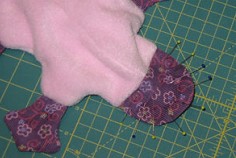
Place and pin all 4 feet in position (Toes facing towards the middle!). Pin and sew the UPPER BODY pieces to the UNDERBELLY piece. Sew ALL the way around, leaving no gap.
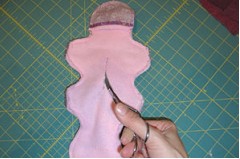
Now, for the clever bit! Cut a slit in the UNDER BELLY piece as indicated by the pattern markings and turn Plattie right sides out through the slit you’ve cut.
This way it makes Plattie easy to turn and stuff later, I think the seam on the flat tummy is easier to sew up by hand than one somewhere along the side.
If you like, you could put in a zip and make Plattie into a Coin Purse too,
some clever people have enlarged the pattern and put a zip in the tummy
to make a Pajama Bag!
Sew a seam around the edge of the bill using a 5mm seam allowance to create the duck-bill-look!
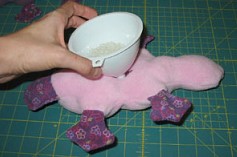
Fill the bill and head area quite firmly with toy stuffing. Fill the rest of the body with toy stuffing. Place some plastic craft pellets in the body cavity, or use some rice or beans if you like! Don’t overfill it as it needs to flop like a beanbag.
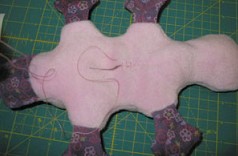
Looking at the photo as a guide, mark the eye positions with a permanent marker pen and sew two 4mm beads in place.
Use a ladder stitch to close the opening on the underbelly.
If the toy is for a young child, use a thick embroidery thread and sew a French knot for each eye. Your Platypus is ready to love!
The aim of author Pauline McArthur is to design soft toy patterns that are easy and quick to sew. She has put her experience to use at www.funkyfriendsfactory.com to help you with your toy-making ventures. You’ll also find a delightful collection of cute and cuddly soft toys that you can make at home, available to buy and download instantly on your computer.
Copyright © 2004-2021 FunkyFriendsFactory All Rights Reserved


Melody says
I adapted your pattern to make a hand puppet for our preschool music program. Everyone loved it. I’d be happy to send you a photo if you’d like.
Jane Lake says
Hi, Melody, I’d love to see a photo of this and, with your permission, post it to this page. Please send directly to me: editor@allfreecrafts.com and I’ll reply as soon as I can.
Victoria says
Is the underbelly part supposed to be smaller then the top part? minis smaller by like an inch
Amber says
I am stuck on the dart part of this… im new to sewing so im unfamiliar with darts and the why and when. thank you
Anke says
I love this project!
I added some rustling material into the feet, too! Thank you& cheers anke
Jane Lake says
So glad it worked out well for you. Thanks for letting me know!