Last updated on April 4th, 2025 at 12:50 pm

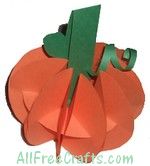
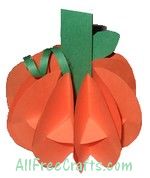
Each of these three-dimensional paper pumpkins is made from ten circles of construction paper and a rectangle of green construction paper for the stem.
By Jane Lake
This Fall or Halloween art project is easy enough for young children, and provides an ideal opportunity to teach them about circles, arcs, rectangles, and the number ten.
What You Need:
- orange and green construction paper
- small amount of glue
- juice can lid, or a round jar lid of similar size to use as a circle template
- pencil or crayon
- scissors
For a companion fall project using construction paper, also see Construction Paper Pumpkin Banner, Construction Paper Maple Leaf which is a step-by-step DIY with a short video as well. I also have Construction Paper Reindeer with a free printable template.
Project Instructions:
1. Method One: Cutting Single Circles:
Trace around a juice can lid on a sheet of orange construction paper. Repeat ten times and cut out each circle just inside the trace lines.
2. Method Two: Cutting Multiple Circles:
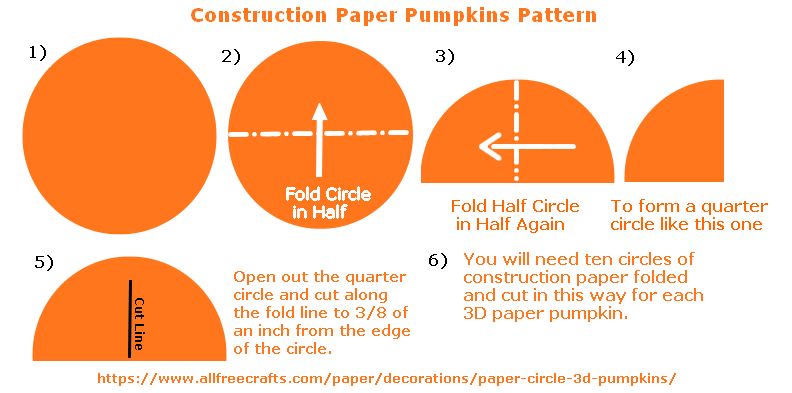
Take a sheet of orange construction paper and fold it in half, then in half again, so that you have four layers.
Place a juice can lid on top of the folded construction paper and trace a circle around it. Use the scissors to cut out a circle through all four layers of paper, cutting just inside the traced line. If you repeat this step twice, you will end up with 12 orange circles; set two of them aside, as you will only need ten circles for each pumpkin.
3. Fold nine of the orange circles in half to form an arc (like a half moon). Fold this half circle in half again, to form a quarter circle, as shown on the diagram at right.
4. Open out the quarter circle. You will now have a fold line in the center. Cut along the fold line to a point about 3/8 of an inch from the edge of the circle.
5. Make the Stem:
From green construction paper, cut a 1/2 inch wide rectangle that is about twice as long as the diameter of your circle. Fold the rectangle in half, lengthwise.
On each end of the rectangle, fold out a small tab.
Apply a small dab of glue to the bottom of each tab, and set the stem in the center of the remaining orange circle to make your pumpkin base.
6. Assemble the Paper Pumpkin
Take one of the nine prepared circles and slide the cut line onto the base. Continue adding paper circles until all nine are in place. Gently arrange the segments evenly around the base so the pumpkin will stand up nicely.
If you wish, you can add a dab of glue between each segment to make sure the pumpkin won’t come apart. However, if you’re not going to be moving the pumpkin around very much, this step isn’t needed.
7. Optional:
If desired, you can cut a small leaf shape from green construction paper and glue it to the stem. To make a curling vine, cut a thin length of green construction paper and curl it around a bamboo stick or knitting needle. Pull and twist the curled paper very gently to make a tendril, then glue it opposite the paper leaf on the pumpkin stem.


Leave a Reply