Last updated on April 26th, 2025 at 10:37 pm
Make a mini greenhouse for seeds or cuttings from a two litre plastic pop bottle, with optional cardboard pots (made from toilet roll tubes).
by Jane Lake
This frugal garden project stems from last year’s recycling experiment to make mini seed starter greenhouses from plastic deli chicken containers (the kind with a clear, domed top).
Although the chicken containers worked really well, my local grocery store now sells deli chickens in plastic bags, so I had to change my strategy a bit.
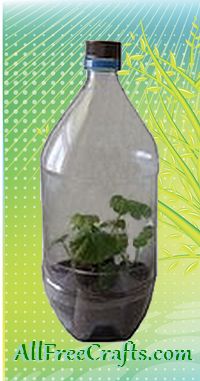
This year’s version of the mini greenhouse uses two liter pop bottles – which are easy to find, and have the advantage of being taller. This makes them ideal for cuttings or rapidly growing seedlings. They will also fit very well on a windowsill that is four inches wide or more.
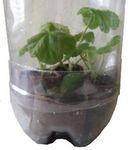
I made the plant pots from cardboard toilet paper rolls – four of these homemade starter pots will fit snugly inside the bottle. When it comes time for planting, you can easily remove the rooted plant or, easier still, plant the entire thing, cardboard pot and all.
Supplies:
- two litre plastic pop bottle
- serrated knife
- scissors
- four cardboard toilet paper tubes
- potting soil
- plant seeds or cuttings
Project Instructions:
1. Use the serrated knife, in a sawing motion, to begin the cut near the bottom of the bottle. Most plastic bottles have a clear line about two inches from the bottom, where the straight sides begin to taper down. Make the cut at least an inch above this line, so you’ll be able to fit the two sections back together.
2. Cut each cardboard roll down to about 2¾ inches. Make four, equally spaced, vertical cuts, each ¾ inch long, up from the bottom of the tube to make four tabs.
Fold each tab down toward the middle of the pot. Tuck the end of the last tab under the first tab to hold all the tabs down (just like folding shut a cardboard box).
3. Fill each pot with damp potting soil, then plant your seeds or cuttings. Our photo shows three geranium cuttings, and a jade cutting, that were dipped in rooting hormone before inserting into the potting soil. They rooted very quickly!
4. Place the pots into the bottle base. Although it’s a tight squeeze, four pots should fit snugly inside.
5. If needed, water the pots, then fit the top of the bottle in place. There’s a wee trick to this – slide most of the top inside the base, then press your fingers against the last section to make an indent; this will enable you to slide the rest of the top inside the base. When you release the indent, that section should spring back out, creating a close seal all around, but if it doesn’t, don’t worry – the plants won’t mind a little venting.
6. Set the bottle greenhouse in a sunny windowsill and observe the humidity level over the next few days. A slight film of moisture collecting on the sides of the bottle is beneficial, but if water starts to run down the sides, open the top of the bottle for a while to reduce the humidity.
7. As the last frost date approaches, begin setting the bottle outside on fine, warm days, gradually allowing the plants to adjust to full sunlight. For the last week or so before planting, you should also remove the top of the bottle to let the seedlings harden off and fully acclimatize to the sunlight and wind.
Suggestions:
After planting, use the tops of the bottles as a cloche for any small plants that need protection overnight.
Save the bottles for next year, or use them to propagate indoor plants throughout the year.


Leave a Reply