Last updated on February 21st, 2016 at 12:17 am
 How to Make Faux Faberge Jewelled Eggs
by Jane Lake
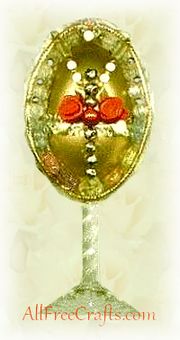
Put on the glitz for Easter or Mother’s Day and decorate your eggs with jewels.
This faux Faberge egg project is a great way to re-use broken or outdated jewellery. The crystal egg stand is also a recycling triumph – what better way to use a broken wine glass stem than in a project like this?
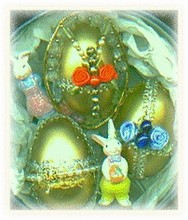
Two more golden jewelled eggs are pictured below, making full use of gold metallic rick rack, string pearls, fancy silver braid, and more old ‘jewels.’
Craft Supplies:
- plastic egg
- assorted costume jewels and gold beads – I used two long earrings in the example shown, plus parts of two broken necklaces
- gold spray paint or gold acrylic craft paint
- two ribbon roses
- thin gold braid
- gold or silver rick rack or ribbon
- pencil
- hot glue gun and glue sticks
Instructions:
Open the egg and paint gold, either with gold acrylic paint or gold spray paint. If you have problems getting the paint to stick to the plastic, use a primer first before painting. When dry, put both ends back together.
Using the hot glue, glue the egg to an egg stand. A broken wine glass stem was used here, but other types of egg stands are available. You could try making a matching gold stand out of recycled materials – spraying painting a jar top for the base, and a piece of dowel for the stand. Use your imagination here – it’s fun to be creative!
Begin decorating the egg by hot gluing the gold or silver rick rack (or ribbon) over the center join. Don’t worry about those pesky little glue strings that form as you work – once dry they are easy to remove.
Use the pencil to lightly sketch a line all around the egg, where you want the outer circle of jewels to go. Experiment with the jewels to find the look you want. You can glue this outer circle of jewels in place one by one, or use a string of jewels – perhaps cut from an old necklace or, alternatively, strung together by you.
Glue the outer circle of jewels in place with hot glue, beginning where the egg meets the egg stand and continuing all around. It helps to do one quarter at time, as this allows you time to place the jewels before the hot glue hardens.
Choose a special stone for the centerpiece of your jewelled egg and glue it in place. In this case, it is a shiny red “ruby”.
Flank the centerpiece stone by two ribbon roses. These are optional – you could use two more dramatic looking stones, if you like.
Place a line of gold beads vertically from where the egg joins the stem upwards. Here the line ends at the three quarter mark, but it could be extended to the top.
At the top centre, glue on a stone in its own setting (another contribution from a broken necklace), or simply use a large stone for dramatic effect.
Glue two lines of jewels from the center stone, going diagonally to the top. You can see the two lines in the this example are actually long narrow earring drops of pearls and gold beads.
Optionally, you can frame the outer circle of stones by gluing on thin gold braid, as shown. Begin where the egg meets the stand and continue all around.
At the back of the egg, reinforce the join of the egg and wine glass (or dowel) by applying a fairly thick line of hot glue.
That’s it! No jewelled egg made this way will be exactly like another, and that is part of the charm.
Have fun crafting your jewelled eggs!


Mary Megerdichian says
i have lots of beautiful and unique decorating supplyfor eggs and all kinds of eggs i would to sell them
would you be interested or can you give me a direction how to sell them it is not something that can be given away.Thanks for your help MARY M