Last updated on March 19th, 2024 at 10:18 am
Pompom Bunny Easter Wreath – Just Hanging Around
by Twila Lenoir
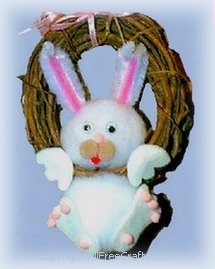
Here’s an Easter Bunny to make from pompoms, craft foam and chenille stems. He’s hanging around a small grapevine twig wreath – so you need one of those too!
You will need:
- 2-2 inch white pompoms
- 2- small tan or grey pompoms
- 1-medium white pompom
- 1-tiny red pompom
- 9- tiny pink pompoms
- 1- white bumpy chenille stem (Amazon)
- 1- pink plain chenille stem
- 7mm goggly eyes (Amazon)
- Scrap piece of white felt
- small grapevine wreath (Amazon)
AllFreeCrafts is reader supported! Many supplies are found at thrift stores so try that first! However, if you buy from an affiliate link on this site, I earn a commission at no extra cost to you. As an Amazon associate, I earn from qualifying purchases. This has kept AllFreeCrafts.com online since 2002. Thank you!
Pompom Bunny Easter Mini Wreaths:
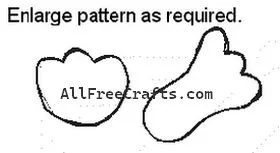
1. You may have to enlarge my hand-drawn pattern, shown here, for the bunny’s feet and hands. Or just copy and draw the shape to make your own pattern.
If using mine, enlarge if needed, then print and cut out the pattern pieces. Place the pattern pieces onto white felt and trace around them. Cut out two bunny feet and two hands.
2. Cut the bumpy chenille stem so that there are two bumps on the stem. Fold the stem in half so that the two bumps are together and the folded part of the stem is at the top. Cut a piece of the pink chenille stem, about the length of the bumpy stem. Glue in the center of the two bumpy stem ears. Make another to complete the two ears.
3. On the 2 inch pompom, which is the bunny’s head, glue the two tan or grey pompoms, placing them together for the cheeks. You can also use white but I thought that it would be hard to see.
4. Glue the tiny pink pompom on top of the two tan pompoms, then add a tiny red pompom for the tongue.
5. Glue the eyes in place above the nose.
6. Glue the two ears on top of the 2 inch pompom and now glue the head to the bottom inside area of the wreath. You will also need to glue the ears to the wreath because the bunny’s head is a little top heavy.
7. Glue the other 2 inch pompom on the bottom of the wreath. Glue the medium white pompom to the back of the bottom 2 inch pompom for his tail.
8. Now glue the two hands on the wreath next to the head and the body.
9. Glue the tiny pink pompoms onto the felt feet, three for the toes and one for the heel. Do the same for the other fot and glue them to the body, as shown in the picture.
10. It’s hard to see in the picture, but I made a thin ribbon bow and attached it to the top of the wreath with a loop for hanging.
Personal note: I had a lot of fun making this mini pompom bunny Easter wreath – and he turned out so cute that I brought him into work, at AC Moore. The manager hung the bunny up in the store so that others could make him. I hope your hang-in-there pompom bunny turns out well for you!
When making this, I could easily see how the basic pompom bunny could fit multiple Easter designs, such as this Jelly Bean and Pompom Bunny and a wee little Pompom Bunny in a Basket.
Make just a pompom bunny head into an Easter Bunny Pencil. I’d love to know if you get creative with this pompom bunny pattern. Let me know in the comments!


Leave a Reply