Last updated on April 21st, 2021 at 12:22 am
Teddy Bear Clothes: Free Crochet Pattern to make a Dress, Underpants, Hat and Short-Sleeved Shirt
contributed by Kathy Wilson of Grandmas Hookery
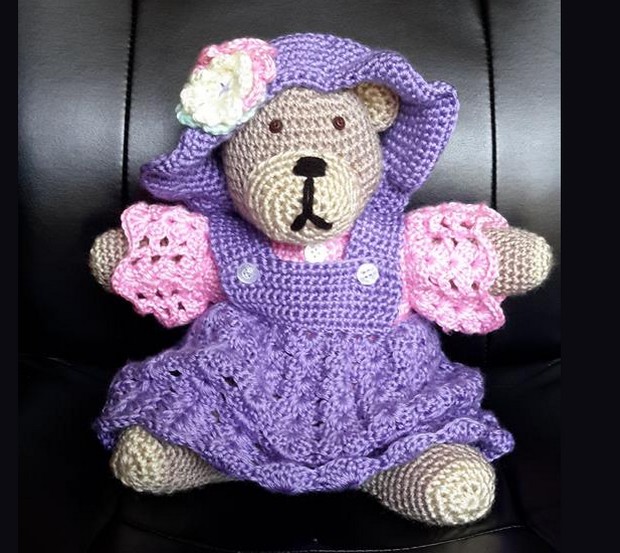
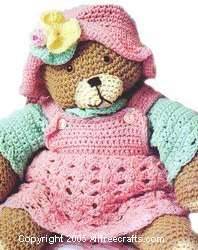
Dress a cuddly crocheted teddy bear in one of several outfits that are also suitable for store-bought teddies or favourite dolls.
This pattern set includes crochet instructions for a dress, matching underpants, hat and short-sleeved shirt or blouse. Please see the Crocheted Teddy Bear page to view more reader submitted photos of the finished outfit.
Materials List
- worsted weight 4 ply – 16 ounces light rose plus 7 ounces light green and small amounts of yellow and pink for the flowers (substitute your choice of colors as desired)
- 4 buttons, 3/4″ diameter to match shirt color
- 2 buttons, 3/4″ diameter to match dress color
- Crochet Hook Size J
- Tapestry needle
- GAUGE: 3 sc = 1″ (To save time, measure gauge)
Free Crochet Patterns for Teddy Bear and Teddy Bear Clothes
Pattern Instructions
Shell Stitch Overskirt
Rnd 1 Working on opposite side of front and back of underpants(right side of underpants facing you) join yellow in any ch at one side seam, ch 1 sc in same ch as joining, sc in each ch around, join with sl st in first sc(80 sc) Ch 3 turn.
Rnd 2 (first shell rnd) Working in back loops only sk first sc *(3 dc, ch 1, 3 dc) in next sc(shell made) sk next 3 sc, rep from * around. Koin to first ch-3 space. Ch 3, turn.
Rnd 3-11 Working in both loops, work a shell in ch-1 sp of each shell around. Ch 3 turn, At end of Rnd 11 break off.
Front Bib
Row 1 On Front only, work as follows on Rnd 2 of Shell Stitch Overskirt, on the remaining free loops of stitches. Starting at one side seam of underpants sk first 10 sts, join yellow in next st, ch 1, sc in same st as joining and in next 19 sts of Front (20 sc) leave remaining sts free. Ch 1 turn.
Rows 2-6 Sc in each sc across. Ch 1, turn at end of each row.
Row 7 Sc in first 3 sc, ch 1, skip 1 sc for buttonhole, sc in next 12 sc, ch 1, sk 1 sc, sc in last 3 sc. Ch 1 turn.
Row 8 Sc in each sc and in each ch-1 sp across. Break off.
Back Bib
Row 1 Using yellow and working on Rnd 2 of Shell Stitch Overskirt, join yarn and sc in each of the center 24 sc of Back. Ch 1 turn
Rows 2-11 Sc in each sc across. Ch 1, turn at end of each row.
At end of Row 11, DO NOT break off.
Straps
Row 1 Sc in first 6 sc. Ch 1, turn. Rows 2-20 Sc in each sc. Ch 1, turn. At end of Row 20, break off.
Second Strap
Row 1 Skip next 12 sc of bib, join yarn and work next 6 sc, Ch 1 turn,. Complete same as for first strap.
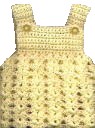
Shirt or Blouse
Starting at neck edge, with White, ch 61.
Row 1: Sc in 2nd ch from hook and in ch across. 60sc
Rows 2-5: Sc in each sc across. Ch 1, turn.
Row 6: Sc in first 10 sc, ch 20, sk next 10 sc (armhole), sc in next 20 sc, ch 20, sk next 10 sc (armhole), sc in last sc. Ch 1, turn
Row 7: Sc in each sc and in each ch across. Ch 1, turn 80 sc.
Row 8-26: Sc in each sc across. Ch 1, turn. At end of Row 26, break off.
Sleeves
Rnd 1: Join White in any st at underarm, ch 1, then spacing sc’s evenly spaced and increasing as needed, work 36 sc’s around entire armhole opening. Join with sl st in first sc and ch 1, turn.
Rnd 2-12: Sc in each sc around, join and ch 1, turn at end of each rnd. At end of rnd 12, break off. REPEAT FOR OTHER SLEEVE.
Front Trim and Buttonholes:
Row 1: Join White in first st at lower left front, ch 1, then sc evenly spaced across left front edge, work (sc, ch and sc) in corner, sc across neck edge, work corner as before, sc across right front edge, end of lower edge. Ch 1, turn.
To mark for buttons:
For girl, mark left front edge, for boy mark right front edge. With pins, mark edge for 4 buttons, the first one is 1″ from lower edge, the last one 2″ from neck edge, the rest are spaced evenly between.
Row 2 (buttonhole row): Sc in each sc of last row, working (sc, ch 1, sc) in each corner and at the same time, work a buttonhole opposite each pin. For each buttonhole, ch 1, sk 1 sc. At end of row, ch 1, turn.
Row 3: Sc in each sc and in each ch-1 sp of last row, inc at corner as before. At end of row, break off.
Underpants
Underpants Front
Starting at waist with yellow, ch 41.
Row 1 Sc in 2nd ch from hook and in each ch across. Ch 1 turn, (40 sc)
Rows 2-16 Sc in each sc across. At end of Row 16, break off.
Row 17 (for crotch) Sk first 15 sc of Row 16 Join yarn in next sc, ch 1 sc in same sc as joining and in next 9 sc, ch 1, turn(10 sc). Leave remaining sts of Row 16 unworked.
Rows 18-26 Sc in each sc across. Ch 1, turn, At end of Row 26 break off.
Back
Starting at waist, with yellow ch 41.
Row 1 Sc in each ch across, ch 1 turn (40 sc)
Rows 2-20 Sc in each ch across. Ch 1 turn at end of each row.
Row 21 (Dec next 2 sc tog)3 times, sc in next 28 sc, (dec next 2 sc tog)3 times. Ch 1 turn (34 sc)
Row 22 (Dec next 2 sc tog)3 times, sc in next 22 sc, (dec next 2 sc tog)3 times. Ch 1 turn (28 sc)
Row 23 (Dec next 2 sc tog)3 times, sc in next 16 sc, (dec next 2 sc tog)3 times. Ch 1 turn (22 sc)
Row 24 (Dec next 2 sc tog)3 times, sc in next 10, sc (dec next 2 sc tog)3 times. Ch 1 turn (16 sc)
Row 25 (Dec next 2 sc tog)3 times, sc in next 4 sc, (dec next 2 sc tog)3 times. Ch 1 turn (10 sc)
Rows 26-29 Sc in each sc across. At end of Row 29, break off.
Sew last row of front and back crotch together, then sew side seams.
Brimmed Hat
Crown: With same color as dress, ch 2.
Rnd 1: 6 sc in 2nd chain from hook. (6sc)
Rnd 2: 2 sc in each sc around. (12sc)
Rnd 3: (Sc in next sc, 2 sc in next sc) around. (18sc)
Rnd 4: (Sc in next 2 sc, 2 sc in next sc) around (24sc)
Rnd 5: (Sc in next 3 sc, 2 sc in next sc) around (30sc)
Rnd 6: (Sc in next 4 sc, 2 sc in next sc) around (36sc)
Rnd 7: (Sc in next 5 sc, 2 sc in next sc) around (42sc)
Rnd 8: (Sc in next 6 sc, 2 sc in next sc) around (48sc)
Rnd 9: (Sc in next 7 sc, 2 sc in next sc) around (54sc)
Rnd 10: (Sc in next 8 sc, 2 scin next sc) around (60sc)
Rnds 11-17: Sc in each sc around
Brim: Rnd 18: Sc in back lps only of each sc around
Rnds 19-23: Working in both lps, sc in each sc around (60sc)
Rnd 24: 2 sc in sc around (120sc)
Rnds 25-27: Sc in each sc around. At end of Rnd 27, break off.
FLOWERS: Make 1 each with Yellow, Pink, and Light Green
or colors to match your dress.
Starting in center ch 4. Join with sl st to form a ring.
Rnd 1: Ch 3, for first dc, work 11 more dc in ring. Join with sl st in top of ch-3
Rnd 2: Ch 3, work 2 dc in joining st, work 3 dc in each dc around, join and break off.
HAT TRIM: Fold each flower in half. Turn brim of hat up for front of hat and sew flowers in place.


verna says
I am looking for a crocheted dress with underskirt and panties for Teddy Bears? Do you have one or know where I might find one for free? Thank you
Beryl MARGARET Vernum says
please can you send me the crochet pattern for the clothes that are pictured on the teddy in the pattern. I have made the teddy ,but the clothes pattern was not the same as in the picture. Thank you so much and it would be very much appreciated. Mrs Beryl Vernum
Bery says
how do i get the crochet pattern for this Teddy Bear
Fran Sanders says
In order to make the dress, would I have to make the underpants first
Jane Lake says
Hi, Fran,
The pattern is for separates, so you can choose which items you want to make or skip some completely. I have seen lots of photos of finished bears with the dress, blouse and hat and you can never even see the underpants. If your dress turns out a bit short for your teddy bear, you could add an extra row or two to lengthen it.
See the Crocheted Teddy Bear page for the way other people have changed the colors and styles of their outfits.
I’m sure yours will look lovely!
Kay says
Can’t wait to make this for my granddaughter.
Jane Lake says
I’m sure she will adore it!
Laurine Pearson says
Teddy Bears are precious! Do you make them for sale?in a million years I could not venture to tackle that kind of work . I would love one for my Grand daughter. Sincerely, Laurine
Margie says
The bear itself turned out great! However I just made the underpants using hook specified and the Guage it stated to be but they are way to big for the bear now I cant move toward with bears dress because underpants are too big! I’m now trying to freehand the clothes hoping I can succeed as it is a Christmas gift and tomorrow is Christmas eve 🙁
Jane Lake says
Hi, Margie, I’m sorry you’re having “technical difficulties” as they say. I do hope you managed to get it worked out. It’s a wonderful gift that you’re making, and I hope you and your family have a great Christmas.
Pat L says
I made the bear and made some corrections to THAT pattern. I am getting ready to start the clothes, and having read the pattern, I can tell it was written by someone other than the lady that designed the bear.
Bery says
how do i get the crochet pattern for this Teddy Bear
Margaret says
Love the pattern however it would have been useful to know what size teddy it is designed for.
Pat L says
The bear I made, from tip of ear to toe (I straightened out the leg) is 15 inches. When it is sitting it is 12 inches.