Last updated on April 21st, 2021 at 01:19 am
Teddy Bear Exercise Clothes:
Crocheted Jumper, Shirt, Headband, Wristband and Shoes
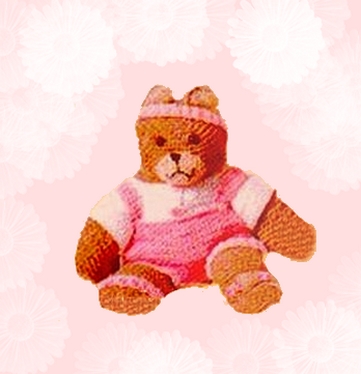
by Kathy Wilson of Grandmas Hookery
Dress our cuddly teddy bear in a sweet exercise outfit for teddy, including a jumper, shirt, headband, wristband and shoes.
Teddy Bear Exercise Outfit
Materials List:
- worsted weight 4 ply yarn, 4 ounces pink, 4 ounces white (or your choice of colors)
- 2 white buttons, 3/4″ in diameter
- 4 pink buttons, 3/4″ in diameter
- Crochet Hook Size J
- Tapestry Needle
- Gauge: 3 sc = 1″ (to save time check gauge)
Free Crochet Patterns for Teddy Bear and Clothes
Free Pattern Instructions:
JUMPER
Making Front side: Starting at waist, with yarn, ch 41.
Row 1: Sc in 2nd ch from hook and in each ch across. Ch 1 turn (40sc) Rows 2-16: Sc in each sc across, Ch 1, turn. At end of Row 16, break off.
Row 17: (for crotch): Skip first 15sc of Row 16. Join yarn in next sc, ch 1, sc in same sc as joining and in next 9 sc, ch 1, turn (10sc). Leave remaining sts of Row 16 unworked.
Rows 18-26: Sc in each sc across. Ch 1, turn. At end of Row 26, break off.
FRONT WAISTBAND AND BUTTONHOLES:
Row 1: Working on opposite side of starting ch of front, with Pink, sc in each ch across, ch 1, turn. With 2 pins, mark 9th sc from each end of row for buttonholes.
Row 2: Sc in each sc across, and at same time, at each pin work (ch 1, sk 1 sc) for each buttonhole. Ch 1, turn.
Row 3: Sc in each sc and in each ch-1 sp across. Break off.
Making BACK Side of Jumper:
Starting at waist, with yarn, ch 41.
Row 1: Sc in each ch across. Ch 1, turn. (40sc)
Rows 2-20: Sc in each sc across. Ch 1, turn.
Row 21: (Dec. next 2 sc tog) 3 times, sc in next 28 sc, (dec next 2 sc tog) 3 times. Ch 1, turn (34sc)
Row 22: (Dec next 2 sc tog) 3 times, sc in next 22 sc, (dec next 2 sc tog) 3 times. Ch 1, turn (28sc)
Row 23: (Dec next 2 sc tog) 3 times, sc in next 16 sc, (dec next 2 sc tog) 3 times. Ch 1, turn (22sc)
Row 24: (Dec next 2 sc tog) 3 times, sc in next 10 sc, (dec next 2 sc tog) 3 times. Ch 1, turn (16sc)
Row 25: (Dec next 2 sc tog) 3 times, sc in next 4 sc, (dec next 2 sc tog) 3 times. Ch 1, turn (10sc)
Rows 26-29: Sc in each sc across, Ch 1, turn. At end of Row 29, break off. Sew last row of front and back crotch together, then sew side seams.
BACK WAISTBAND AND STRAPS:
Row 1: Working on opposite side of starting ch of back, with Pink sc in each ch across. Ch 1, turn.
Row 2: Sc in each sc across. Break off.
FIRST STRAP:
Sk first 7 sc of starting ch of back, with Pink sc in each ch across. Ch 1, turn. Do not rem sts.
Rows 2-35: Work even in sc. Ch 1, turn at end of each row. At end of last row, break off.
SECOND STRAP:
Row 1: Sk next 18 sc, with Pink sc in next 4 sc. Ch 1, turn. Complete as for FIRST STRAP.
Joining: Sew last row of front and back crotch together, the sew side seams. Sew buttons to straps.
LEG TRIM:
With Pink, sc evenly spaced around one leg opening (increasing or decresing as needed to fit snugly around). Join to first sc and break off. Repeat for other leg opening.
SHIRT
Starting at neck edge, with White, ch 61.
Row 1: Sc in 2nd ch from hook and in ch across. 60sc
Rows 2-5: Sc in each sc across. Ch 1, turn.
Row 6: Sc in first 10 sc, ch 20, sk next 10 sc (armhole), sc in next 20 sc, ch 20, sk next 10 sc (armhole), sc in last sc. Ch 1, turn
Row 7: Sc in each sc and in each ch across. Ch 1, turn 80 sc.
Row 8-26: Sc in each sc across. Ch 1, turn. At end of Row 26, break off.
SLEEVES
Rnd 1: Join White in any st at underarm, ch 1, then spacing sc’s evenly spaced and increasing as needed, work 36 sc’s around entire armhole opening. Join with sl st in first sc and ch 1, turn.
Rnd 2-12: Sc in each sc around, join and ch 1, turn at end of each rnd. At end of rnd 12, break off. REPEAT FOR OTHER SLEEVE.
FRONT TRIM AND BUTTONHOLES:
Row 1: Join White in first st at lower left front, ch 1, then sc evenly spaced across left front edge, work (sc, ch and sc) in corner, sc across neck edge, work corner as before, sc across right front edge, end of lower edge. Ch 1, turn.
TO MARK FOR BUTTONS:
For girl, mark left front edge, for boy mark right front edge. With pins, mark edge for 4 buttons, the first one is 1″ from lower edge, the last one 2″ from neck edge, the rest are spaced evenly between.
Row 2 (buttonhole row): Sc in each sc of last row, working (sc, ch 1, sc) in each corner and at the same time, work a buttonhole opposite each pin. For each buttonhole, ch 1, sk 1 sc. At end of row, ch 1, turn.
Row 3: Sc in each sc and in each ch-1 sp of last row, inc at corner as before. At end of row, break off.
HEADBAND:
Ch 5, with Pink
Row 1: Sc in 2nd ch from hook and in each ch across. Ch 1, turn.
Row 2: Working in back loops only, sc in each sc across. Ch 1, turn.
Rows 3-55: Rep Row 2. At the end of Row 55, break off. Sew rows 1 and 55 together to form a ring. Put headband on bear. Tack in place.
WRISTBAND
Make 2.
Ch 5 with Pink. Work as for headband , on 4 sc for 32 rows. Break off. Sew Rows 1 & 32 together to form a ring. Put on bear. Tack in place. SHOES
Make 2. Ch 2 with Pink.
Rnd 1: 6 sc in 2nd ch from hook.
Rnd 2: 2 sc in each sc around.
Rnd 3: (Sc in next sc, 2 sc in next sc), around
Rnd 4: (Sc in next sc, 2 sc in next sc), around
Rnds 5-13: Sc in each sc around. At the end Rnd 13, join to first sc. Break off. Put on bear, Tack in place.
FINISHING
Weave in any additional ends. Sew buttons to shirt, dress bear.
Joan says
Thanks for sharing.
Jane Lake says
You are most welcome. I’m glad that you like it!