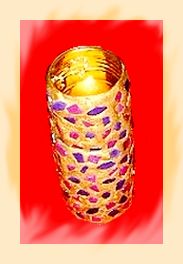
Faux Jewelled Tin Can Candle Holders
 By Jane Lake and Twila Lenoir
Try your hand at a fun-to-make “Up and Down” jewelled candle holder craft that uses a homemade plaster recipe to embed lots of colored “jewels.”
Supplies:
» 8 oz tin can and a 14.75 oz tin can
» homemade plaster recipe (see instructions below)
» artificial jewels, colored glass pebbles or stones
» metal spatula
» thick nail and a hammer
» gold craft paint
» high gloss spray finish
Instructions:
1. Clean the cans and remove the labels. Fill both cans with water and freeze overnight.
2. Working on one can at a time, take the can out of the freezer and hammer holes all over the can, except the bottom, with the hammer and a thick nails. Space the holes out about one inch apart. Repeat this process with the other can. Empty the ice and water out of the cans and wipe both cans dry.
3. Make the following homemade plaster recipe:
Combine 2 cups salt and 1 cup of flour in a saucepan. Add 2/3 cups of water and mix well. Stir constantly over medium heat, until the mixture is hot – about 3 to 5 minutes. The plaster will be thick and hard to stir. Remove from heat.
4. With a metal spatula or knife, spread plaster mixture all over the larger can, including the bottom. Be careful that you don’t cut your hand on the sharp holes that you have punched!
5. Sit the plastered can with the opening facing down. Center the smaller can on top of the larger can, with the opening of the smaller can facing up.
6. Spread the 8 oz can with plaster mixture up to the rim of can.
7. Push jewels or stones into the plaster, all over both cans.
8. You will now have a decorated tube with an opening at the top and the bottom. Bake at 200° degrees in the oven until the container turns white and hard. This may take two hours or longer.
9. When the candle holder is cool and dry, remove from the oven. A few stones or jewels may pop off during the cooling process; if so, just glue them back in place.
10. Paint all the white area of the container with gold paint, avoiding the jewels. Let this dry, then spray on a gloss finish.
Suggestions for Use:
You can use this bejewelled candle holder to hold a votive candle in the smaller opening. Or, if you turn the candle holder upside down, you will have room for a larger candle.
When the candles are lit, you can see the glow of the candle through the holes that were poked through the can.
Caution:
Never leave children alone with candles – and never leave a candle unattended while burning. Please use candles safely!


Leave a Reply