Last updated on January 4th, 2024 at 12:36 am
by Robin Hall
In today’s fast-paced world, most of us don’t have the time, or the patience, to do an all-consuming job of making a slipcover. We go buy them, but they are not always what we want. They are generic, just don’t work on the furniture, or look unprofessional.
If you can find the time and feel creative, you can produce a masterpiece for an old (or new) piece of furniture that needs a change to correspond with a new room update. The slipcover will produce a sense of confirmation and beauty for you, the person doing the work. A job well done is always good for growing self-confidence and character!
I owned a very busy tailor shop and I was used to “custom fitting” my clients and worked the slipcovers the same way. When one was finished, it was hard to tell if the piece had been re-upholstered or slip covered. What a great feeling it was to see the finished piece!
So with that said, I have a few techniques for you to use that will make the lost art of making a slipcover a bit easier.
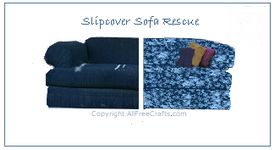
The Making of a Slipcover: A Lost Art
Start with a simple furniture piece.
A good example would be an ottoman, simple dining chair or a toaster! Look at the piece, see where the natural lines are? That is where the seams will be for the slipcover. Scratch out a picture of your furniture piece, this will help as you take measurements for pieces. Measure width and length, add an extra 1¼” to width and length for seams. Write each piece size down on drawing to reference from. Make sure you have your closure type figured out. You will need to add extra material for overlapping if using velcro or ties and zippers. Where will your closures be? Do you even need one on this slip cover? All of this needs to be calculated into original diagram of furniture piece. We will tailor fit these pieces to the furniture INSIDE OUT. You will end up with all your slipcover pieces being odd sized squares or rectangles, etc. This is easier for quick marking and cutting instead of attempting to cut the exact shape of each piece. There will be some extra material in certain areas (which you will cut away) but it gives you room for making a few mistakes! Remember, the art of slip covers and upholstery is very forgiving!
If you are using denim or heavy cotton or anything that does not have to be dry-cleaned for your slipcover, I suggest you preshrink the material.
You can wash and dry it later many times without shrinkage (a great option if you have small children and newer furniture). Choose a solid color. Sheets or curtains (even older ones found at Goodwill if you’re on a budget) can work for making slipcovers and you may find them on sale to make the cost less. Cording can be covered and added into prominent seams of the slipcover if you want to add some detail. Most of your material to cover cording with will come from the leftover inches at the sides going along the length. They will be long pieces sewn together on a mitered seam. Cording material width is 1¼”. Cutting everything with pinking scissors will eliminate (to a certain degree) having to serge or finish the edge of raveling fabric.
You will “railroad” your slipcover measurements by marking them (and eventually cutting), going length wise on fabric and then side by side across the width of fabric.
If you have an exceptionally wide piece you will “railroad” it going length of material instead of across, thus avoiding seams. Visualize how the sizes will lay out on the fabric, using drawings here will be very helpful. Example: If you use 60″ width material, you will get at least 3 dining chair slipcover backs across, if they are 16″ – 18″ wide. They could run 36″ – 48″ in length down the material. Then you will need to figure the inside back, seat, and sides or skirting (remember, if you are doing 2 or more of same, times each piece by the number you are doing). Depending on how much turn up you want for the hem will depend on how much extra you add on side or skirting measurement. Figure out how much material you will need by calculating the length of longest slipcover pieces, adding them together and divide by 36″ for yardage. Make sure to utilize the most from your fabric. There are cheat sheets at some material stores that give basic yardage for upholstering & slip covering furniture , see if you can find one, their priceless!
Once you have all your measurements for your slip cover pieces, start with the largest sizes and mark everything out on your fabric, WRONG SIDE.
You will need a yardstick or longer, measuring tool. A large square is good to have also. (Any hardware store should carry the tools) Label all pieces; i.e. back back, front back, seat, sides or skirting, etc. Cut your pieces.
Holding your slipcover pieces up to the furniture piece INSIDE OUT, pin the seams together about every 2 inches lengthwise along the seam.
Make sure to center your pieces over furniture so you have equal seam allowance on sides, edges, etc. Back-back to front-back, pin. Seat to front-back, pin and so on. Sew these pieces together. Once you start sewing, your seams will only be about 3/8″ instead of the full 5/8″. This gives the slipcover a tiny bit of room to move when finished. I recommend getting some T-pins to use when you are making slipcovers for larger upholstered pieces, you can stick them into the furniture and they will hold the slipcover fabric in place when fitting the pieces together.
Normally, I will pin fit the whole slipcover together inside out on the furniture piece, then go sew, removing pins along the way.
This is similar to a puzzle, make sure to sew all seams that dead end into other seams first. Once you have it sewn together, turn it right side out and fit it. Check for areas that may be a bit off and correct. From experience I can tell you it is usually pretty good if you can sew a straight seam. You can put some masking tape on your sewing machine face plate and mark 3/8″ over from the needle to help with this. Complete all finishing touches, stand back and take a picture!
This is a wonderful way to grow patience, skill and redecorate for less.
There is time involved, but you will have a great sense of accomplishing a lost art! Have fun!
There is more to this than what I have here, but you should be able to get a pretty good idea of what to do and how. There are also some very good books (try Simple Slipcovers, or Simple Upholstery and Slipcovers) you can get from your public library and material/craft stores to help you.
Author Robin Hall has been a successful Tailor by trade for 30 years and has sewn everything including home decor items. She has, in the past, also operated an online home decor store.


Leave a Reply