Last updated on September 2nd, 2025 at 08:04 pm
If you’ve brought home a bucket of seashells from the beach, why not turn them into a pretty keepsake? These easy seashell shadow box ideas are a trendy way to show off your seaside treasures. And they make wonderful homemade gifts for anyone who shared your time at the cottage.
You don’t need a lot of supplies—just some shells, a shadow box, and a little time.
General Directions for Seashell Shadow Boxes
Skill Level: Easy to Moderate
Time: 1–2 hours + drying time
Theme: Coastal / Beach Decor Nautical Summer Vibes
Perfect for: Summer crafting, ocean lovers, kids & adults
How to Make a Seashell Shadow Box
- Choose Your Shadow Box:
Pick a size that fits your shell collection. Remove the back panel. - Prepare the Backing:
Cover the backing with fabric (like burlap or linen), scrapbook paper, or paint it for a clean background. - Arrange Your Shells:
Lay out the shells before gluing to find a layout you like. Try a pattern, shape (like a heart or seahorse), or a random natural look. - Glue in Place:
Use a strong craft glue (like E6000 or Gorilla Clear Grip) to attach each shell. Let dry thoroughly. - Reassemble the Box:
Once dry, place the backing back into the frame and secure it. - Display and Enjoy:
Hang your shadow box or stand it on a shelf to show off your beachy creation.
1. No-Glue Seashell Shadow Box
Think inside the box! Nothing could be easier to assemble than my original DIY Seashell Shadow Box – first published in 2014 and still timelessly appealing. Because you need no glue at all for this version, it’s suitable for both adults and children.
Total size of this box is about 5″ x 5″. Sometimes deep picture frames can be adapted to use as a shadow box – watch for thrift store or garage sale bargains!
- Remove the back of the shadow box and lay it glass-side down.
- Arrange larger shells at the bottom, medium in the middle, and small ones near the top.
- Place shells upside down so the pretty sides face the glass.
- Fill in gaps with smaller shells, then gently tilt the box so they settle naturally.
- Check the design by lifting the box to preview it through the glass.
- If you’re happy with the look, add some padding (like quilt batting or cardboard) if needed, then replace the back and secure it.
2. Natural Seashells Artfully Arranged
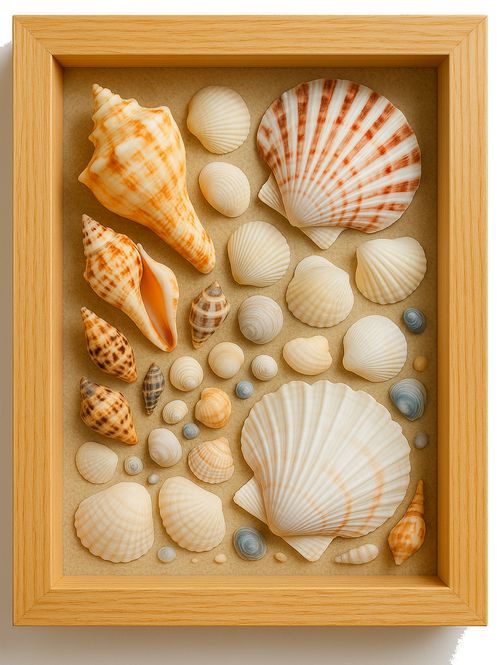
If using fabric or textured backings, lightly sketch placement of your seashells in pencil before gluing.
Use tweezers for precise placement and allow 24 hours to fully cure for permanent adhesives like E6000 or Gorilla Clear Grip.
Hot Glue can also be used, but it may not hold heavier shells long-term, especially in humid environments such as a bathroom or outdoors in hot, humid weather.
Aleene’s Tacky Glue takes longer to dry than E6000 but is suited for paper backed projects using smaller shells.
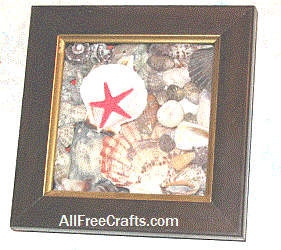
3. Mixed Media and Seashell Shadow Boxes
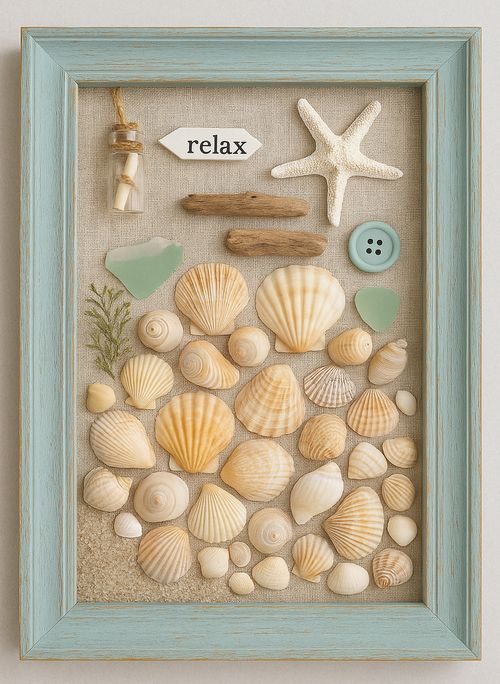
A tiny message in a bottle (or Wishes in a Bottle) and a miniature “relax” beach sign complement this shadow box arrangement of common seashells gathered from the beach.
Take a small bag of beach sand home too and glue some sand toward the bottom edge of the shadow box backing.
Other ideas to include: small driftwood samples, pastel sea glass, pressed or dried seaweed sprigs, snippets from a nautical map, or a small anchor or ship’s wheel charm.
4. Seashell Seahorses, Crabs, Starfish Shapes and More
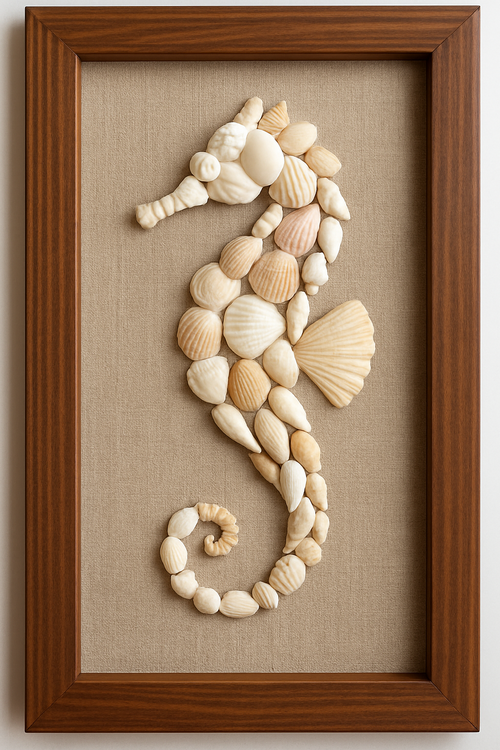
Variations of this seahorse seashell shadow box can be found on Etsy for rather expensive prices. Check there or on Pinterest for DIY inspiration.
But it’s so simple to make your own collage of seashells in many shapes.
Obviously, I like sea themes such as seahorses, crabs or starfish, but nautical shapes such as a ship’s anchor are also appealing.
Search for free templates in the shape you desire, print, cut out and then pencil around the template onto your chosen shadow box backing. From there, just follow the general directions, above, to create your own seashell shadow box collage.
5. Gold, Gilded or Painted Seashells
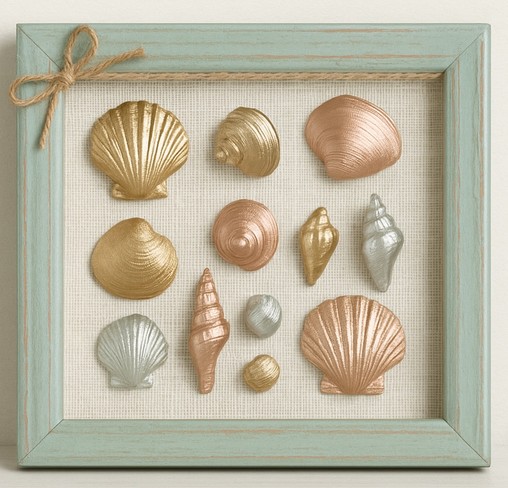
There’s a beauty all it’s own when you hand-paint seashells. Here’s an example of gold and silver painted seashells that emphasis the gorgeous shapes of each shell with a simple application of gold and metalic acrylic paint.
Clean the shells well before starting this DIY for a smooth, consistent appearance. Use white glue or mod podge as a base coat to seal the surface and improve adhesion. Go monochrome with your final paint, all in one gold paint, or mix it up as shown.
Optional steps include gilded hightlights, but I think it’s absolutely gorgeous even without any embellishments.
6. Summer Seashell Shadow Box in a Circle
This sweet summer seashell craft was produced by The Crafting Spot on You Tube.
The short seashell shadow box video (about 3.5 minutes) details the steps from drawing a circle on the shadow box backing with a compass to filling it in with seashells.
I love the tiny pearl addition in the scallop shell shown at the botttom.
Seashell Resources and Inspiration:
- Seashell Seahorse Framed By String: short YouTube Video showing how to make a simple, hand-drawn seahorse covered in seashells and framed by jute string.
- Clam Shell Change Holder – free project on AllFreeCrafts
- Seaside Mail Holder – designed by Twila Lenoir
- Seashell Angels – Pretty seashell angels that adorn my Christmas tree every year
- Sand Dollar Poinsettias – free sand dollar project with printable Legend of the Sand Dollar
- Seashell and Sea Glass Candle Ring – uses a STYROFOAM* Brand Foam wreath base
- Seashell Candles – made from the wick and wax from tea candles


Leave a Reply