Last updated on November 23rd, 2024 at 07:22 pm
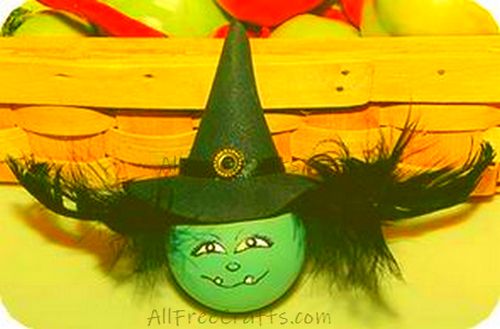
Create a unique recycled light bulb witch face. Step-by-step instructions to paint the witch’s face with a printable pattern for the hat. Add a spooky touch with black feathers.
You Will Need:
- Burned out light bulb ( I used a globe style bulb, but regular bulbs will work just fine for this project)
- Printable Witch’s Hat Pattern
- Acrylic Enamel Paints: sage green, black, white
- Black Feathers
- Black Craft Foam
- Gold Bead or Button
- Black String or ribbon
- Hot Glue
- Tacky Glue
- Toothpick
- Paint Brush
DIY Project Instructions
PAINT LIGHTBULB
Paint your lightbulb using sage green paint. It’s important to use an “enamel” paint for this project. If you use regular acrylic paints, the paint will scratch and peel. If you have glass paint, that will be even better. If you decide to use regular acrylic paints, do not expose your bulbs to the outdoors and be very careful not to scratch the surface. Allow your paint to dry.
MAKE A WITCH’S HAT
I made the hat using craft foam, but you can purchase a ready made hat at craft shops. To make the hat, use the printable pattern pieces (but you will need to enlarge the pieces if using a regular light bulb). The best way to make the hat, is to draw your circles on a sheet of paper first and use the paper template, to cut from the foam.
To assemble your hat, roll the 1/3 circle to create a cone shape and using tacky glue, secure the seam. If you want to add a hanger for your witch, glue about a 5 inch strand of string or ribbon (2 cut ends) on what will be the inside of the cone. The ribbon will extend up and out of the top of the cone (see photo). Allow this glue to dry completely before you continue. Cut a hole in the centre of your full circle, this hole will need to be large enough, to insert over the socket end of your light bulb.
Once the glue on your cone section is dry, attach the cone to the bib section using tacky glue and allow the glue to dry.
To dress up the hat a little, glue a small strip of black ribbon around the seam between the cone and brim of the hat. Add a small gold bead or button to the centre (see photo for placement).
ADD HAIR
For the hair, I used feathers, but you can use raffia or doll hair or any other suitable product. Cut feathers to random lengths with longest length about 3 inches. I used 9 pieces of feather for this project. Using your finger nails or scissors, very gently pull the exposed ends of the feathers (soft section of the feathers only) to create a curl on the feather. Similar to curling ribbon. With your fingernails, you pinch the feather between 2 finger nails and pull gently, this will curl the ends. If using scissors, place the soft section of the feather ends along one blade of your scissors and your finger or thumb on top of the feather with the feather strands pinched between the scissor blade and your finger. Gently pull the feather through (very gently or you’ll break the feather) to create a small curl. If your scissors are very sharp, you may cut through the feather, so be careful.
Hot glue your feathers to the lightbulb where the hair should be placed (see photo). Making sure the glue on your hat is dry, place the hat over the lightbulb and hot glue in place on the lightbulb. This will cover all the feather ends.
PAINT THE WITCH FACE
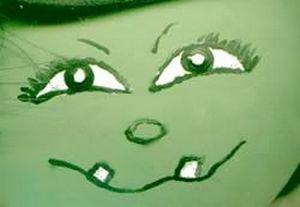
To the left is a clear diagram of the face and it is very easy to paint.
The eyes are simply a 1/3 circle, painted white. Once the white paint is dry, paint the edge of your eye with black paint (a toothpick works great for painting the detail, just don’t press with toothpick). Dip your toothpick in black paint and gently paint the outline.
Using a toothpick or very fine liner paint brush, paint an oval shape for the nose and crooked line for the mouth.
Paint 2 squares with white paint to create the teeth and once that paint is dry, outline the teeth with black paint. Again, using a toothpick, draw eyelashes and small strokes for the eyebrows.
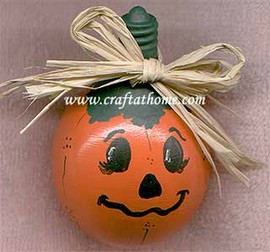
If you have two light bulbs to recycle, make the coordinating recycled Light Bulb Pumpkin as well!


Leave a Reply