 Free Sewing Pattern: Quilt Block Aprons
By Christina Sherrod of CraftandFabricLinks.com
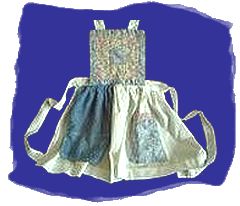
This beautiful, but easy to sew, quilted top apron comes in two sizes. Here we have instructions for an apron to fit girls, size 4 to 6, pictured on the right.
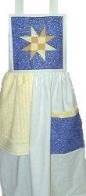
Please visit CraftandFabricLinks Quilt Block Apron: Size 8-4 for the larger pattern to fit girls 8-14, pictured at left.
Quilt Block Apron for little girls (Size 4-6)
Supplies Required (choose your own colors: I will refer to colors in picture)
- 1/8 yard pink fabric
- 1/4 yard blue fabric
- 1 1/4 yard muslin
- 1/2 kitchen towel
- Thread (to match background)
- 1/8 yard yellow fabric
Note: all seams are 1/4 inch. Always iron between steps.
- Sewing Supplies: scissors, quilting pins, large sewing ruler, fabric marking pencils, seam ripper
hint: quilting pins are easier to use than regular pins; a tupperware box works well as a supply box.
Safety Reminders For Little Helpers
A. Always have an adult do all the ironing!
B. Never run with scissors. Carry them pointed end down.
C. Never use a sewing machine without adult supervision.
D. Always let an adult use the seam ripper for you.
Now you are ready to start!
Please Note: These diagrams are not exactly to scale, but pattern pieces do fit as shown.
First, cut out your pattern pieces. I use butcher paper, bought on a roll at Costco.
Muslin Pattern Pieces
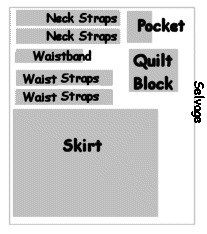 Skirt: Cut 1 piece 17″ x 36″.
Pocket: Cut 1 piece 5 1/2″ x 6 1/2″
Waist Ties: Cut 2 pieces each 3 1/2″ x 23″
Neck Ties: Cut 2 pieces each 3 1/2″ x 25″
Waist Band: Cut 1 piece 3 1/2″ x 14 1/2″
Quilt Block Back: Cut 1 piece 9″ x 9″
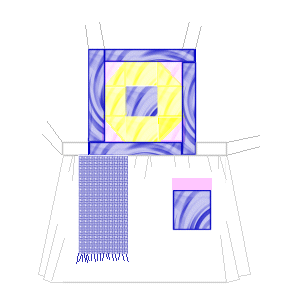
Now, lay-out pattern pieces as shown at right. Cut out fabric pieces.
Quilt Block Pieces
Yellow: Cut (4) 2 1/2″ squares
;Cut (2) 3 1/2″ squares
Pink: Cut (2) 3 1/2″ squares
Blue: Cut (1) 2 1/2″ squares
;Cut (4) 1 1/2″ x 8″ strips
Pocket Pieces
Pink: Cut 1 piece 2.5″ high x 5.5″ wide
Blue: Cut 1 piece 4.5″ high x 5.5″ wide
 Creating Your Quilt Block
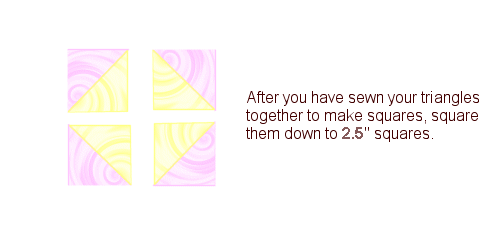
1. Cut the two pink squares on the diagonal, creating 4 triangles.
2. Cut two of the yellow squares on the diagonal, creating 4 triangles (leave 2 yellow squares whole).
3. Sew pink triangles to yellow triangles along the diagonal edge to form 4 squares as shown below.
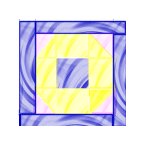
4. After you have sewn your triangle squares, you should have 4 pink / yellow squares, 4 yellow squares,and 1 blue square. Place them in rows of 3 squares each; then sew the three rows together (refer to picture at top
of page for arrangement of squares).
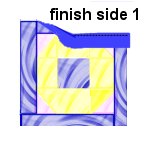
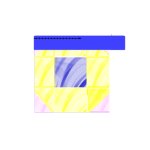 5. Place one blue strip along the top of your block of squares, right sides together, lining up one end of the blue strip even with the left edge of the block. Sew the strip to the block, right sides together – but stop about
1/2 way down the line. The blue strip will extend beyond the end of the block on the open end. This is correct.
Refer to picture. After sewing strip one on, iron the strip open.
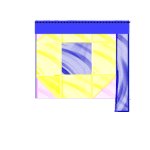
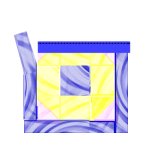
6. Rotate the block 90 degrees to the right. Sew a new strip of blue to your new top of the block. The blue piece can be sewn entirely across this side. Repeat on around until all blue strips have been sewn on. After your 4th blue piece is sewn on, you can go back and finish off the first blue piece. Refer to picture.
Neck Ties / Quilt Block Back
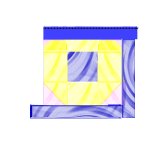
7. Fold ties right sides together. With right sides together, sew side seams and one end. Turn right sides out. Baste, serge, or sew across the unfinished edge. Repeat with second tie. Pin the muslin quilt block backing to the quilt block, right sides together, with the two finished neck ties placed inside the two layers (unfinished edge of each tie extending slightly beyond the edge of the quilt block). Place the ties so that their seams are toward one another, rather than to the outside. Refer to photo at left.
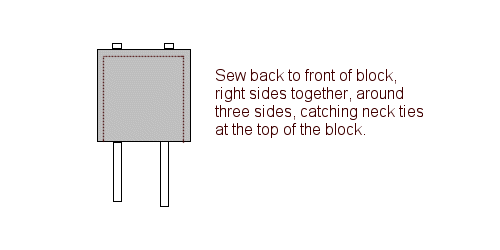 Sew backing of quilt block to the quilt block front along the two sides and across the top that contains the
two ties. Be careful not to catch the ties in the sides of the block. They should be laid out straight so you do not accidentally sew them into any sides except at the top.
Refer to picture. Turn the block right side out, with ties sticking up out of the top. Iron.[clear]
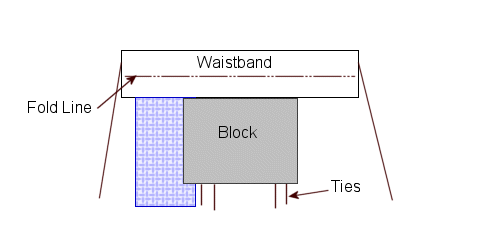
Skirt / Waistband
8. Serge or zigzag along both long edges of the waistband. Fold under the two ends and iron. Fold the waistband right side out, lengthwise, and iron.
9. Serge or zig zag across the top of the skirt, the bottom of the skirt (top and bottom are the two long sides) and the top of the towel. Fold under the short sides of the skirt 1/4″. Fold under again and stitch along the edge, finishing the sides. Run two gathering stitches along the top edge of the skirt and top edge of the towel. Gather the skirt across the top – adjust so that the skirt width equals the length of the waistband. Gather the top of the towel slightly. Place the towel on the skirt, with the right side of the towel and skirt facing up. Baste the towel into place on the skirt (about 2-3″ from the side of the skirt). Place the quilt block bottom edge along the top edge of the skirt, right sides together. Pin the waistband to the top of the skirt, keeping ends of waistband folded under. The bottom layer is the skirt, the second layer is the towel, the next layer is the quilt block, the top layer is the waistband. Stitch across. Refer to picture.
 Finishing Waistband / Waist Ties
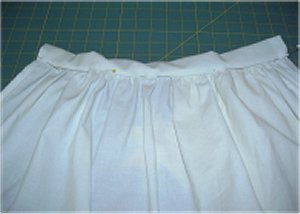
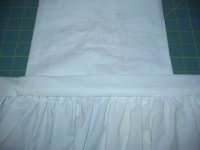
10. Fold waistband over top of skirt and pin in place on wrong side of skirt. Hand stitch waistband in place. Pictures show back of apron.
Place the unfinished edges of the waist ties into the waistband open ends so that seams face toward the floor. If ties don’t fit into waistband, adjust their width to fit. Machine stitch across ends of waistband catching waist ties.
11. Sew the pink pocket strip to the top of the blue pocket piece, right sides together to create an outer pocket piece that measures 6.5″ high x 5.5″ wide. Zig zag or serge across bottom edge of outer pocket. Zig zag or serge across bottom edge of pocket lining. Turn under bottom edge of outer pocket front and bottom edge of pocket lining 1/4″ and iron. Sew the pocket lining to the pocket front around three unironed sides , right sides together (keep the bottom edge that was folded under open). Turn pocket right side out. Place pocket on skirt. Sew in place along two sides and across bottom folded edges.
12. Hem the bottom of the skirt.
Congratulations! You are finished!
Your next apron will be easier. Remember, it is always easier to make more than one of any item at a time. It goes much faster to make two together, than it does to make one now and one later.
If you have any problems with this pattern, please email me. I’ll answer any questions and revise the pattern instructions as necessary.
Patterns Copyright © 2000 – 2014 Craft And Fabric Links. This means you may print them for your personal use only. Any other purpose must be first approved in writing by
CraftAndFabricLinks.com.


Leave a Reply