Last updated on October 10th, 2015 at 02:08 am
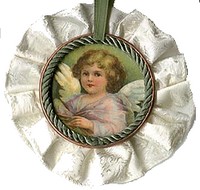
Victorian Angel Juice Lid Ornament
Here’s an easy way to add a little Victoriana to your country cottage or vintage decor, especially at Christmas when you can use these little ornaments to bring a Victorian theme to your Christmas tree.
Make the base from a recycled juice can lid; cut the picture from a greeting card or old gift wrap – and you may even have enough leftover trims to complete the project.
Craft Supplies:
- Juice Can Lid
(kind from frozen concentrate juice, no sharp edges)Lace or Wire Ribbon - 1/4 inch ribbon
- Decorative Cord
- Hot Glue
- Picture from old Christmas Card, Gift Wrap, etc
- Gold or copper paint or paint pen
- Sandpaper
How to: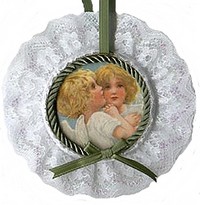
Sand your lid a little with sandpaper to help the glue stick better. Wash your lid thoroughly and allow to dry completely. Place your lid over the picture you wish to use and draw around the lid. Cut out your picture along the outline. Glue your picture to what was the outside top of the lid. Add a little glue to the top of the picture and cover the entire picture and ornament on both sides with a coat of glue. Allow the glue to dry completely. (If you like, you can add a coat of gloss varnish to the picture area and if you do this before the glue dries completely, you’ll have a little crackle in the varnish, that makes your ornament look a little more aged).
Now paint with a gold or copper paint pen around the top rim of the lid and allow to dry. You will be able to see this part of the lid when your ornament is complete.
Glue a piece of cording around the inside of the lid and be sure to secure both ends of the cord with a little extra glue to keep it from unravelling.
 Glue a piece of ribbon (for hanger) across the outside rim and glue about 1 inch down the back of the lid for extra strength. I left the hanging ends of these open to tie in a bow, but you can just add a loop of ribbon if you prefer. Refer to photo.
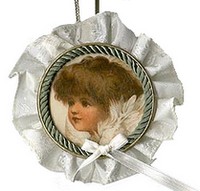
Now depending on which ornament you’d like to make will depend on the ribbon or lace placement:
For the lace trim:
Glue a piece of lace to the outside rim. Folding each end of the lace, wrong sides together about 1/4 inch in to hide the end cuts.
For wire ribbon:
Take one end of the wire ribbon and gather one edge of the wire ribbon by securing one end of the wire and pulling the other end until the ribbon is gathered together to the desired fullness. Twist together to two ends of wire that you have gathered to secure the wire in place. Cut off the excess wire.
Fold each end of your lace or ribbon(wrong side together) about 1/4 inch to hide the end cut. Glue to the back of the ornament, placing centre of the lid. The easiest way to do this by applying the glue to the back of the lid (be generous with the glue) and placing the ribbon ring on the glue. Place a bottle or something with a little weight on top of the ribbon until it is dry.
Add a little bow as a finishing touch to the bottom centre of the ornament or leave as it is.
Copyright © 1999-2015 Susan Spatone All rights reserved.


Leave a Reply