Last updated on June 16th, 2016 at 11:15 pm
How to Make Friendship Bracelets from Embroidery Floss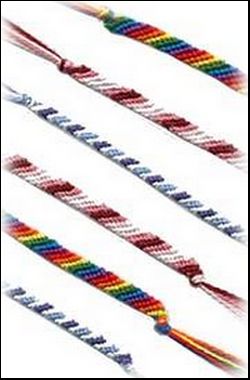
Once you get started on this free craft project, you’ll want to make lots more friendship bracelets to give to all your friends.
All you need is a little patience and lots of different colors of embroidery floss.
What You Need:
- J. & P Coats® Embroidery Floss or J. & P. Coats® Craft Thread
– One skein of each color. - transparent tape or safety pin to hold strands of floss in place as you work.
Craft Instructions:

Cut one yard of embroidery floss for each color in your bracelet. (Tip: It’s easier to learn using four different colors.) Arrange the strings in the order you want the colors to alternate in your bracelet.
1. Tie the strings together with an overhand knot, leaving a 2″ tail at the top. Tape it to a table or pin it to your jeans.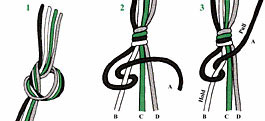
2. Pick up strand A and wrap it over and under strand B to make a knot
3. Tighten the knot by holding strand B and pulling strand A up.
4. Make a second knot with strand A over strand B; pull strand A tight.
5. Drop strand B; pick up strand C. Make 2 knots with strand A over strand C. Repeat on strand D. Strand A will now be on the right.
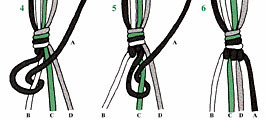
6. One row has been completed. Continue next row by making 2 knots with strand B over strand C, D, and A. With each row, the strand on the left is always “worked over” to the right.
7. Four rows are completed. Continue until bracelet is desired length.
Hint: You can always tell the right side of your bracelet because the rows will slant to the right.
TIE IT ON: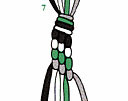
When your bracelet fits your wrist, finish off by tying the strings together with an overhand knot. Then tie it on your wrist or ankle with a square knot (right over left and left over right). Cut the strings, leaving 5/8″ tails.
Note: this site is not endorsed by Coats & Clark.
Copyright © 2003 by Coats & Clark Inc.
Reproduced with permission from Coats & Clark Inc.


therese says
this worked really well! It was fun too, I love my new bracelet