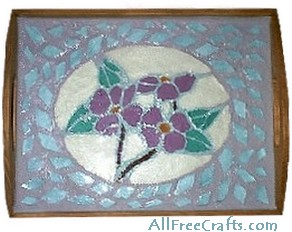
Sculpey Mosaic Serving Tray
This mosaic tray looks like a designer creation that cost a small fortune in an upscale boutique. However, it’s simple and economical to make, using sculpey clay and our recipe for faux grout.
by Twila Lenoir
Simply choose your own stained glass window pattern, and follow the directions below – we’re sure that you’ll be amazed at the results!
Supplies:
- Sculpey clay in colors needed for your design
- Wooden Tray
- White sand
- Acrylic craft paint
- Glue
- Craft stick or popsicle stick
- Paper cup or disposable container
- Any kind of pin
- gloss sealer
- Check out Down East Stained Glass Patterns for a variety of free stained glass patterns.
Note: Children’s coloring books often have strong images with bold outlines, perfect for this kind of project.
Instructions:
1. First find the stained glass mosaic pattern you like and print it out.
2. Stain or paint your tray and let dry completely.
3. Roll out sculpey clay in the colors that you need to 1/8 inch of an inch. As an example, first, you would roll out green sculpey clay for the leaves, then follow the directions below.
Place the pattern over the green clay, and with a pin, poke holes right through the paper and into the clay, spacing the holes out a bit, but outlining each separate leaf into the clay. As our sample pattern above shows, one of the leaves is in two sections, and these you would treat as two separate pattern pieces, moving the paper over the clay a little to keep each outlined section apart.
Use the pin to outline all the pieces that you need in green (or whatever color you are working with) – when you lift the paper the pattern pieces should be clearly shown in the clay. Cut each piece out and place on a cookie sheet lined with tin foil.
4. If you are using sculpey clay, preheat the oven to 275° F and bake for 20 minutes. If you use a different brand, follow the directions that come with that clay.
5. Repeat Steps 3 and 4 with the rest of your pattern pieces.
6. For the background mosaic, we used baby blue clay, rolled out to 1/8 inch and cut into small diamond shapes.
7. When the clay is cool, place the pieces on your tray leaving a small space separating one from the other. This space will be filled with the grout recipe that follows. When you have all the pieces where you want them, cover the back of each piece with glue, set in place firmly, and let dry.
8. Make the grout by mixing about ¼ cup of white sand and two tablespoons of white glue, to the consistency of oatmeal. Add a dollop of acrylic craft paint in the background color of your choice and mix thoroughly.
9. Spread the faux grout over the mosaic with your fingers, making sure that you push the grout into all areas. Set aside to dry for a little while.
When the grout is semi-set, take a damp cloth and rub the excess grout off the mosaic tiles, smoothing the spaces as you work.
10. Let the mosaic tray dry overnight, then spray or pour on a gloss sealer and let that dry completely. Enjoy!


Leave a Reply