Last updated on September 6th, 2015 at 08:01 pm
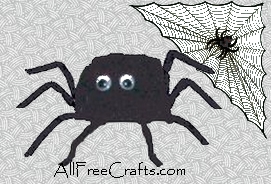
Egg Carton Spider
Kids have been making egg carton spiders for years – they are easy to do, make great Halloween decorations, and you only need a few inexpensive supplies.
by Jane Lake
For this project, we provide two different ways of attaching the spider legs; use whichever method is easier for you.
A grownup may need to cut the egg carton into individual cups for younger children, but older kids will be able to do this step themselves.
If you like this Halloween craft project, you may also wish to try making Egg Carton Bats or Handprint Spider Smilies.
You will need:
- egg carton
- 4 long chenille stems for each spider
- pair of plastic movable eyes for each spider or paint to make your own
- hot glue or tacky glue
- scissors
- black craft paint (also white, if painting eyes)
- paint brush
- black or invisible thread, black yarn, or black elastic thread
 Craft Instructions:
1. You will need one egg section of the egg carton for each spider, so cut as many sections as you need for the number of spiders that you want to make. Turn the sections upside down and trim the bottom so that the spider body will sit flat on your work surface.
2. Paint each egg carton section, inside and out, with black craft paint and let dry.
3. For each spider, make two small holes on the top of the middle section. A corn cob skewer is useful for this, but you could use the tip of your scissors. Insert thread, yarn or elastic thread into the holes and tie off. Omit this step if you don’t wish to hang the spider.
4. There are two ways to attach the spider’s legs.
First method: Make four leg holes on each side of the spider’s body. Poke the holes through with an awl, sharp pencil or plastic yarn needle. Thread a chenille stem through the first hole, right through the middle, then out through the matching hole on the other side. Repeat for all four legs. When all stems are in position, bend them into leg shapes that will support the spider.
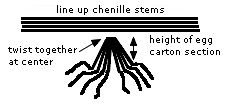 Second Method: Line up all four chenille stems evenly, and twist them together in the center, folding the stems in half with four stems on each side, as shown in the diagram at right.
Add a generous amount of tacky glue or hot glue to the top center of the stems and glue them inside the spider body, at the top center. When the glue is dry and the stems secure, fold the stems into four legs on either side. If desired, you can secure each leg with a small amount of glue where the stem meets the bottom of the spider body.
5. Glue on the plastic eyes, paint your own, or draw eyes on a white piece of paper, cut out and glue in place.
6. Set out or hang your spiders as Halloween decorations or attach them to a web or wreath.


Leave a Reply