Last updated on September 5th, 2015 at 09:39 am
Paper Plate Jack o’ Lantern Pumpkin
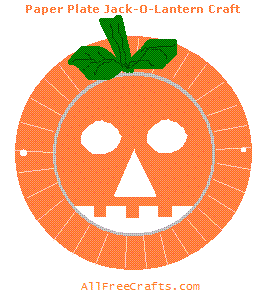
Make a pumpkin Jack o’ Lantern mask from a paper plate.
By Jane Lake
This is a great Halloween craft project to do with one child or a group of kids. The supplies are inexpensive and the results quick and gratifying.
Supplies:
- paper plate
- string or elastic cord
- pencil or crayons
- orange craft paint
- green construction paper
- scissors
- stapler and staples
- ruler
Instructions:
The natural curve of a paper plate will fit around the face better if you use the back of the plate as the front of the mask.
On the front of the plate, draw a triangle nose with the top point of the triangle being at the center of the plate. The nose should be about 1-1/2 inches high, with a bottom line about 1-1/2 inches long.
Draw two oval shapes as eyes, placing the inner points of the ovals about 1 inch apart and about a 1/2 inch from the top of the nose. Make sure the eye holes are large enough (at least 1 inch high and 1-1/2 inches wide) to allow a clear view when you are wearing the mask.
Draw a smiling curve line as the bottom of the mouth. Usually, you can follow the inside edge of the paper plate brim to do this. Join both ends of the smile curve with a straight line. If you like, draw three small, equally spaced, squares or rectangles along this straight line to represent teeth.
Cut out the eyes, nose and mouth shapes.
Paint the front of the mask orange. Cut a stem and two leaves from green construction paper and glue to the top of the mask.
Staple two strings, or a single length of elastic cord, to the sides of the mask. Secure with a knot so that the string or elastic will not pull through the staples.


Leave a Reply