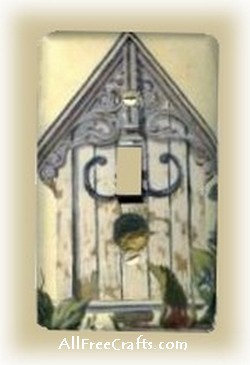
 How to Wallpaper a Light Switch Plate
by Jane Lake
Whether you want to coordinate your light switches to suit your decor, or you’d just like to create an decorative home accent, this wallpapered switch plate is a simple and effective way to update a room.
The wallpapered light switch plate shown here was decorated using a sample piece of wallpaper border. The method used is similar to creating a paper book cover. Just follow the easy step-by-step instructions.
MATERIALS NEEDED:
- wallpaper scraps or wallpaper border
- light switchplate
- masking tape
- pencil
- scissors
INSTRUCTIONS: .
1. Place the switchplate on your wallpaper sample, and center it on the design that you’ve chosen. In this case, I centered the hole for the switch in the middle of the birdhouse.
2. Using a pencil, lightly mark the outline of the switch hole on the front of your wallpaper. With sharp scissors, cut a line down the center of the rectangle that you have just created. At the top and bottom of the rectangle, cut outwards from the middle line to each side of the rectangle, forming two flaps that you can fold to the back like tiny shutters on a window.
3. Turn over the wallpaper so that you are looking at the back. Align the switch hole with the cut out in your wallpaper. Now trace around the switch plate in pencil; next, draw another line 1/2″ larger all around. Cut out this larger rectangle.
4. Place your cutout on the front of the switch plate, aligning the switch holes and folding the ‘shutters’ to the back. Fold each side to the back to form crease marks, then release. At each corner, snip at a 45 degree angle from the outer pencil line to the inside pencil line. This is to allow you to fold the corners neatly.
5. Wet the wallpaper and reposition on the switch plate. Fold the switch hole flaps to the back. Now fold the outside edges to the back, being careful to form neat corners.
6. You will find that the wallpaper will probably not stick in place on the back. Reinforce the hole flaps and each edge with masking tape.
7. Attach to the wall and enjoy a bright new room accent for very little money (this could even be free if you have access to small wallpaper samples!)



Leave a Reply