Last updated on April 20th, 2021 at 10:46 pm
Free Teddy Bear Crochet Pattern
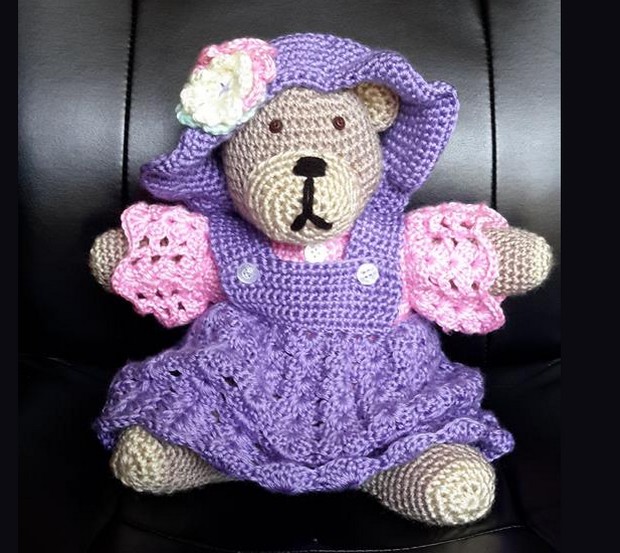
This free crochet teddy bear pattern is cuddly, lovable and the perfect model for lots of coordinating teddy bear outfits. Those free pattern pages are also on AllFreeCrafts, including the dress and hat shown on this page, and you’ll find the links below.
Update: Here, I’ve added a photo of our crocheted bear, in lovely shades of peach and green, completed by reader, Deb Woods Boehmer, for her seven-year-old granddaughter.
After Deb’s mother passed away, she frogged the yarn from a baby sweater that her mother never completed then used it to crochet the teddy bear’s clothes shown here.
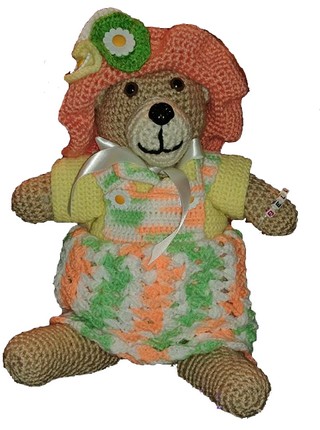
Crocheted with love, and so heartwarming a story, I had to share.
Free Crochet Patterns for Teddy Bear Clothes
Materials List:
- worsted weight yarn (5 ounces of the main color and a small amount of contrasting color)
- Sample colors: MC = dark brown, CC = beige
- Size K crochet hook
- Purchased teddy bear eyes, if desired
Crocheted Teddy Bear – Pattern Instructions:
Do not join rounds. Mark the first stitch of each round (a safety pin makes a good marker).
With MC, ch 2.
Rnd 1: 8 sc in 2nd ch from hook.
Rnd 2: (2 sc in ea sc) around. (16 sc)
Rnd 3: (sc in next sc, 2 sc in next sc) around. (24 sc)
Rnd 4: (sc in next 2 sc, 2 sc in next sc) around. (32 sc)
Rnd 5: (sc in next 3 sc, 2 sc in next sc) around. (40 sc)
Rnd 6: (sc in next 4 sc, 2 sc in next sc) around. (48 sc)
Rnd 7: sc in ea sc around. (48 sc)
Rnd 8: (sc in next 11 sc, 2 sc in next sc) twice, sc in next 24 sc. (50 sc)
Rnd 9: (sc in next 12 sc, 2 sc in next sc) twice, sc in next 24 sc. (52 sc)
Rnd 10: (sc in next 13 sc, 2 sc in next sc) twice, sc in next 24 sc. (54 sc)
Rnds 11 – 16: sc in ea sc around. (54 sc)
Rnd 17: (sc in next 13 sc, sc next 2 sc together to decrease) twice, sc in next 24 sc. (52 sc)
Rnd 18: sc in ea sc around. (52 sc)
Rnd 19: (sc in next 12 sc, sc next 2 sc tog) twice, sc in next 24 sc. (50 sc)
Rnd 20: sc in ea sc around. (50 sc)
Rnd 21: (sc in next 11 sc, sc next 2 sc tog) twice, sc in next 24 sc. (48 sc)
Rnds 22- 24: sc in ea sc around. (48 sc)
Rnd 25: (sc in next 4 sc, sc next 2 sc tog) around. (40 sc)
Rnd 26, 27: sc in ea sc around. (40 sc)
Rnd 28: (sc in next 3 sc, sc next 2 sc tog) around. (32 sc)
Rnd 29: (sc in next 2 sc, sc next 2 sc tog) around. (26 sc)
Rnd 30: sc in ea sc around. (26 sc)
Stuff to within about 1″ from top before continuing.
Rnd 31 – 33: sc in ea sc around. (26 sc)
Rnd 34: (sc next 2 sc tog) around.
Stuff to top.
Rnd 35: (sc next 2 sc tog) around.
End off, leaving an 8″ tail of yarn for sewing. Using a large-eye yarn needle, weave yarn through remaining stitches. Pull tight to close and sew closed. Weave in end.
Head:
With MC, ch 2.
Rnds 1 – 5: Repeat rnds 1 – 5 of body.
Rnds 6 – 14: sc in ea sc around. (40 sc)
Rnd 15: (sc in next 4 sc, sc next 2 sc tog) around.
Rnds 16, 17: sc in ea sc around.
Rnd 18: (sc in next 2 sc, sc next 2 sc tog) around.
Stuff to within 1″ of top before continuing.
Rnd 19: (sc in next sc, sc next 2 sc tog) around.
Finish stuffing. Sew head to body. (Head will be sewn on at about round 33 of body.)
Muzzle:
With CC, ch 2.
Rnds 1 – 3: Repeat rnds 1 – 3 of body.
Rnd 4: (sc in next 9 sc, hdc in next 3 sc) twice.
Rnd 5: sc in ea st around. (24 sc)
Rnd 6: Repeat rnd 4, join with slip stitch in 1st sc.
End off.
(Areas with the hdc stitches are the sides of the muzzle.)
With black yarn, using large-eye yarn needle, embroider nose features on center top of muzzle. Embroider mouth shape with straight stitches. Stuff. Using yarn, sew to lower half of head.
Legs: (Make 2)
With MC, ch 2.
Rnds 1, 2: Repeat rnds 1 and 2 of body.
Rnd 3: Repeat rnd 4 of body.
Rnd 4,5: sc in ea sc around.
Rnd 6: (sc in next 3 sc, sc next 2 sc tog) around.
Rnd 7 – 13: sc in ea sc around.
Rnd 14: (sc in next 2 sc, 2 sc in next sc) around.
Rnds 15 – 21: sc in ea sc around. At end of rnd 21, join with slip stitch. End off.
Stuff. Sew to bottom of body.
Arms: (Make 2)
With MC, ch 2.
Rnd 1: 6 sc in 2nd ch from hook.
Rnd 2: 2 sc in ea sc around. (12 sc)
Rnd 3: (sc in next sc, 2 sc in next sc) around. (18 sc)
Rnds 4 – 6: sc in ea sc around.
Rnd 7: (sc next 2 sc together for decrease) 4 times, sc in next 10 sc. (14 sc)
Rnd 8 – 18: sc in ea sc around. End off at end of rnd 18, leaving an 8″ tail of yarn for sewing.
Stuff firmly. Sew an arm to each side of body.
Ears:
Inner Ear: (Make 2):
With CC, ch 2.
Row 1: 3 sc in 2nd ch from hook. Turn.
Row 2: ch 1, 2 sc across (6 sc). Turn.
Row 3: ch 1, (sc in next sc, 2 sc in next sc) across, changing to MC in last sc. (9 sc) Turn.
Row 4: With MC, ch 1, (sc in next 2 sc, 2 sc in next sc) across. End off, leaving 8 ” tail for sewing.
Outer Ear: (Make 2):
With MC, ch 2.
Row 1: 3 sc in 2nd ch from hook. Turn.
Row 2: ch 1, 2 sc across (6 sc). Turn.
Row 3: ch 1, (sc in next sc, 2 sc in next sc) across (9 sc). Turn.
Row 4: ch 1, (sc in next 2 sc, 2 sc in next sc) across. End off, leaving 8 ” tail for sewing.
(Ears are not stuffed.) With MC yarn, using large eye yarn needle, sew inner ear to outer ear around top edge of ears. Making ear into a curved shape as you sew it on, sew ears to top sides of head, leaving about a 1″ space in between the ears.
Tail:
With MC, ch 2.
Rnd 1: 7 sc in 2nd ch from hook.
Rnd 2: (2 sc in next sc) around. (14 sc)
Rnd 3: sc in ea sc around. End off.
Stuff lightly. Sew to back near bottom of body.
Eyes:
Sew on purchased animal or wiggley eyes, round black buttons or make these crocheted eyes:
(Make 2) ch 2, 5 sc in 2nd ch from hook, sl st in first sc to join. End off.
Sew eyes to head just above top edge of muzzle.


Ruth says
what size is this bear. She sure is cute
Yvonne says
I would like to know the size also. Thanks
Mary E Seifert says
I love the bear and the outfit so much. I am not creative and I need your pattern to guide me. Can you please share with us a pattern for that delightful hat. It is her crowning glory and I would love to replicate the whole thing; bear, dress and hat. Thank you so much for sharing with us.
Jane Lake says
Thank you for your kind comments, Mary! You’ll be glad to know that we have the pattern for the dress, shirt, underpants and, yes, even the hat. See the whole set here:
https://www.allfreecrafts.com/crochet/toys-crochet/teddy-bear-dress/
Karen says
I followed the pattern and mine came out all out of proportion don’t know what I did wrong
Misty erickson says
Do you have a pattern for the purple and pink outfit that is shown in the picture of the bear above. I can’t seem to find the pattern for it.
Jane Lake says
The outfit is the same as the one below it just in different colors. You’ll find the link for the dress just before the beginning of the bear pattern. Some people are finding it works up too big for their bear, in which case you’ll need to use a smaller hook.
Kathleen says
Loving this pattern…. Making 2 of them for my great neices. Can you tell me how you attached the legs & arms?? Do you attach them like the head? Or do you crochet the ends closed then attach?
Susan Cannon says
I have this same question!! Can someone please help?
Lorraine says
I have made my first ever stuffed animal and although the eyes are a bit crossed and the nose slightly squeezed I love it. But I have now seen this beautiful bear and I am in love. I have four grand daughters all of whom expect nana to have something every time they come I’m going to make 5 one for me! Thank you.
Jane Lake says
I especially like the “one for me” because you deserve it, nana, after crocheting four delightful bears for four lucky granddaughters. Your comment made my day. Love it!
Leonie young says
Hi I am having trouble with the legs the st are not coming out right. Row 1 8sc, row 2 16sc. Then it goes into row 4 of body which =
Sorry I am lost can u tell me st numbers please
Love the pattern
Cheers
Leonie
Jane Lake says
Hi, Leonie, Row 3 ends with 24 stitches, and Row 4 has 32. Hope this helps you. Good luck!
Joanne says
Can you please tell me how many balls of the MC is required?
Thank you
Rhoda McClain says
Love this bear!
Ria Plate says
i am a 86+ yrs old great grandma and learning to crochet. I have just finished a headband and planning to make at least 5 more. But this lovely creature came across my way. And I simply must make it for my 1 year old to be
(soon) little Stella. Hope so it won’t be too difficult. I have some handspun wool ( from my knitting and spinning days) just right for Teddy. I will let you know the results. Greetings from Down Under, Ria
Jane Lake says
Your little Stella is so lucky to have a grandma willing to make her a special teddy bear, especially with handspun wool. What an heirloom that will be. I still have my childhood bear (rather scruffy and bald in places) and I love him as much as ever. Do let me know how your teddy turns out. I’m sure it’ll be lovely!
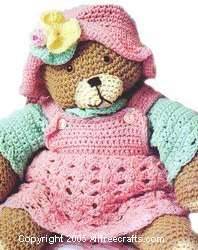
Jane Lake says
Hi, Ria, Thought you might like to see the new photo that I added, of this bear pattern done by Teresa McCullough. I think it’s adorable!
Kathaleen says
I am having a problem with the clothes being too large for the bear.
Also, in the pattern for the shirt on row 7, how do you actually sc crochet under the arm since to have sc in the 20 chains of the arms?
Pat says
Could you please tell me how big the bear is. Ty
Connie says
I just finished the bear. Finished size from top of head to tip of foot is 21 inches. The dress however is much too big. I am going to try making it again with a smaller hook.
Missy says
I am making this now. I am having a little difficulty with attaching the overskirt to the underpants. Can you give a little step to get me started
Kaye says
I love this bear I’m in the process of making it now
I wanted to make a big bear while looking I saw this beauty.
Would you know how I would change this from the size it is now
To be 20 inches or larger?? The ones I’ve seen so far are goofy looking
Any help would be wonderful. Can’t wait to finish this one. Thank
You for sharing your psttern
Kaye
Dian says
There are a few ways to change the size of the bear. Use smaller hook for smaller bear, or larger hook for a larger bear. However, I’ve noticed, depending on the pattern, if you are going bigger, you might notice the “holes” are larger and you need to tighten the tension on the yarn to correct. I tend to have a naturally tight tension… and my stuff is never as large as the pattern says. So, with a larger hook, one size, it usually turns out right. But, the tension and the hook size are the only ways i know.
susan says
There have been several inquiries as to the size of the bear, but no responses. Can someone who has made the bear already please let us know?
Debbie says
Love the Teddy Bear. I collect Teddy bears. My ex coworker is having a baby girl in July. I am going to try and make one for her shower.
Jane Lake says
That is so nice of you, Debbie. I’m sure your bear will be beautiful.
Kathy Shauger says
can you please tell me how big the teddy should be when finished. Thank you
Dian says
20-21″ tall