Last updated on January 22nd, 2016 at 11:08 pm
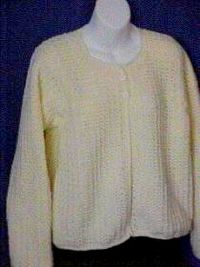 Adult Jiffy Jacket –
Cardigan
designed by Kim Guzman © 2000-2014
Email to kim@crochetkim.com
This free crochet pattern is copyrighted and provided here by special permission from crochet designer Kim Guzman. This pattern is for your personal use only and may not be sold or published to other websites or electronic mailing lists, etc.
Designer Notes: I first designed when TLC was a specific kind of yarn. It was before it branched off into an entire line of products. It is a very loosely woven yarn. Very light and airy. I believe it is most like the TLC Luster that is currently available.
Many people have used Red Heart Super Saver for this garment with lovely results. You’ll probably not use more than 40 ounces for the large size.
| Bust Size Chart |
| Size | Measurement | Finished |
| Small | 36-38″ | 44″ |
| Medium | 40-42″ | 48″ |
| Large | 44-46″ | 52″ |
Materials
- Crochet Hook: H (or size to obtain gauge)
- 7 (9, 11) skeins Red Heart TLC (5 oz.) – Natural
- Yarn Needle
- 2 3/4-inch Buttons
- Ruler or Measuring Tape
Gauge
8 Shells worked in pattern
for 16 Rows = 5″ square
Sizes:
All sizes are written in Small, with Medium and Large written in parenthesis. If there is only one number, then it will be the same for all three sizes. It is recommended that you circle all calculations for the size you are making before starting the project. Please note that I have only stitched up size Small. The Medium and Large sizes are an estimate based on grading charts and stitch gauge.
When starting a new skein of yarn, always start at the beginning or ending of a row. I had to learn this the hard way. *grins* If you join in the middle of a row, the ends will show as an opaque area, disrupting the pattern. When weaving in the ends of a garment, always weave along the seam line, as opposed to along a row. This will help hide the ends better as well. If you’re having a problem with “ruffling” when you are stitching around the garment, please see my Tips Page.
Special Stitches
Shell: In ch-2 space, work (sc, ch 2, sc).
Instructions
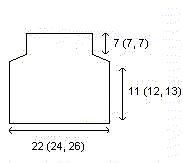
Back
Row 1: Ch 101 (107, 113). Work (sc, ch 2, sc) in third ch from hook. * Sk 2 ch. Work (sc, ch 2, sc) in next ch. Repeat from * across to within last two stitches. Sk 1 ch. Sc in last ch. Ch 2, turn.
Rows 2-36 (40, 44): Work Shell (see Special Stitches above) in each ch-2 space across. Sc in beg ch-2 turning ch. Ch 2, turn. [33 (35, 37) Shells]
Rows 37 (41, 45) – 42 (46, 50): [Decrease] Sc in first ch-2 sp of Shell. Work Shell in each ch-2 space of each Shell across, to within last Shell. In last Shell, work 1 sc. Ch 2, turn. [At the end of the last Row, there will be 21 (23, 25) Shells]
Rows 43 (47, 51) – 64 (68, 72): Work Shell in each ch-2 space across. Sc in beg ch-2 turning ch. Ch 2, turn. [21 (23, 25) Shells] Do not ch-2 on the last Row. Fasten off.
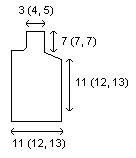
Left and Right Fronts (make 2)
Row 1: Ch 50 (53, 56). Work (sc, ch 2, sc) in third ch from hook. * Sk 2 ch. Work (sc, ch 2, sc) in next ch. Repeat from * across to within last two stitches. Sk 1 ch. Sc in last ch. Ch 2, turn.
Rows 2-36 (40, 44): Work Shell (see Special Stitches above) in each ch-2 space across. Sc in beg ch-2 turning ch. Ch 2, turn. [16 (17, 18) Shells]
Row 37 (41, 45): [Decrease} Sc in first ch-2 sp of Shell. Work Shell in each ch-2 space of each Shell across Sc in beg ch-2 turning ch. Ch 2, turn.
Row 38 (42, 46): [Decrease] Work Shell in each ch-2 space of each Shell across, to within last Shell. In last Shell, work 1 sc. Ch 2, turn.
Rows 39 (43, 47) – 42 (46, 50): Repeat the two previous Rows. [At the end of the last Row, there will be 10 (11, 12) Shells.]
Rows 43 (47, 51) – 52 (56, 60): Work Shell in each ch-2 space of each Shell across. Sc in beg ch-2 turning ch. Ch 2, turn.
Row 53 (57, 61): [Neckline Decrease] Work only 7 (8, 9) Shells across. Sc in next Shell. Ch 2, turn.
Row 54 (58, 62): [Neckline Decrease] Sc in first ch-2 of Shell. Work Shell in each remaining ch-2 space of Shell across. Sc in beg ch-2 turning ch. Ch 2, turn.
Row 55 (59, 63): [Neckline Decrease] Work Shell in each Shell across, to within last Shell. Sc in last Shell. Ch 2, turn.
Rows 56 (60, 64) – 64 (68, 72): Work Shell in each ch-2 space across. Sc in beg ch-2 turning ch. Ch 2, turn. [5 (6, 7) Shells] Do not ch-2 on the last Row. Fasten off.
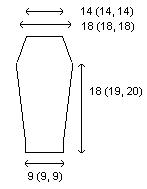
Sleeves (make 2)
 Row 1: Ch 65. Work (sc, ch 2, sc) in third ch from hook. * Sk 2 ch. Work (sc, ch 2, sc) in next ch. Repeat from * across to within last two stitches. Sk 1 ch. Sc in last ch. Ch 2, turn.
Rows 2 – 3: Work Shell (see Special Stitches above) in each ch-2 space across. Sc in beg ch-2 turning ch. Ch 2, turn. [21 Shells]
Row 4: [Increase] In first ch-2 sp of Shell, work (sc, ch 2, sc, ch 2, sc). Work Shell in each ch-2 space of each Shell across, to within last Shell. In last Shell, work (sc, ch 2, sc, ch 2, sc). Sc in beg ch-2 turning ch. Ch 2, turn.
Rows 5 – 6: Repeat Row 2. [23 Shells]
Row 7: Repeat Row 4.
Rows 8 – 9: Repeat Row 2. [25 Shells]
Row 10: Repeat Row 4.
Rows 11 – 12: Repeat Row 2. [27 Shells]
Row 13: [Decrease] Sc in first ch-2 sp of Shell. Work Shell in each ch-2 space of each Shell across, to within last Shell. In last Shell, work 1 sc. Ch 2, turn.
Rows 14 – 21: Repeat Row 2. [25 Shells]
Row 22: [Decrease] Repeat Row 13.
Rows 23 – 30: Repeat Row 2. [23 Shells]
Row 31: [Decrease] Repeat Row 13.
Rows 32 – 39: Repeat Row 2. [21 Shells]
Row 40: [Decrease] Repeat Row 13.
Rows 41 – 48: Repeat Row 2. [19 Shells]
Row 49: [Decrease] Repeat Row 13.
Rows 50 – 57: Repeat Row 2. [17 Shells]
Row 58: [Decrease] Repeat Row 13.
Rows 59 – 66: Repeat Row 2. [15 Shells]
Row 67: [Decrease] Repeat Row 13.
Rows 68 – 69 (72, 75): Repeat Row 2. [13 Shells] Do not ch 2 at the end of the last Row. Fasten off.
Assembly
Block the front, back and sleeve pieces to the sizes on the diagrams. Arrange the front, back and sleeves, and, with yarn needle, stitch the top of shoulder, arm holes, side seams and sleeves together on the wrong side.
Finishing
Attach yarn to the bottom left side of the right front. Ch 1. Sc evenly around the entire cardigan, with 3 sc in each corner. Sl st to first sc. DO NOT TURN.
Ch 1. Sc along the bottom of the right front, with 3 sc in the corner. With ruler, measure down from the next corner to a point 3 inches from the corner and place a marker. Return to crocheting. When you get to the marker, work 2 ch, sk 2 sc. [Buttonhole made] Sc in next stitch. With ruler, measure down from the corner to a point 1 inch from the corner and place marker. Return to crocheting. When you get to the marker, work Buttonhole. Continuing stitching sc around the entire cardigan, with 3 sc in each corner and skipping a stitch on the inside curves. Sl st to first sc. DO NOT TURN.
Sc along the bottom of the right front, with 3 sc in the corner. Sc along side of right front, with 2 sc in each Buttonhole. Continue working sc around the entire cardigan, with 3 sc in each corner and skipping a stitch on the inside curves. Sl st to first sc. Fasten off. Weave in all ends carefully (see Notes from Designer above). Attach buttons to correspond with the buttonholes.
About the Author:

Kim Guzman’s crochet designs have appeared in such magazines as Quick and Easy Crochet, Easy Living Crochet and Crochet with Heart. You may also have seen her designs published in leaflets from Leisure Arts, Aleene’s Creative Living, Annie’s Attic and The Needlecraft Shop.
Kim’s web site at CrochetKim.com is a delight to browse and offers crochet patterns for clothing, baby crochet, afghans and more, with lovely patterns to buy and a nice selection of complimentary patterns in each category. Well worth a visit!


Leave a Reply