Last updated on September 22nd, 2015 at 11:23 pm
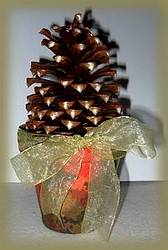
Pine Cone Topiary
Turn a pine cone into a simple, elegant and festive topiary in this easy and inexpensive Christmas craft project.
by Jane Lake
You Will Need:
- fully opened, dried pine cone
- acrylic paint, metallic paint or glitter glue to decorate pine cone
- clay pot in a size to suit your pine cone
- coordinating ribbon
- your choice of pot decoration – leave natural, paint or decoupage
- craft glue
- optional: sand, rice, or other substance to add weight to the clay pot
Project Instructions
1. Choose a clay pot and pine cone that fit together in such a way that the bottom of the pine cone fills, or just overlaps, the top of the clay pot.
2. If the pine cone hasn’t opened fully, place it in 200° oven until it has dried and opened up completely.
3. Decorate the clay pot as desired – you can paint it in several coats of craft paint or spray paint, or decoupage with small overlapping squares of tissue paper, fabric or even cut-up pieces of Christmas cards or gift wrap. Try pinking shears to cut out the squares for a patchwork effect.
Use decoupage medium according to the directions on the jar, or simply use white glue thinned with a little water, applying the glue to the pot then overlapping decoupage pieces until the pot exterior is covered completely. Once the pot is completely covered in decoupage medium, let dry, then seal with a thin coat or two of decoupage medium or thinned glue.
4. If using rice or sand to weigh the pot down, cut a circle of cardboard to cover the hole in the bottom of the pot, then add the rice or sand.
5. Glue the pine cone in place, either just inside the rim of the pot or resting on it.
6. Highlight all the edges of the pine cone with dabs of craft paint, metallic paint or glitter glue. You can apply craft paint or metallic paint with a sponge; use the dispenser or glue gun to add glitter glue.
7. To finish, place a pretty ribbon around the rim of the clay pot, tie in a bow, and cut the ribbon ends on an angle or in a vee shape.


Leave a Reply