Last updated on November 15th, 2024 at 09:33 pm
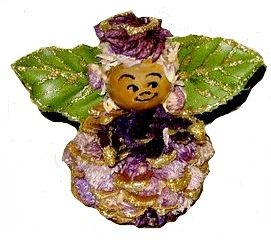
This is an easy homemade Christmas craft that uses potpourri and a pine cone as the basis for a fragrant pine cone angel Christmas ornament.
By Jane Lake
Craft Supplies
- one “open” pine cone with spaces large enough to take inserted potpourri
- chunky potpourri with enough of one color of flower to use as stuffing all around the pine cone
- glue gun and gold glitter glue sticks, or alternatively craft clue and gold glitter
- 1″ wooden bead
- black permanent marker
- green silk flower leaves for the wings – I used the leaves from a silk rose
- optional: doll hair if you prefer not to use potpourri for this
Instructions:
Warm up your glue gun and go!

1. Use the marker to draw simple facial features on the wooden bead as shown. The eyes are like commas laid sideways; eyebrows, nose and mouth are just shallow arches.
2. Position the bead on top of the pine cone. You may be able to use the uppermost part of the pine cone to push through the hole in the bead to anchor it in place; if not, secure with hot glue.
3. Now begin pushing potpourri flowers in between the spiral layers of the pine cone, filling all the spaces you can. Just beneath the head, position two potpourri seedpods as arms.
4. Glue on the leaves to form wings at the back of the head. My rose leaves were joined in a group of a three, and I rolled up the third one, gluing it in place so that a thread to hang the ornament can be strung through it.
5. Heat the glue gun, and smooth some gold glitter glue over the head where you want to position hair. Either sprinkle the wet glue with small leaves of potpourri or use it to secure doll hair.
6. Use the glue gun to outline in gold glitter glue the veins and outline of the leaves.
7. Add gold glitter glue to the edge of each spiral layer of pine cone “petals” and the edges of the seed pod “arms.”
Don’t worry about the glue “strings” – these can easily be removed by nails scissors or tweezers when the glue is dry.


Leave a Reply