Last updated on March 28th, 2025 at 12:33 am
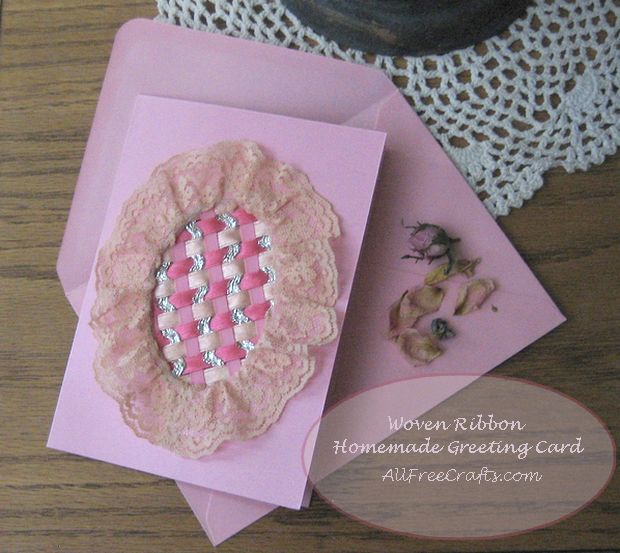
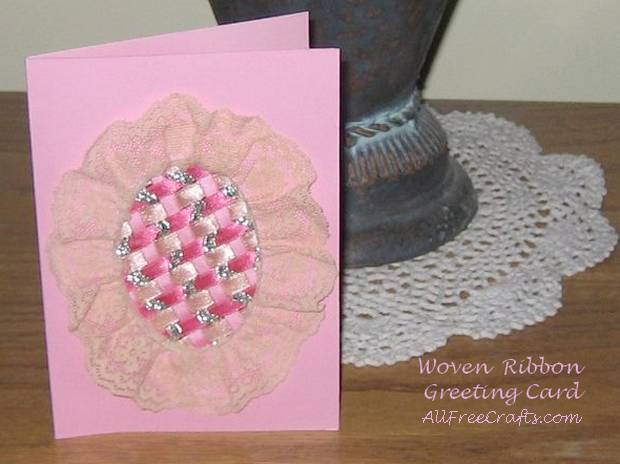
Here’s a homemade greeting card featuring woven ribbons and gathered lace set in an oval, or another shape, cut with scissors from the front of the card. My sample card, with its egg-shaped oval is meant for an Easter greeting card, but the feminine look would work beautifully for Mother’s Day too.
by Jane Lake
What You Need:
- 4.5 inch by 6 inch greeting card and envelope set (or make your own from card stock)
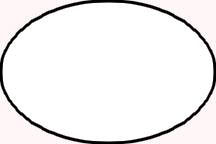
- printable 2 inch x 3 inch oval egg-shape pattern
- 1/4 inch ribbon in dark pink, peach, and light pink (or your choice of color combination)
- silver rick rack or 1/4 inch metallic ribbon
- approximately 8 inches of pre-gathered ribbon, cream or peach
- double-sided adhesive tape
- Tools: printer, paper and ink; pencil, scissors
Support AllFreeCrafts (and satisfy your curiousity) because all of the following projects are free, available right here on AFC, and hopefully pique your interest. Enjoy! Laced Hearts Woven Baskets (great for Valentines or Christmas tree ornaments), Paper Doily Sachets, Rose Motif Greeting Card.
Project Instructions:
This homemade card is easier to show than to tell, so I’ve got lots of photos to help with each step.
To begin, print out the oval pattern on computer paper and carefully cut around the outside of the black line.
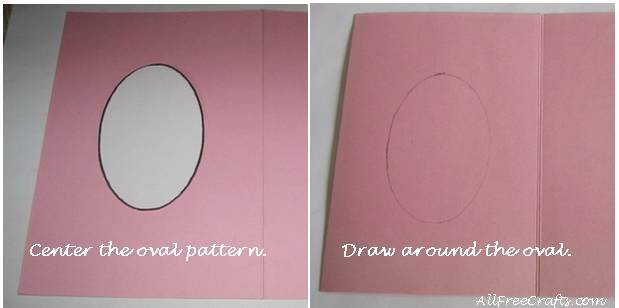
Open the card and position the oval in the center of the left hand side. Make sure the lace will fit all the way around without touching the sides of the card. Hold the paper oval down with one hand and lightly trace around it in pencil.
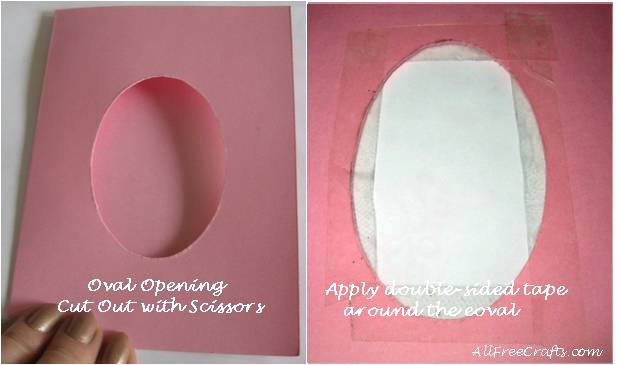
Insert the tip of your scissors inside the oval, near the edge, and cut all the way around the oval. Set the oval shape aside. Run your fingers around the edge of the oval opening in the card to smooth down any rough spots. If it’s not perfect, don’t worry – the lace will cover it in the next step.
Now cut a rectangle of paper just a bit smaller than the card front and slip it inside the card. Use a pencil to trace around the oval and draw it on the paper. Cut out this oval as well. Set the paper aside until you begin the ribbon weaving.
Working on the inside of the card, apply double-sided adhesive tape, as shown, in a rectangle that extends all the way around the oval. Cut away any sections of tape that extend inside the oval.
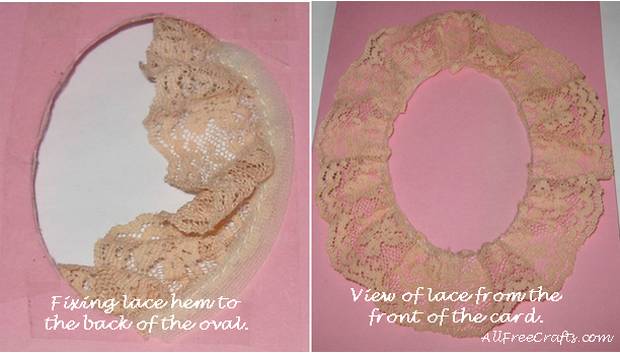
Beginning at the bottom of the oval, press the end of the lace hem into the adhesive tape. Keep pressing the hem against the edge of the oval all the way around, leaving a small overlap at the bottom.
You may need an extra tab of adhesive tape to keep the overlapping lace in place.
Close the card and fold the lace so that it lies flat on the front of the card all the way around the oval. Evenly space four to six small tabs of double adhesive tape beneath the lace to keep it lying nicely against the card without flattening it completely.
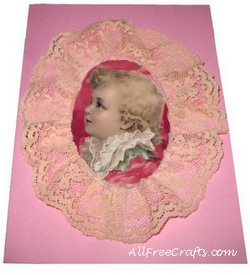
At this point, you could skip the ribbons and use whatever picture you prefer to fill the oval. It’s up to you. But I promised instructions for a woven ribbon card and hopefully you’re still with me here.
Weaving the Ribbons
The ribbons are woven into the oval opening on the paper previously cut to fit inside the card. Open the card, place the paper into position, and check that both ovals line up properly.
Important: Now take out the paper and flip it over. Frame the oval with a rectangle of double-sided adhesive tape, as shown below. Do not extend the tape inside the oval at all. This working area will form the woven design that shows through the front of the card.
Also remember: the back of some ribbons are a slightly different shade than the front. Ensure that all your ribbons have the front towards you as you work.
Begin placing ribbons on the diagonal, beginning at the top and working down. With ribbon edges touching, alternate peach and dark pink colors. Secure the ends of each ribbon by pressing onto the adhesive tape.
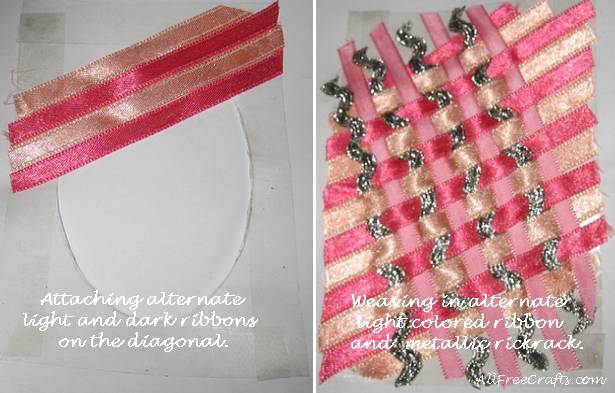
When the oval is covered completely by alternating dark pink and peach ribbon, start weaving in the light pink and silver rick rack, alternating colors and going from left to right.
When working near the edges, you may have to gently loosen some of the lower ribbons from the adhesive tape in order to weave the top ribbon through.
As you progress, gently push each ribbon close to the next one in line before pressing the ends into the adhesive tape to secure.
Completing the Woven Ribbon Greeting Card
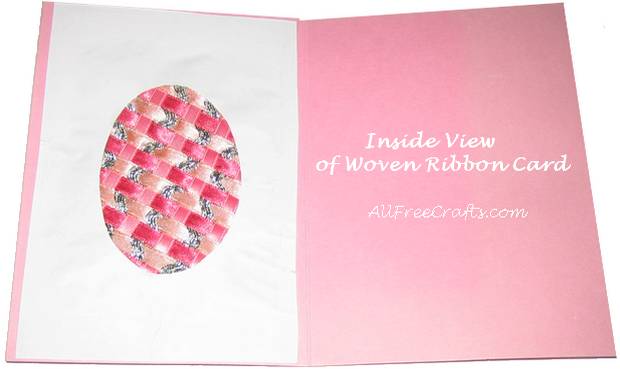
Once the oval is covered with woven ribbons, flip over the paper and align it inside the card. If everything looks good, remove the paper, turn it over, and apply double-sided adhesive tape along all four edges.
Alternatively, you can apply tape to the card itself, placing the strips near the perimeter of the inside front.
Carefully place the woven paper into its final position and gradually smooth down the taped edges, being careful not to wrinkle the paper. If wrinkles do appear, cover them with a fresh piece of paper or thin card stock cut to fit.
Now the unveiling: turn your card over and view the front. Isn’t it pretty? To make it smell sensational too, spritz the ribbons lightly with perfume or apply a small amount of essential oil with the tip of your finger.
If you’re not in too much of a hurry to mail it, add lavender buds to the envelope, enclose the card, and let the lavender infuse the paper and ribbons with heavenly lavender scent for a few days, removing the flowers just before mailing.


Leave a Reply