All Free Crafts

Free Crafts, DIY Projects and Patterns to Make Homemade Gifts

  • Craft Projects
    • Angels
    • Bath and Body
    • Gifts in a Jar
      • The Bakery
      • Soups and Sides
      • Sweets and Treats
      • Pickles and Preserves
      • Decorative Jars and Bottles
    • Paper Crafts
      • Decorations
      • Paper Rolls
      • Paper Plate Crafts
      • Homemade Cards
    • Kid’s Crafts
    • Easy Homemade Gifts
      • Decoupage Crafts
      • Personal Homemade Gifts
      • Candle Making
      • Objets d’art
      • House Gifts
      • Silk and Faux Florals
  • Celebrations
    • Christmas Crafts
      • Santa Crafts
      • Snowman Crafts
      • Christmas Displays
      • Christmas Ornaments
      • Recycled Greeting Cards
    • Easter Crafts
      • Easter Baskets
      • Easter Bunnies
      • Easter Eggs
      • Easter Projects
    • Valentine Crafts
      • Hearts and Crafts
      • Valentines for Kids
      • Romantic Ideas and Projects
      • Homemade Valentine Treats
    • Halloween
      • Pumpkin Crafts
      • Ghosts and Ghouls
      • Witch Crafts
      • Halloween Recipes, Games, Activities
      • Homemade Costumes
    • Thanksgiving
    • Mother’s Day
    • Patriotic Crafts
    • St Patrick’s Day Crafts
  • Patterns
    • Crochet
      • Crocheted Clothing and Accessories
      • Afghans and Blankets
      • Bags, Purses, Wallets
      • Kitchen Crochet
      • Quick and Easy Crochet Patterns
      • Crocheted Toys
      • Vintage Crochet Patterns
      • Filet Crochet
      • Baby Crochet Patterns
    • Knitting
      • Knitting Patterns for Home
      • Knitted Winter Accessories
      • Easy Knitted Gifts
      • Vintage Knitting Patterns
    • Sewing
  • Recycling
    • Cardboard
    • Containers
    • Denim
    • Greeting Cards
    • Household Goods
    • Lightbulbs
    • Recycled Paper
  • Nature
    • Birding
    • Botanicals
    • Bugs and Insects
    • Pine Cone Crafts
    • Shells, Sticks and Stones
  • Gardening
    • Annuals
    • Perennials
    • Clay Pot Crafts
    • Fall
    • Garden Crafts and Projects
    • Herbs
    • Indoor Gardening
AllFreeCrafts » Paper Crafts » Decorations » Stamped Floral Impressions

Stamped Floral Impressions

Sharing is Caring!
PinterestFacebookEmail

Last updated on April 4th, 2025 at 01:04 pm

floral impression framed rose

How to make raised floral impressions for framing with a simple base of toilet tissue. Use a favourite rubber stamp to create the raised impression then paint and frame.

Craft Supplies:

  • Toilet Tissue
  • Rubber Stamp
  • Acrylic Paints – please note that crayons, markers or coloured pencils will work too, but you will need to be a little more careful when using these types of colouring options
  • Suitable sized frame for your impression
  • Towel

Paper projects can be so satisfying! Some editor’s favourites here:

  • Construction Paper Maple Leaf
  • Miniature Paper Gift Bags
  • Crepe Paper Daffodils
  • Paperback Flowers
  • Paper Flowers Bouquet
  • Papered Hearts

Craft Instructions:

To make the picture centre you will need toilet tissue. Layer eight sheets of two-ply tissue, one on top of the other.

You can make these using less or more tissue, depending on the effect you would like to achieve, but start with eight sheets to begin with. If your tissue is on-ply, use 16 sheets instead of eight.

You will need a flat clean working surface for this craft and the best place is your kitchen counter top. Working near the kitchen sink will make your job easier. Take your layer of eight sheets of tissue and saturate them with water. Gently press a little of the water out of the tissue (press against the side of the sink or a bowl). This helps to compress the tissue together.

Place your rubber stamp with the stamp facing up and place your saturated tissue on top of the rubber stamp imprint. With your fingers, gently press the tissue into the stamp design.

Once your tissue has a good impression, place a towel over the tissue and press with the palm of your hand to remove access water from the tissue. Move the towel and press again until no more water transfers to the towel.

Gently peel the tissue away from the stamp and set aside to dry. These impressions must be completely dry before you continue. Disturbing your impressions, while they are drying may damage the impression, so don’t disturb them during the drying process.

Now that your impressions are dry, using acrylic paints, colour in the design of your rubber stamp impression. Do not apply a lot of pressure when colouring your design. You can colour the entire design or just add a little colour to specific areas of your impression. It’s important that very little paint be applied at one time. Dip your paint brush in the paint and then wipe away the excess on a paper towel. Using an almost dry brush, paint the colour onto the paper. Too much moisture will cause your impression to flatten.

You can make these as large or as small as you like. If you don’t have any really neat rubber stamps, you could use an impression from a crystal dish, vase, lamp, etc. Anywhere there is a definite and clear impression and there is no risk of water damage to the piece, there is a rubber stamp replacement.

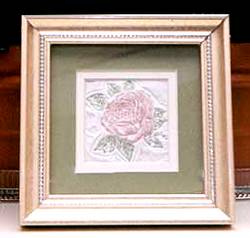
Place your impression in a frame and you are all done.

This frame is about seven inches square and the photo cannot show how truly pretty these are. A grouping of these will look magnificent on a small wall.

Copyright © 1999-2024 Susan Spatone All rights reserved.

Sharing is Caring!
PinterestFacebookEmail

Related Posts:

  • homemade easter tags
    Homemade Rubber-Stamp Embossed Easter Tags
  • stamped snowman card
    Stamped Snowman Cards
  • rubber stamp position tool
    Rubber Stamp Position Tool
  • stamped gift bags
    Rubber Stamped Winter Theme Paper Bags
  • stamp organizer
    Stamp Organizer
  • paper doily sachet
    Paper Doily Sachet

By Jane Lake Filed Under: Decorations

Leave a Reply Cancel reply

Your email address will not be published. Required fields are marked *

Please explore ALL our FREE CRAFTS!

Recent Posts

  • How to Preserve Garden Herbs
  • Easy Willow or Vine Wreath DIY
  • Construction Paper Maple Leaf – DIY plus Video
  • How to Grow Cress Egg Heads
  • Happy Easter Bunny Signs
  • Bread Tag Weatherproof Bird House Roof

Basic Knitted Dish Cloth

Dishcloth – Basic Knitted Dishcloth Pattern

six hand knitted dishcloths is many colors

Free basic knitted dishcloth pattern, very easy to knit in cotton yarn.

...Free Home Knitting Patterns

Build the Right Bird House

How to Build the Right Bird House

build the right birdhouse

How to build the right bird house for the birds you want to attract, including dimensions, entrance hole sizes, check list of tips.

Homemade Hummingbird Food

Hummingbird Food Recipe and Care Tips

hummingbird food recipe and placement tips banner

Homemade hummingbird food; make an ant moat; storage, placement, cleaning and companion flowers.

How to Attract Orioles

Homemade Oriole Food

male Baltimore oriole on orange feeder

Homemade oriole food from a sugar and water recipe; attracting orioles with other foods and nesting materials.

More Birding...

Two Needle Knitted Mittens

free knitting patterns for two needle mittens

Free knitting pattern to make traditional two needle mittens for sizes child to adult.

More Free Winter Knitting Patterns...

Categories

Privacy Policy

Terms of Service

Copyright © 2025 ALLFREECRAFTS.COM