Last updated on October 3rd, 2015 at 11:30 pm
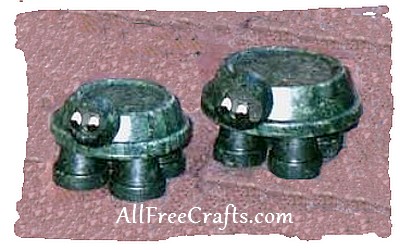
Here’s a great way to recycle leftover clay pots and saucers – make them into this cute terra cotta turtle duo for your garden or porch step.
Craft Supplies:
- 4 inch clay pot saucer
- 6 inch clay pot saucer
- 3 inch round wood disk
- 5 inch round wood disk
- 1 1/2 inch clay pots (8)
- 2 wood balls, flat on one side for faces
- Patio Paints (3 shades of Green, White, Black)
- E6000 Glue or Household Goop
Paint Brush (Flat and Fine liner) - Sea Sponge
- Patio Paint Clear Coat (Optional)
Craft Project Instructions:
Prepare your clay pots for painting, then glue your 3 inch wood disk to the inside of the 4 inch clay saucer.
Glue your 5 inch wood disk to the inside of your 6 inch clay saucer.
Paint your 8 clay pots and wood balls with your darkest shade of green and paint the 4 and 6 inch (including the wood disks) saucers with the lightest shade of green. Allow the paint to dry completely.
Dip your sea sponge into the medium shade of green and dab the paint onto your 8 clay pots and wood balls.
With a clean sea sponge, dip into your darkest shade of green and dab the paint onto your clay pot saucers.
Again, with a clean sea sponge dipped in black paint, dab black paint on all pieces sparingly. Just a tiny bit of black is needed for a little extra contrast.
Now comes the hard part. You need to draw a turtle pattern on the saucers with a mixture of all three colours of paint. Use a flat brush for this project and dip one corner of your brush in the darkest shade of green and the other corner in the lightest shade of green, then dip the entire brush gently into the medium shade of green. Mix the three paints together on a pallet by stroking the brush back and forth about 2 times. You don’t want the paint to completely mix together, you want to see all three shades when applied to the saucer.
Draw turtle shells with your loaded brush on both saucers by painting strokes like a letter U. Pacing your brush at the top of the U and following around to the other side and up to the top of the U. Make this pattern with one single stroke for each shell over the entire outside of the clay saucers. You will see a little of the under finish showing through at all of the edges of your Us. Hopefully, the photo will be clear enough on your computer to see the pattern on the shells. This will help you along.
Allow all your paint to dry and for your final painting step, dip a clean sea sponge in the lightest shade of green and very lightly add a little more texture to the saucers, going over the entire pattern that you just painted. Don’t add so much paint that you cover up the design you just painted but enough to add a little extra texture.
Now you need to glue your turtles together. Glue 4 pots to the wood disks on each turtle (refer to photo for placement) and glue your wood balls to the saucer, referring to photo.
You can paint the faces before gluing your ball to the saucer, but I find that it’s much better to glue the ball first so that you can better judge the placement of the eyes.
To paint the eyes, draw 2 oval shapes using white paint. Allow the paint to dry.
Paint a dot in the bottom lower section of your oval with black paint and allow the paint to dry.
Dab a dot of white paint in the centre of your black dot to add a little extra to the eyes. Allow to dry and then outline the white oval shape with a very fine black line.
I painted a couple of tiny lines for eyelashes and just an upward curved line for the mouth, both using black paint.
If you plan on keeping this little duo outdoors, you may want to add a final coat of clear coat patio paint to the entire painted surfaces for a little extra protection.
.Copyright © 1999-2015 Susan Spatone All rights reserved.
Published with permission from CraftAtHome.com

Leave a Reply