All Free Crafts

Free Crafts, DIY Projects and Patterns to Make Homemade Gifts

  • Craft Projects
    • Angels
    • Bath and Body
    • Gifts in a Jar
      • The Bakery
      • Soups and Sides
      • Sweets and Treats
      • Pickles and Preserves
      • Decorative Jars and Bottles
    • Paper Crafts
      • Decorations
      • Paper Rolls
      • Paper Plate Crafts
      • Homemade Cards
    • Kid’s Crafts
    • Easy Homemade Gifts
      • Decoupage Crafts
      • Personal Homemade Gifts
      • Candle Making
      • Objets d’art
      • House Gifts
      • Silk and Faux Florals
  • Celebrations
    • Christmas Crafts
      • Santa Crafts
      • Snowman Crafts
      • Christmas Displays
      • Christmas Ornaments
      • Recycled Greeting Cards
    • Easter Crafts
      • Easter Baskets
      • Easter Bunnies
      • Easter Eggs
      • Easter Projects
    • Valentine Crafts
      • Hearts and Crafts
      • Valentines for Kids
      • Romantic Ideas and Projects
      • Homemade Valentine Treats
    • Halloween
      • Pumpkin Crafts
      • Ghosts and Ghouls
      • Witch Crafts
      • Halloween Recipes, Games, Activities
      • Homemade Costumes
    • Thanksgiving
    • Mother’s Day
    • Patriotic Crafts
    • St Patrick’s Day Crafts
  • Patterns
    • Crochet
      • Crocheted Clothing and Accessories
      • Afghans and Blankets
      • Bags, Purses, Wallets
      • Kitchen Crochet
      • Quick and Easy Crochet Patterns
      • Crocheted Toys
      • Vintage Crochet Patterns
      • Filet Crochet
      • Baby Crochet Patterns
    • Knitting
      • Knitting Patterns for Home
      • Knitted Winter Accessories
      • Easy Knitted Gifts
      • Vintage Knitting Patterns
    • Sewing
  • Recycling
    • Cardboard
    • Containers
    • Denim
    • Greeting Cards
    • Household Goods
    • Lightbulbs
    • Recycled Paper
  • Nature
    • Birding
    • Botanicals
    • Bugs and Insects
    • Pine Cone Crafts
    • Shells, Sticks and Stones
  • Gardening
    • Annuals
    • Perennials
    • Clay Pot Crafts
    • Fall
    • Garden Crafts and Projects
    • Herbs
    • Indoor Gardening
AllFreeCrafts » Halloween » Pumpkins » Jolly Golly Doll

Jolly Golly Doll

Sharing is Caring!
PinterestFacebookEmail

Last updated on September 6th, 2015 at 07:45 pm

pumpkin doll

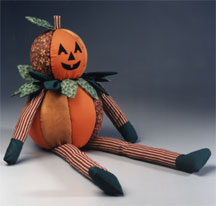
Jolly Golly Pumpkin Doll

By Kathleen George

You will need to download our Free PDF Pumpkin Doll Pattern to make this project.

Supplies:

STYROFOAM* Brand Products:

— 1 Ball, 5″
— 1 Ball, 6″

Other Materials:

— 1-1/4 yd. fabric, of each of the following: orange, tan and print for body; orange stripe for arms, legs and stem; green and green print for leaves.
— Batting
— Fiberfill
— Black felt
— Thread, to coordinate with fabrics
— 1-1/2″ wooden dowel, 3″ long
— Rubber bands
— tracing paper
— Pencil
— scissors
— serrated knife
— Permanent marker
— Putty knife or thin-edged table knife
— Tacky white glue and/or low temperature glue gun and glue sticks

Instructions:

1. Place four rubber bands around 6″ ball, dividing ball into four equal sections; mark lines with a sharp pencil. Repeat, dividing sections again, so ball is now divided into eight equal sections. Repeat with 5″ ball, dividing it into four equal sections.

2. Cut a 3/8″ slice from top and bottom of 6″ ball; cut a 3/8″ slice from bottom of 5″ ball. Redraw the lines that were sliced off, and then firmly score all lines with the tip of the pencil. Using the tip of a pencil, create a hole 1/2″ wide and 1/2″ deep in the center of top of the 5″ ball and the bottom of the 6″ ball.

3. Using Pattern A, cut out four pieces of batting for 5″ pumpkin; using Pattern C, cut eight pieces of batting for 6″ pumpkin. Glue batting to the center of each section.

4. Using Patterns B and D, cut fabric pieces for pumpkins: For 6″ pumpkin, cut four orange, two tan and two print pieces; for 5″ pumpkin, cut two orange, one tan and one print.

5. Working on one section at a time, center fabric piece over batting and “tuck” fabric edges into scored lines. To tuck the fabric, position the putty knife on top of the fabric and directly on the scored line, then gently push the excess fabric into the foam. Tuck one side and then the other, keeping the tension as even as possible between the two sides. Trim excess fabric. Once all sections are covered, push excess fabric into holes or if there is no hole, glue flat to the bottom or top of the pumpkin.

6. Make leaves: Using Pattern E, cut out 16 dark green leaves and 26 print leaves. Sew with 1/4″ seam and leaving bottom edge open (you should have 21 leaves). Trim close to seams and turn right side out; press. Gather several leaves at the open end to add dimension. Glue 20 leaves around top of 6″ pumpkin (see photo); save one leaf for pumpkin head.

7. Insert dowel 1 1/2″ deep into top of 6″ pumpkin; remove dowel and add glue to hole. Repeat, inserting dowel into bottom of 5″ pumpkin. Spread glue on dowel and on bottom of 5″ pumpkin. Insert dowel in holes and press two pumpkins together.

8. Arms: Cut two 6 1/2″ x 2 1/2″ pieces of striped fabric (arms) and two 2 1/2″ squares of green fabric (hands). Sew green hand to striped arm with a 1/4″ seam. Press seam open. Fold the arm in half lengthwise with right sides together. Sew 1/4″ seam, rounding the corners of the hand and leaving the end open at top of arm. Clip and turn arms; press and lightly stuff with fiberfill. Glue on arms, positioning close to neck and under leaves.

9. Legs: Cut two 11 1/2″ x 4 1/2″ strips of striped fabric (legs); cut feet from green fabric using Pattern F. Sew foot to leg with 1/4″ seam. Press seam open. Fold leg in half lengthwise with right sides together. Sew 1/4″ seam, leaving top of leg open. Trim seam and turn; press and lightly stuff with fiberfill. Glue legs to bottom of 6″ pumpkin.

10. To make stem, cut a 1 1/2″ x 1″ piece of striped fabric. Fold lengthwise with right sides together. Sew 1/4″ seam, leaving one end open. Trim seam, turn and lightly stuff with fiberfill. Place generous amount of glue in the hole at the top of head; push and twist stem firmly into hole. Insert remaining leaf next to stem.

11. Using patterns, cut facial features from black felt, or, design your own face. Glue features to face.

12. To finish, cut a 3 1/4″ circle from felt; glue to bottom of pumpkin.

*Trademark of The Dow Chemical Company. Project reprinted courtesy of The Dow Chemical Company, Manufacturer of Genuine STYROFOAM(R) Brand Foam.

Sharing is Caring!
PinterestFacebookEmail

Related Posts:

  • styrofoam pumpkin garland
    Styrofoam Pumpkin Garland
  • styrofoam pumpkin
    Pumpkin Patch Teddy
  • terra cotta pumpkins
    Terra Cotta Mosaic Pumpkins
  • feltpumpkinppl
    Felt Pumpkin People
  • decoupaged styrofoam mini pumpkins
    Decoupaged Mini Pumpkins
  • standing styrofoam angel
    Styrofoam Angels

By Jane Lake Filed Under: Pumpkins Tagged With: styrofoam

Leave a Reply Cancel reply

Your email address will not be published. Required fields are marked *

Please explore ALL our FREE CRAFTS!

Recent Posts

  • How to Preserve Garden Herbs
  • Easy Willow or Vine Wreath DIY
  • Construction Paper Maple Leaf – DIY plus Video
  • How to Grow Cress Egg Heads
  • Happy Easter Bunny Signs
  • Bread Tag Weatherproof Bird House Roof

Basic Knitted Dish Cloth

Dishcloth – Basic Knitted Dishcloth Pattern

six hand knitted dishcloths is many colors

Free basic knitted dishcloth pattern, very easy to knit in cotton yarn.

...Free Home Knitting Patterns

Build the Right Bird House

How to Build the Right Bird House

build the right birdhouse

How to build the right bird house for the birds you want to attract, including dimensions, entrance hole sizes, check list of tips.

Homemade Hummingbird Food

Hummingbird Food Recipe and Care Tips

hummingbird food recipe and placement tips banner

Homemade hummingbird food; make an ant moat; storage, placement, cleaning and companion flowers.

How to Attract Orioles

Homemade Oriole Food

male Baltimore oriole on orange feeder

How to make homemade oriole food nectar from a sugar and water recipe, plus how to attract orioles with other foods and nesting materials.

More Birding...

Two Needle Knitted Mittens

free knitting patterns for two needle mittens

Free knitting pattern to make traditional two needle mittens for sizes child to adult.

More Free Winter Knitting Patterns...

Categories

Privacy Policy

Terms of Service

Copyright © 2025 ALLFREECRAFTS.COM