Last updated on August 21st, 2014 at 12:13 am
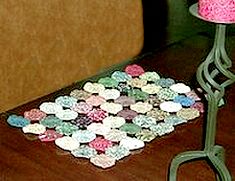
Yo Yo Placemat
How to Make a Scrappy Yo-Yo Placemat
by Lesley Dietschy
Create these charming placemats for your dining room or kitchen table using handmade Yo-Yos. It’s a great project to use up your fabric scraps or you can buy fabric to match your decor.
Placemat Dimensions:
12″ wide x 18″ long (approx.)
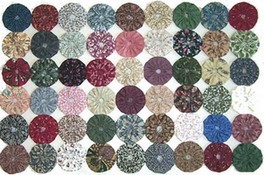
54 Yo-Yo’s needed to make one placemat
Supplies:
- 4 inch circle template (cut from plastic or cardboard)
- 100% cotton fabric scraps
- tracing pen or pencil designed for marking on fabrics
- quilting thread
- invisible thread
- hand sewing needle
- scissors
- thimble
Craft Instructions:
1. Using a fabric marking pen or pencil, trace desired amount of circles onto wrong side of fabric being used. Cut out circles.
2. Thread a needle with about 10″ of quilting thread and double knot one end.
3. Hold a 4″ circle with the wrong side of the fabric facing you. Fold 1/4″ of the circle’s raw edge toward the wrong side of the fabric and secure it with a running stitch close to the fold. Continue folding and stitching around the entire circle.
4. When you reach the beginning point, gather stitches tightly. Be sure that the right side of the fabric is on the outside of the yo-yo.
5. Smooth and flatten yo-yo so the hole is in the center.
6. Knot and cut off excess gathering thread.
7. Join the Yo-Yos together where they touch with a few whip stitches using Invisible Thread.
Tips:
Make sure to use a strong quilting thread. You do not want the thread to break when you gather the fabric.
Start the first stitch underneath the folded edge to hide double knot.
The top side of the Yo-Yo is the side with the hole in the middle.
Put Your Skills to Use:
1. Using a 4″ circle template, trace and cut out 54 circles of desired fabric.
2. Make the yo-yos as described above.
3. Once all 54 yo-yos are made, arrange the yo-yos in 6 rows and 9 columns until desired design. Tip: If using scrappy fabrics, try not to place yo-yos together that are similar in color.
4. Join yo-yos together as described above.
5. Repeat instructions for each placemat.
Variations:
Yo Yo Mat
Try using smaller circle templates which will make smaller yo-yos. Please note: the smaller the yo-yo, the more yo-yos you will need to complete the project.
Arrange yo-yos in different designs. i.e. create a square within a square look simply by using 3 colors. One color for center yo-yo, one color for inside square, and one color for outside square. Make a wall hanging using the same technique with fabrics to compliment your home decor.
Care and Use:
It is not recommended to use these decorative placemats for everyday dining. To clean placemats, hand wash using a gentle soap like Woolite and rinse with cold water.


Leave a Reply