Last updated on August 20th, 2014 at 08:23 pm

Recycled T-Shirt Pillow
Recycle Your Favorite T-shirt into a T-Shirt Throw Pillow
Free sewing pattern courtesy of Savvyseams
Is your favorite shirt getting worn out? Have a tee with a cute design that just doesn’t fit right? Make an easy (and super soft) cover for a throw pillow for the futon, bed, couch or chair. 
Materials:
– A t-shirt
– A throw pillow sans cover (you can find these cheap at a fabric or crafts stores)
– Invisible zipper at least 1″ longer than one side of the pillow (and invisible zipper foot – available at any store with invisible zippers – they fit almost all machines and are usually $1-2 dollars)
– Needle for knits, thread, sewing machine, iron
– Chalk pencil or washable fabric marker
Get Started
Step 1:
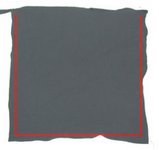
Mark cutting lines on the shirt with chalk or washable fabric pen. To decide the size you need, take the dimensions of the pillow and about 1/2″ on each side for seam allowance, plus about 1/2″ ease. So add 1.5″ to each dimension. If your design is not printed straight with the grain (as mine was), you will have to decide whether to make your cutting lines square with the design or the grain. I suggest squaring the lines with the design – the slight skewing of the grain will be less obvious than skewing the design.
 Make sure the shirt is laying completely flat and pin the back and front together, so you only have to cut once. (Alternatively, if there is a design on the back you wish to preserve, you can cut the shirt open at the side seams and cut out the back separately).
Step 2:
Cut along the lines you drew.

Step 3:
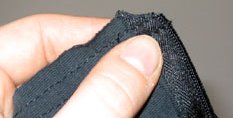
Separate the two layers of fabric, and stay stitch along the edge of the each piece where you will install the zipper (in the example, the zipper it sewn into the bottom seam).
 Step 3 con’t:
The stay stitching should be less than 1/2″ away from the edge of the fabric. Be sure to use a knits needle (or your machine may jam) and take care not to stretch or scrunch the fabric while stay stitching.
 Step 4:
Open the invisible zipper, and press the coils out. Follow the instructions included with your zipper, if there are any.
Step 5:
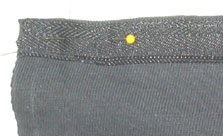
Remember RIGHT SIDES TOGETHER: Pin the open invisible zipper to staystitched edge of the front piece. Pin the zipper tape to the fabric (note the coils are to the inside, not along the fabric edge).
 Step 6:
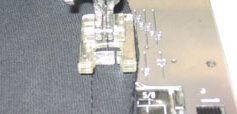
Attach the invisible zipper foot to your machine. Make sure the needle is lined up in the center of the hole. The bottom of the foot is “M” shaped, and the point in the middle keeps the coils open so zipper can be sewn in right next to the coils. The zipper coils are fed through on the right or the left of the middle point. The degree of “invisibility” of the invisible zipper depends greatly on how close you can sew to the coils — so be sure to press those coils out, but don’t hit them with your needle! Also be sure to backstitch at the beginning and end of each line of stitching. Your zipper should be as long or longer than the length of the pillow front piece.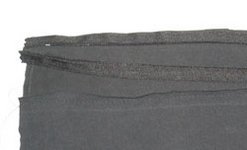
Step 7:
Line up the zipper for the other side. This can be confusing; just remember the mantra RIGHT SIDES TOGETHER. It may help to lay the pillow back over the front, right sides together, as above.
 Step 8
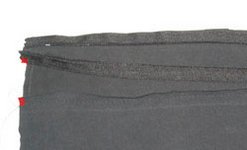
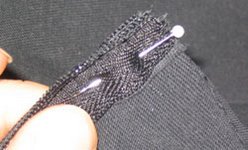
Take the corner of the back piece and the corner of the zipper marker with the red dot (make sure there are no twists in the zipper!) and pinch them together.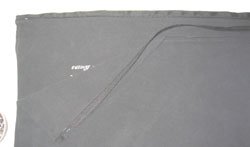
Step 9
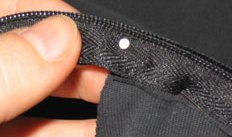
Then fold this corner back. The zipper tape should be flush with the edge of the fabric, on the right side, with the coils towards the inside. Now pin it in place. Make sure you line up the zipper tape the same way as you did for the front piece, otherwise your zipper will be crooked when zipper up.
 Step 10: Sew the other have of the zipper to the back as you did for the front piece in step 6. When zipped up, all you should be able to see is a seam and a zipper pull.
 Step 11:
Open the zipper about half-way, and line up the sides and top of the pillowcase with the right sides together. Fold the zipper in half so the coils are at the very bottom, and pin in place.
 Step 12:
Fold the zipper in half on the other side too, with the zipper coils at the very bottom.
 Step 13:
Sew the sides and top closed with a 1/2″ seam allowance. When you get to the zipper, you can most likely sew over the coils and backstitch over them to secure the ends. Be careful not to break your needle, though. If you want to play it safe, end the machine stitching just short of the zipper coils and finish the last 1/4″ by hand.
 Step 14:
Sew a line of reinforcement stitching just outside of the original stitch line for the sides and top, if desired.
 Step 15:
Clip the corners, especially the corners with the zipper.

Step 16:
Turn right side out and put in the pillow.
 Step 17:
Zip up that zipper and commence snuggling.
 Copyright 2004-2006. Some rights reserved. This free sewing pattern is licensed under a Creative Commons License. All patterns and information provided by SavvySeams are for use at your own risk. No guarantees are made and SavvySeams assumes no responsibility or liability for use of our patterns. If you are unsure of a pattern or technique test it first on muslin or scrap fabric.
Remember: never sew over pins!


Leave a Reply