Last updated on November 19th, 2019 at 09:32 pm
This free shopping bag sewing pattern makes a fabric version of a paper grocery bag, with easy measurement, cutting, and sewing instructions.
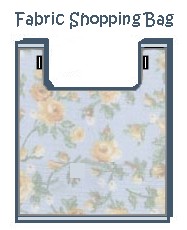
Home Sewn Shopping Bag
How to Sew a Fabric Shopping Bag
It seems that every time I turn around, I’m being handed another silly plastic shopping bag. I have lots of places to recycle them (reuse them, actually) – the library takes them, etc., I still get tired of dealing with them. Invariably, I collect several bags stuffed with other bags before I remember to take them to the library, and that’s just wrong.
I know a lot of people carry their own tote bags, and I have a couple of them, but I often end up with five or six bags’ worth of groceries, and tote bags aren’t that convenient to load. So I looked more closely at one of the ubiquitous plastic bags here at Silver Seams World Headquarters, and realized it would be really, really easy to sew.
A serger (overlocker, for non-USAns) helps here, but isn’t necessary.
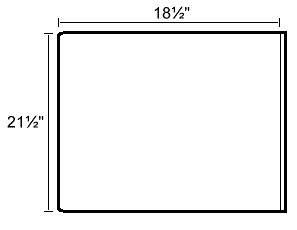
Take a piece of fabric, 37 1/2″ wide by 21 1/2″ long.
Fold it in half long-ways, and stitch the side closed.
I assume 1/4″ seams here, but it’s not critical.
If you sewed it right sides together (RST), turn it now – but you can just leave the seam inside the fold.
These are utilitarian, not beautiful.
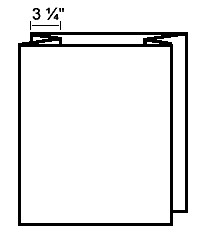
Now fold in the sides slightly over 3″.
Now is where you’d tuck that seam in, but it doesn’t matter.
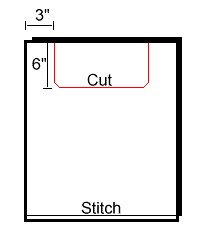
Now sew across the bottom. This seam goes on the outside, no doubt about it.
If you’re using a conventional machine, you might want to zigzag stitch the seam allowance to cut down on fraying.
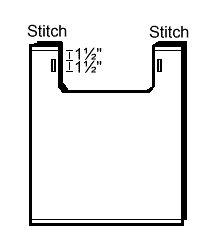
Then cut the bag opening out.
You’ll want to catch the inside fold too, otherwise your handle won’t have a hole in it.
It’s probably best to finish the raw edges of the handle area first, before sewing the “shoulder” seams of the handles. You can use an overlock stitch, zig-zag stitch (multiple times is best) or go all-out and put bias tape on them. Then, keeping the folds in place (you’re sewing through four layers), stitch across the handle seams. You may want to open up the handles, press the seam allowance to one side, and sew it down. This seam takes a lot of weight, remember.
If you want to get really fancy, you can sew “buttonholes” and thread your bags onto the metal arms just like the plastic bags go, but that’s four buttonholes (don’t buttonhole-stitch your handles closed!) when you could just hang the bag on the handles instead.
All done… now when they ask “Paper or plastic?” you can answer “Fabric!”
Copyright © 2006 Silver Seams.com


Barbra says
Thank You.
Barbra says
Hi, can you tell me the finished size of this tote…width, height and depth.
Jane Lake says
Hi, Barbra, I’m not sure of the exact dimensions. I followed the pattern some years ago, but made one slightly smaller. The original was based on a plastic shopping bag but they vary too.