Last updated on October 11th, 2015 at 12:47 am

How to Sew Your Own Christmas Tree Skirt
by Diane Ellis
Making your own Christmas Tree Skirt is simple, and can be done as a project for the whole family to enjoy together.
Editor’s Note: I was unable to find a picture of the finished Christmas tree skirt pattern outlined in this article, but you can see from the Christmas Tree Skirt Kits available from Amazon (some are shown at right), what beautiful effects can be achieved by sewing a simple circle shape in plain or seasonal fabric, embellished with felt shapes, cross stitch, embroidery, or other decorations personalized for your family.
Fabric
Good fabrics to choose are plain cottons (red, green or white), or you can buy special Christmas prints in a range of fabrics including cottons and plush velvets. You can even choose contrasting colours for top and bottom.
Depending on the thickness of your fabric, you may also need some heavy interfacing to sit between the two fabric layers. If using cotton for top and bottom layers, I would definitely recommend using some interfacing between these.

For a 6′ tall tree, your skirt should be at least 44″ round (or 112cm). You will need two circles of fabric, so you will need 2½ yards of fabric (assuming the bolt of fabric is at least 44″ wide) – or 1-1/4 yards of each if using contrasting fabrics top and bottom. In metric you will need 2½ metres of fabric (assuming the bolt is at least 112cm wide) or 1-1/4 metres of each if using contrasting fabrics top and bottom.
Don’t worry about seam allowance, as we will be finishing all edges off with ribbon or bias tape (see Notions section below).
Notions
We will need ribbon or bias binding tape to finish off all of our edges. The ribbon or tape needs to be a minimum of 1″ wide but can be up to 2″ wide (minimum 2½cm up to 5cm), and we will need 6 yards of ribbon or tape (or 5-1/2 metres).
For closures, I recommend using Velcro tape – ½ yard will suffice (1/2 metre).
If you have bought plain fabrics, you may also want to consider buying some coloured felt, so that you can cut out and sew on colourful Christmas shapes such as angels, Christmas trees, stars, snowmen, and, if you are particularly crafty, perhaps even Santa and some reindeer.
Drawing Your Pattern
The trickiest part of this is drawing out the circle. What I have found works for me is to tie my tailors chalk pencil to a knitting needle (use one of your children’s coloured pencils in a contrasting colour to your fabric if you don’t have tailors chalk). Now the length of the string is important! That’s what determines the size of your circle. The amount of string between your pencil and the knitting needle needs to be 22 inches (or 56cm) – or as near as you can get.
If using one piece of fabric, fold in half with right sides together, and, using your measuring tape, find the exact centre of the material. Mark the centre with an “X”. If you are using two pieces, I recommend you do this separately for each piece of fabric.
I also suggest you weight down the 4 corners of your fabric with some heavy tins or books, as you want the fabric to be taut, and to not move as you draw your circle. If you can talk some family members into holding the fabric for you – so much the better!
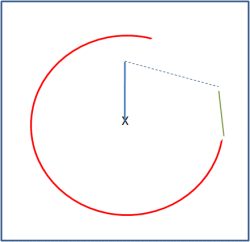 Now place the pointy end of the knitting needle in the centre of the fabric, and extend your pencil to the end of the string. Now smoothly draw your circle on the fabric. Don’t forget to turn the knitting needle as you draw the circle, otherwise you will end up wrapping the string around the needle and your circle won’t be perfect!
When the circle is done, draw a straight line across the very centre of your circle. Now we want to draw a 4″ (10cm) circle in the very centre of our larger circle (for the Christmas tree trunk). Mark off on your straight line 2″ (5cm) each way from the centre, and using a plate or bowl as a guide, draw your 4″ (10cm) circle.
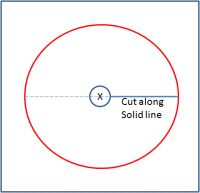 Finally, we need to cut an opening in the skirt and cut out the middle small circle. Cut along the straight line we drew earlier up to the inner circle, and then cut out the inner circle. Do not cut the material in half, only cut one side and the inner circle. Now cut away the excess fabric from the large circle.
To Make
Place your top fabric piece right side down on your table. If you have interfacing, place this on top now. Now place your bottom fabric right side up on top of the other fabric pieces. Make sure all of the edges are aligned.
We are now going to pin on the ribbon or bias binding tape. Start at one of your outer edges where we cut the opening on the skirt. Fold the ribbon evenly over the edges of your fabrics and pin the ribbon or tape so that the pin goes through the ribbon on both sides of the fabric. Continue this all around the outer edge of the skirt. When you reach the other outer end of the skirt, snip the ribbon to fit.
Stitch this section of ribbon or tape in place.
Now, using the same technique, pin the ribbon along the cut edges of the skirt, and around the inner circle, and back down the other cut edge. You should be able to do this in one piece. Snip the ribbon to fit. Before you sew on the ribbon, cut of two pieces on the Velcro fastener, about 2″ (5cm) each. Pin this on the opposing cut edges so that they will fasten neatly and keep the skirt closed when it on your tree.
Stitch in place. If you have used a patterned fabric, your Christmas Tree Skirt is now complete!
Decorating Your Christmas Tree Skirt
If you have used plain fabrics, why not decorate it now by cutting out and sewing on angels, stars, Christmas trees, snowmen, Christmas parcels, holly, perhaps even Santa Clause. You can use felt or coloured cotton fabrics.
Or, if you are not that crafty, why not consider pinning on some small plastic or wooden decorations! Or use some fabric paint and write your own Holiday Message.
About the Author:
Diane Ellis sews purely for friends and family, and enjoys making her own patterns, and using her skills to decorate her home. She is the co-author of Sewing4Dummies.com where, for a limited time, you can sign up for a free 6 part sewing course called Easy Fun Sewing Projects.


Leave a Reply