Last updated on December 26th, 2015 at 12:39 am
 How to Make Pretty Tin Can Storage Containers
by Twila Lenoir
Practical and pretty, and costs next to nothing to make!
Craft Supplies:
- tin cans in assorted sizes
- wallpaper remnants, scrapbook paper, gift wrap paper or fabric
- wooden coat rack, or a piece of wood that is long enough to hang all your cans
- ribbon
- 2 part epoxy glue
- acrylic craft paint
- two 1-1/2″ saw tooth picture hangers
- craft glue
Instructions:
First, take the labels off the cans carefully; these labels will be your templates.
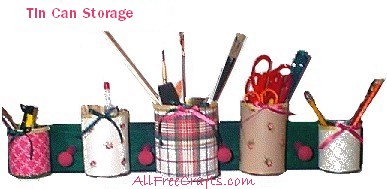
Wash and dry the cans thoroughly. I used a big tomato puree can for the middle canister, corn and string bean cans to the right and left, while the smaller cans held tomato sauce and mushrooms.
Take your label templates and trace them onto wall paper, paper, or favric – whatever you want to use to cover the cans. I used assorted wallpaper remnants. Cut out each traced template and glue around your cans. Let dry.
While the cans are drying, you can sand the piece of wood and wipe off any wood dust. Paint the wood in your choice of colors and let dry.
You can seal the wood that you painted with a spray or brush on sealer. I didn’t because I might want to change the colors from time to time.
Hammer the hangers on the back of your wood, one on each side.
For each can, I glued a matching ribbon around the lip of the can, with each end meeting in the front. I then made a matching ribbon bow and glued that on to cover the first ribbon ends.
I tried to screw the cans on the wood, but I couldn’t do it for the life of me, so I used my old faithful – my 2 part epoxy. I swear by this stuff. I just mixed the two parts as directed and glued the can to the wood.
Now when glue has dried, hang your new art supply storage unite on the back of the door or wall where you need it to go. I love catch alls, and these keep dangerous items safely away from my little guy.
Suggestion:
If you are able to purchase the coat rack as I have used, I was thinking that you can glue clothespins on the pegs and then you can use the clothespins to hang craft instructions or even items that need drying.


Leave a Reply