Last updated on May 29th, 2020 at 11:41 am
Stick Weaving: How to make Ojo de Dios or God’s Eyes
by Jane Lake
A primitive form of star weaving, reminiscent of a dreamcatcher, Ojo de Dios, or God’s Eyes, can be as simple or as complex as you wish. Quick and easy, they are attractive as a single dramatic wall accent or a mobile for a child’s room.
These are easy enough to make a good kid’s craft or group activity, with inexpensive materials and highly satisfactory results. Just follow the step by step photos and instructions below.
Ojos de Dios
General Instructions:
Ojo de Dios, or God’s Eyes, are commonly made by the Huichole Indians of Mexico, but are also found in Africa and in the East. Originally, they symbolized the loving eye of a god and they were often made for each year of a child’s life up to age five. Today, Ojo de Dios remind us of God’s watchful love, and are enjoyed for their use of colour and texture. They are also easy and cheap to make. This is a great chance to use up scrap yarn.
You can choose from a wide range of materials for this project and make them as simple or as complex as you wish. Tiny versions, suitable to hang on a Christmas tree, are readily made with toothpicks and embroidery floss. Craft sticks, or popsicle sticks, and medium weight yarn make a good child’s project.
Sticks from a willow, birch or other shade tree will create a less geometric shape, and take more experience, as the knolls of the branches must be covered neatly, and require skill in applying the right tension to the yarn. The lack of uniformity is appealing, however, as every Ojo de Dios is slightly different from the rest.
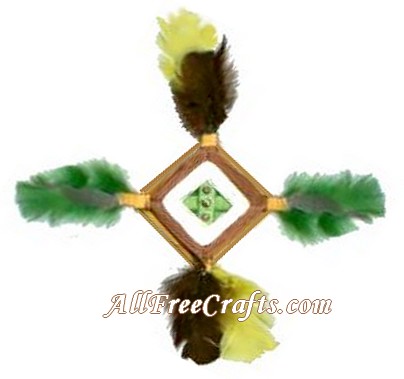
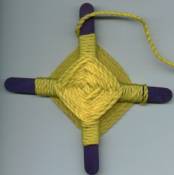
My instruction sample was made with craft sticks and yarn.The Ojo de Dios pictured at the beginning of the article was made of craft sticks, embroidery floss, and feathers.
When you have learned how to make Ojo de Dios, consider adding feathers, beads, buttons, acorns, seeds, bells, sequins, or other creative embellishments.
What You Do:
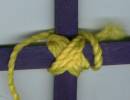 1. Select your base sticks and place them in a cross shape. Put a noose knot in the first yarn and tighten it around the intersection of the sticks. Wind the yarn in a figure eight
 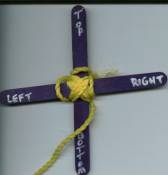 around the intersection (I found this technique worked on the bamboo skewers but not on craft sticks), or alternatively wind the yarn several times, first from right to left diagonally, then from left to right. You want to cover the center of the sticks as shown here in Fig.1 (at left).[clear]
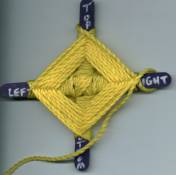
 2. Now begin weaving your first round. I worked anti-clockwise, moving the yarn behind the top stick, back over the top stick, behind the left stick, over the left stick, behind the bottom stick, over the bottom stick, and behind and over the right stick to complete one round. See Fig.2 (at left) and Fig. 3 (at right).[clear]

 3. Continue in the same way to complete as many recessed rows as you like (Fig.4 at left). Many Odo de dios are done completely in recessed rows, which show the shape of the sticks. However, I alternate recessed and raised rows. To do this, you need to reverse direction. Basically, I reverse, and turn my work over, so I am working on the back. This creates a raised row on the front. See Fig. 5 (at right).[clear]
Raised rows are formed in Fig.6 (far left) and you see a rear view of the work in Fig. 7 (far right).
[clear]

 4. Change colors by knotting the new color to the old one, so the knot forms on the back of the sticks. Do not clip off the old color until you’ve worked over it for a few rows and you’re confident the knot is secure. Fig. 8 (near, left) and Fig. 9 (near, right) show a front and back view of the new colored rows taking shape.[clear]

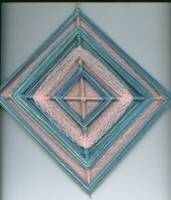 5. I reversed again with the new color, and you can see the finished Ojo de Dios sample in Fig.11 (at left). On the right, another completed God’s Eye in different colors of yarns, using kebab skewers as the base.[clear]
Jay Mohler has a great Ojo de Dios site, with beautiful photos of his own designs, plus instructions on Making your own 8 sided Ojo de Dios. This is a wonderful site for those who wish to make more complex Ojo designs.


Leave a Reply