Last updated on October 16th, 2015 at 09:26 pm
Free Lavender Crafts: Lavender Wands and Lavender Bottles.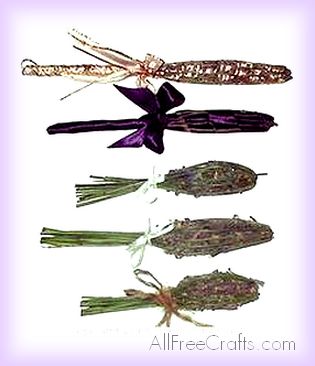
by Jane Lake
Ladies have been making lavender wands and lavender bottles for centuries.
They are simple to make, and you’ll find step-by-step photos to follow right on this page. Use the finished lavender wands or lavender bottles just as you would a scented sachet.
If you like this lavender craft, you may also enjoy making a Lavender Fan or Lavender Recipes.
Project Supplies:
For each lavender bottle, all you will need is about 13 or 14 lavender flower stems, with the stem, measured from the bottom of the flower bud, being at least six inches long. You’ll also need either thin twine or thin ribbon to tie.
For the lavender wands, you will need 13 long stemmed lavender flowers and your choice of thin ribbon. The ribbons shown in our two samples are about 1/2″ wide, but narrower ribbon would work very well – it will just take a little longer to weave.
 How to make Lavender Bottles:
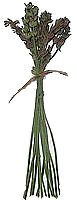
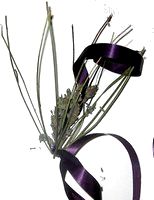
Gather about 13 or 14 lavender flower stems and allow them to wilt for a while, until flexible. Tie in a bunch, with a 12″ length of thin string or twine fastened 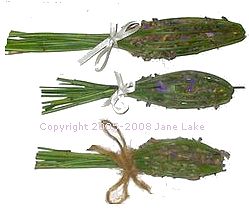 just below the flower heads, as shown in photo at far left.
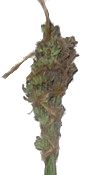
Take one end of the string and wind it clockwise around the lavender flowers, ending at the top. Take the other end of the string and wind it counterclockwise, ending at the top. You will only need to go around the flowers two or three times. Tie both ends of the string together and trim remaining ends. See photo at left for details.
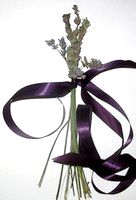
To finish, bend each stem up and over the flower heads. Try to get the stems fairly evenly spaced to create a “basket” effect. Tie the stems together just past the end of the flower heads with string or narrow ribbon, finishing with a small bow, as shown in picture on the right. Cut stems evenly and hang to let the completed lavender bottle dry out completely.
 How to make Lavender Wands:
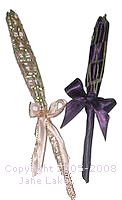
Gather 13 long stemmed lavender flower stems and allow them to wilt for a while, until flexible. Hold the stems together and stagger the flower heads a little to avoid bunching and to lengthen the flower bud shape. Tie a 40″ piece of 1/2″ ribbon just below the flower heads, leaving one end of the ribbon about 10 inches, and the other end about 30″ long, as shown in the photo at far left.
Note: Narrower ribbon, ¼” or smaller, could be used very effectively in this craft. If you do use narrower ribbon, just be aware that you will need a longer length to complete the weaving and make adjustments accordingly.
Fold the shorter length of ribbon up into the flowers, then fold all of the stems up and over the flowers as well, as shown in the photo at left.
Begin weaving the longer ribbon in a simple under and over pattern through the stems. You will need to keep the tension even, and to adjust the placement of the stems to keep them evenly spaced, especially on the first two rows of the weaving pattern.
Push in the loose ribbon end and any stray lavender buds as you work, increasing the tension as you get toward the end of the flowers to close in the wand.
When you have finished weaving, tie the two ribbon ends together to secure. You can now finish the lavender wand in a number of ways – you can simply tie a bow in the two ends of the ribbon and even off the stems, leaving them in a natural state. Or, if you have enough ribbon left, you can wind it around the stems in a spiral, bringing it back up to tie in a ribbon with the shorter ribbon end, as shown in our examples at right. Or you can tie the ribbon in a long loop for convenient hanging.
Once you have made one lavender wand, you can experiment…try weaving over and under two stems placed together, or varying the weave design. Try different widths and types of ribbon…regardless of the end result, you are sure to find a use for every lavender wand that you produce.
Suggested Uses for Lavender Bottles or Wands
 Lavender Practical Inspirations for Natural Gifts, Crafts and Displays using Lavender
- Try hanging several lavender bottles in your clothes closet
- Hang just one around the neck of a clothes hanger to imbue your favorite blouse with a delicate scent of lavender.
- Tuck several lavender wands in your lingerie drawer or linen cupboard.
- Make lavender wands or lavender bottles to give as gifts. What could be nicer to receive than a specially wrapped gift embellished with a lavender wand…or even better – an entire selection of homemade lavender wands, nestled in an attractive basket or box?
- When the lavender fragrance begins to fade, renew it with a drop or two of Lavender Essential Oil
.


julia tuck says
hi, could you tell me if i can have emails of your crafts each time a new one is on this site, thank you