Last updated on October 3rd, 2015 at 11:07 pm
Clay Pot Dragonflies
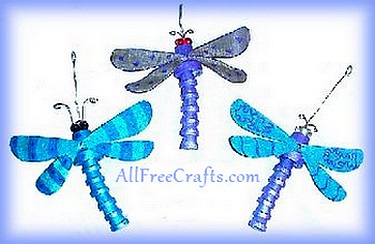
Gina’s Clay Pot Dragonflies
designer: Gina DiCicco
These bright, colorful dragonflies are made from clay pots with wire mesh wings. They would look wonderful in the garden, especially if you set them “flying” near a garden pond, but they would also bring a spot of unusual color and whimsy to a sunroom or sunny window.
Craft Supplies:
- one 1 inch clay or wooden flowerpot
- six ½ inch clay or wooden flower pots
- 14 inches of 22 gauge copper wire
- 8 inches of 26 gauge copper wire
- 6 x 3 inch piece of fine copper wire mesh
- six 6mm beads
- two or three 8mm beads
- two 8mm beads (eye color)
- metallic paint
Tools:
— round nosed pliers
— wire cutters
— scissors
— needle nosed pliers
— paint brush
— drill with a 1/8 inch drill bit
Instructions:
Paint your pots whatever color you want or leave them plain, let dry. (It may be necessary to drill small holes in the tiny pot bottoms.) Trace a wing pattern on the wire mesh and cut it out. In the back of the 1 inch pot, drill two small holes, one over the other, to fasten the wings on. Feel free to paint and decorate the wings any way you want.
Thread one of the 6mm beads onto the wire and putting the ends together, bring bead to the bottom center. Twists wire a couple of times. Turning a ½ inch pot upside down, thread the two ends of the wire thru the hole in the bottom. Add a bead and thread another pot till all 6 are held together.
Taking the wings and about a 1inch piece of wire, bend it to make a narrow U shape. Place the center of the wings in the U of the wire and thread the two ends into the two holes from the back of the pot. Go inside and twist the wire snugly to attach the wings.
Take the wire threaded with the 1/2 inch pots and thread on the two plain 8mm beads, then put the wire ends thru the bottom of the 1 inch pot. Thread one of the ‘eye’ beads on each of the two pieces of wire and then twist the end once or twice to secure. Separate the wires and trim to about 1 inch or so each. Taking your round-ended pliers, fashion the antennae. Take the 8 inch piece of wire and thread one end between the eyes, bring up and twist to a spiral to be able to hang it. Loop the end around a pencil and twist a loop into it.
More on Dragonflies:
For more information on dragonflies:
Odonato (Dragonflies and Damselflies
Distribution, diversity, identification and photos of dragonfly species around the world.
British Dragonflies Society
Working to conserve dragonflies and their wetland habitats.
Wikipedia – Dragonfly
Definition, description, photos and historical significance of dragonflies.


Jeanie Fosnight says
Where can I find the half inch pots to make the dragonflies?
Jane Lake says
I’ve seen bags of tiny wooden pots at Michaels. Sometimes they are displayed along with miniature furniture for a fairy garden.