Victorian Style Note Holder
This note holder on a wooden plaque is so easy to make that you’ll want to make several, each with a different decorative button, as individual homemade gifts for family and friends.
by Twila Lenoir
Craft Project Supplies:
- 4-1/2 inch oval wood shape (available at craft stores)
- wooden spring-type clothes pin
- fancy button, or crafting button
- acrylic craft paint
- small magnet
- black permanent marker
- strong craft glue
- sealer
Project Instructions:
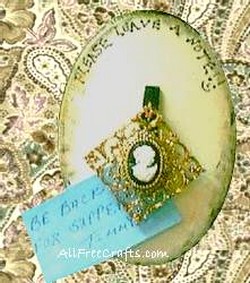
1. Choose a fancy button or crafting button as the main feature of the note holder and use this to pick your paint color scheme. The sample in the photo had a button which featured antique white, black and gold, so those were chosen as the matching paint colors.
2. Paint the front and back in your main color, let dry, then trim around the edge in a contrasting color. Our sample was then left to dry again before gold paint was applied with a dry brush around the black trim.
3. Paint the clothes pin in the contrast color and let the paint dry. Glue the clothes pin to the center of the note holder, with the opening facing down so you can hold notes at the bottom.
4. With black permanent marker, write a message at the top. Our project has “Please Leave a Note” but you may prefer a message of your own.
5. Place a small piece of paper in the mouth of the clothes pin to prevent sealer from seeping in, then spray or paint on a gloss or matte sealer over the entire project.
6. When the sealer is dry, remove the paper from the clothes pin.
7. Glue a decorative button to the front of the clothes pin, far enough down so that it doesn’t prevent you from easily opening and closing the pin.
8. Sign and date the back of your project.
9. Glue a good magnet to the back.


Leave a Reply