How to Make a Homemade Tray from a Document Frame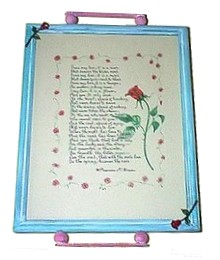
by Twila Lenoir
You may already have an old picture frame lying around that is suitable for this homemade project; if not, you can buy an inexpensive document frame or picture frame from the thrift store or dollar store.
Supplies:
- glass fronted document or picture frame
- four 1 mm round raw wood beads
- acrylic paint in assorted colors
- two popsicle sticks or craft sticks
- picture of your choice, or a printed poem
- card stock or scrapbook paper to print the picturedecorative buttons or charms
- strong glue
- four doll head beads, round wooden beads or maybe even small wooden blocks – whatever you have handy that will work as part of the handle
1. First, choose an appropriate picture or illustrated poem for your tray and print it out on card stock or a pretty scrapbooking page.
2. Take inspiration from the colors in your picture. Pick two or three colors to paint the frame tray, the craft sticks and the wooden beads. Our example uses FolkArt Emerald Green and Raspberry Sherbet. Once the paint is dry, paint a whitewash of white pickling gel all over the frame, then wipe off.
You could also try the directions to make a crackled picture frame for this project.
Sometimes a pretty whitewash can be achieved by watering down white craft paint, painting on and wiping off immediately. Don’t be afraid to experiment! You can always try again if you don’t like the first effect.
3. Once the painted finish is dry, assemble the handle by laying down the craft stick and gluing a 1 mm bead on each end. Let the glue dry, then glue the assembled handle to each end of the frame tray.
4. Glue the larger wooden beads, or blocks, to the back of the frame. You can’t see them in our photo, but the beads used for our tray had to be glued to the heavy cardboard backing in order to allow us to change the picture in the future. Your wooden frame may be different – if you have more room, then glue the small bead “feet” to the wooden frame itself; if not, do what we did and glue them to each corner of the cardboard or hardboard backing.
5. Finally, cut the hanks from the back of the decorative buttons and glue them to opposite corners of the frame tray. We used rose buttons, but you may use any button or charm that suits your decorating sense and the theme of your picture or poem.


Leave a Reply