Last updated on March 6th, 2016 at 12:13 am
 Cat on a Hat Floral Craft Decoration
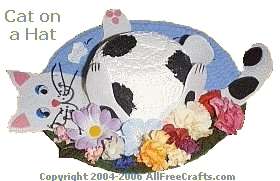
designed by Twila Lenoir
Pick the color of this homemade cat on a hat decoration to match your cat, or the kitty of your favourite cat lover. Won’t they be surprised when you present them with a cat on a hat that looks like their own favourite kitty?
Supplies:
8 inch straw hat (if you use a bigger hat, you will need to enlarge the pattern)
craft fun foam in a color that matches your cat, plus small scraps of pink foam or felt for ears and paws
acrylic paint in green (grass), light blue (sky), white (clouds), and black (birds), plus colors required to paint your cat
goggle eyes
black and red permanent marker
silk flowers and leaves
decorative buttons or charms
gloss sealer
small piece of wire to make a hanger on thee back
steal a few black fibers from a paint brush for whiskers
printed cat on a hat pattern
Craft Instructions:
1. Paint the center of the straw hat (the cat’s tummy) in the color of the kitty that you have chosen. Next, paint bottom half of the hat in green, to represent grass, and the top half in light blue to represent the sky. Add some white clouds to the sky and a few black checkmarks in the sky to represent flying birds. Let the paint dry and seal with painted on or sprayed on gloss sealer.
2. Print out the cat on a hat craft pattern. Trace these shapes onto craft fun foam, making one head and one tail. You’ll need four paws, arranged in the way shown on the photo.
3. Cut some two small pink felt or craft foam triangles for the inner ears and three small circles for the pads on the cat’s feet. (I didn’t make a pattern for those, but they should be fairly easy to do).
4. Glue the pink triangles to the ear shapes on the head. Glue on the goggle eyes (or draw your own). Draw a small red triangle for the nose, with the point heading down, as shown in the photo. Draw on a smile (two “U” shapes that meet under the nose) in black permanent marker. Add black dots, inside each “U” shape, for the beginning of the whiskers.
5. Steal a few hairs or synthetic fibers from a paint brush and glue six of these into place as whiskers, using three inside each “U” shape of the smile.
6. Glue the tail on, where the blue sky and green grass meet, at the bottom of the cat.
7. Glue on the paws, using the photo as reference for placement. Add the three pink felt circles to the top paw as the pads of the cat’s foot.
8. Glue some green silk leaves into place, then glue on your choice of flowers.
9. Lastly, attach a small piece of wire onto the back to use as a hanger. Enjoy!


Leave a Reply