Last updated on January 4th, 2025 at 10:58 pm
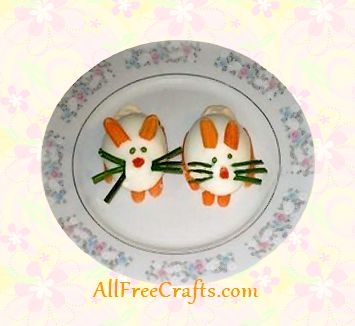
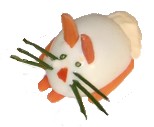
How to make two little edible bunnies from one hard-boiled egg, some baby carrots and other tiny edible additions.
by Jane Lake
Here’s a pretty way to present hard boiled eggs for breakfast on Easter morning – make them into edible Easter bunnies.
Kids love these, and may enjoy helping you to make them, although some of the assembly requires steady hands and a little patience. These cute little hard boiled egg bunnies are worth it though, don’t you think?
Supplies:
- one hard boiled egg (makes two bunnies)
- chives
- two small triangles of red pimento (taken from a stuffed olive), red pepper or radish for the noses
- six small baby carrots
- one teaspoon of mayonnaise for each bunny tail
- knife
- toothpick
- serving plate
Here’s How:
1. Boil an egg and let it cool. Peel, cut in half lengthwise, and place both sides on your serving plate.
2. The slimmer part of the egg (the more pointed end) will become the bunny’s face. Begin assembly by making a small hole for the nose triangle in the center of the face area. You can use a toothpick or the tip of a paring knife for this step. Insert the small red triangle of pimento (or pepper or radish).
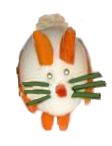
3. Cut two tiny chive pieces (they should be round and hollow). These will be the eyes. Make two small holes just above the nose where the eyes should go and insert one small chive round in each eye area.4. Cut six pieces from the chives to make whiskers. These should be about one a half inches long, or maybe a little less – it depends on how long you wish the whiskers to be, and how much you like chives!
Start with the bottom whisker on each side of the nose and work your way up until you have inserted all six whiskers, three on each side.
Again, cut a small hole, or use a toothpick to create a small hole for the whisker, then insert a length of chive at the angle you wish it be. You can point the whiskers up, down or straight, so each bunny you make can have a slightly different look.
5. Cut the tip from a baby carrot, then cut it in half lengthwise for the ears. Cut the bottom section of each carrot ear into a point. Cut two slits for the ears, just above the eyes, and insert one carrot ear into each slit, with the flat, cut side pointing forward.
6. If desired, you can give the bunny some carrot paws. (Moms will like the fact that this puts more veggies on the plate!) To make the front paws, simply cut the tip of a baby carrot in half lengthwise, gently lift the front of the bunny with the knife, and insert the paws underneath.
The back paws are made in the same way, but are slightly longer. These should be carefully inserted under each side of the bunny.
7. Finally, put a dollop of mayonaise at the back of the egg bunny to make a tail. You may need to sculpt the mayonaise with a clean finger or spoon to make it look rounded like a bunny tail. Wipe any excess off the plate with a paper towel.
If you’re hosting a big Easter party, make a plate of Beautifully Colored Deviled Eggs or Deviled Egg Chicks as well!
Bon appetit!


Leave a Reply