Last updated on August 11th, 2014 at 10:25 pm
Painted Sunflower Jar
What You Will Need:
– empty glass jar, washed, dried, all labels removed
– white vinegar or rubbing alcohol
– paper towel or soft cloth
– Free Printable Sunflower Pattern
Tools
– Liner, shader and scruffy brush
– Micron black craft pen
– Stylus
– Old toothbrush
– Acrylic matte spray
– Scrap strip of homespun material
– White craft glue
Acrylic Paint Colors (we used Delta Ceramcoat)
White
Crocus Yellow
Yellow
Antique Gold
Autumn Brown
Dark Forest Green
Forest Green
Black
Craft Project Instructions:
Base coat the surface of the jar with 1 coat of white. Allow to dry for 24 hours. If you don’t, you risk peeling the paint off with your second coat. This rule does not apply when painting on pourous surfaces such as wood. Remember, the paint does not soak into the glass like it does on wood, therefore your drying time is increased!
Paint of second and third coat, allowing 20 minutes dry time in between coats. Allow third coat to dry for a couple of hours before moving on to the next step.
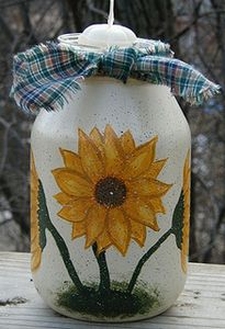
Trace the pattern onto base-coated surface. Paint petals with Crocus Yellow. Outline petals with Yellow, shade with Antique Gold.
Paint center of flower with Antique Gold, then use a scruffy brush to dab on Autumn Brown over the top of the Antique Gold, leave a little showing underneath in spots. Use a Stylus to dot Dark Forest Green in the center of the flower.
Use Forest Green to paint stems. Use scruffy brush and Forest Green to blend stems into the bottom of the design.
Use black Micron craft pen to draw lines around center of flower.
Dip the bristle tips of a toothbrush into some black paint that has been lightly thinned with a drop or two of water. Test your splattering ability on a piece of scrap paper before doing this on your jar. Hold toothbrush horizontally and drag your finger across the bristles, causing the paint to splatter spots wherever you aim it. When you are comfortable with this method, go ahead and splatter the entire surface of the jar with black paint. Clean out toothbrush and repeat this method with white paint. Let dry.
Dot white craft glue around the rim of the jar. Position strip of homespun material around the rim and tie in a knot or bow.
Sign your work! Spray completed project with 2-3 coats of acrylic spray sealer (matte) according to directions on can.
Hint:
Small glass votive holders or small clay pots work great in the mouth of the jar. Place votive candle on holder and you are all set!
Author: Amanda Formaro is the entrepreneurial mother of four children. She is also the owner of FamilyCorner.com Magazine.


Leave a Reply