Last updated on April 21st, 2021 at 02:29 am
Free On-this-Page Patterns for a Teddy Bear Overalls Outfit: Jumper Overalls, Shirt and Beret-style Cap
This free pattern set, all on this page, includes free instructions to make homemade overalls for an adorably cute and popular crocheted teddy bear. The outfit comes complete with an undershirt and a jaunty, beret-style cap.
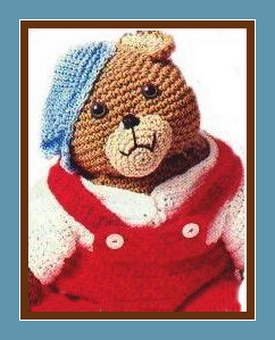
by Kathy Wilson of Grandmas Hookery
Materials List:
- Knitting worsted weight 4 ply yarn, 9 ounces red, 7 ounces white, 2 ounces blue (or your choice of colors)
- 6 White buttons, 3/4″ in diameter
- 2 buttons, 3/4″ diameter
- Crochet hook size J
- Tapesty needle
- Gauge: 3 sc = 1″
- To save time check gauge
Free Crochet Patterns for Teddy Bear Clothes
Pattern Instructions:
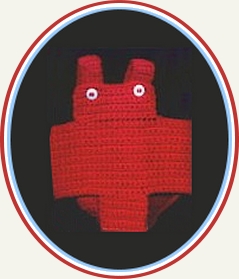
OVERALLS
Making Front side of Bibs: Starting at waist, with yarn, ch 41.
Row 1: Sc in 2nd ch from hook and in each ch across. Ch 1 turn (40sc)
Rows 2-16: Sc in each sc across, Ch 1, turn. At end of Row 16, break off.
Row 17: (for crotch): Skip first 15sc of Row 16. Join yarn in next sc, ch 1, sc in same sc as joining and in next 9 sc, ch 1, turn (10sc). Leave remaining sts of Row 16 unworked.
Rows 18-26: Sc in each sc across. Ch 1, turn. At end of Row 26, break off.
FRONT BIB: Row 1: Working on opposite side of starting ch, join yarn in 13th ch, ch 1, sc in same ch as joining and in next 15 ch. Ch 1, turn (16sc). Leave remaining sts unworked.
Rows 2-6: Sc in each sc across. Ch 1, turn.
Row 7: Sc in first 3 sc, ch 1, skip 1 sc, (buttonhole), sc in next 8 sc, ch 1, skip 1 sc, sc in last 3 sc (buttonhole). Ch 1, turn.
Row 8: Sc in each sc and each ch 1 across (16sc). At end of Row 8, break off.
Making BACK Side of Bibs: Starting at waist, with yarn, ch 41.
Row 1: Sc in each ch across. Ch 1, turn. (40sc)
Rows 2-20: Sc in each sc across. Ch 1, turn.
Row 21: (Dec. next 2 sc tog) 3 times, sc in next 28 sc, (dec next 2 sc tog) 3 times. Ch 1, turn (34sc)
Row 22: (Dec next 2 sc tog) 3 times, sc in next 22 sc, (dec next 2 sc tog) 3 times. Ch 1, turn (28sc)
Row 23: (Dec next 2 sc tog) 3 times, sc in next 16 sc, (dec next 2 sc tog) 3 times. Ch 1, turn (22sc)
Row 24: (Dec next 2 sc tog) 3 times, sc in next 10 sc, (dec next 2 sc tog) 3 times. Ch 1, turn (16sc)
Row 25: (Dec next 2 sc tog) 3 times, sc in next 4 sc, (dec next 2 sc tog) 3 times.
Ch 1, turn (10sc) Rows 26-29: Sc in each sc across, Ch 1, turn. At end of Row 29, break off. Sew last row of front and back crotch together, then sew side seams.
BACK BIB:
Row 1: Working on opposite side of starting ch, skip first 8 ch, join yarn in next ch, ch 1, sc in same ch as joining and in next 23 ch. Ch 1, turn. (24sc)
Rows 2-11: Sc in each sc across. Ch 1, turn. At end of Row 11, DO NOT BREAK OFF.
STRAPS:
Row 1: Sc in first sc in row just completed, and in next 3 sc. Ch 1 turn. (4sc)
Rows 2-20: Sc in each sc across. Ch 1, turn. At end of Row 20, break off.Skip next 16 sts of Back Bib, with yarn sl st in next sc, sc in joining sc and in last 3 sc. Ch 1, turn. (4sc). Complete same as for first strap.
Joining: Sew last row of Front and Back crotch together, then sew side seams.
OVERALL LEGS:
Rnd 1: Join yarn in any st of leg opening, ch 1, sc evenly spaced around leg opening, (increasing or decreasing until there are 36 sc around leg opening). Join with sl st to first sc. Ch 1, turn (36sc)
Rnds 2-19: Sc in each sc around. Ch 1, turn. At the end of Rnd 19, break off. Repeat for other leg.
OVERALL TRIM: Starting at front on top row of bib, join yarn, ch 1, sc in first sc, sc in each sc across, then sc evenly spaced around entire top of bibs including straps, join with sl st in first sc. Break off.
SHIRT
Starting at neck edge, with White, ch 61.
Row 1: Sc in 2nd ch from hook and in ch across. 60sc
Rows 2-5: Sc in each sc across. Ch 1, turn.
Row 6: Sc in first 10 sc, ch 20, sk next 10 sc (armhole), sc in next 20 sc, ch 20, sk next 10 sc (armhole), sc in last sc. Ch 1, turn
Row 7: Sc in each sc and in each ch across. Ch 1, turn 80 sc.
Row 8-26: Sc in each sc across. Ch 1, turn. At end of Row 26, break off.
SLEEVES
Rnd 1: Join White in any st at underarm, ch 1, then spacing sc’s evenly spaced and increasing as needed, work 36 sc’s around entire armhole opening. Join with sl st in first sc and ch 1, turn.
Rnd 2-12: Sc in each sc around, join and ch 1, turn at end of each rnd. At end of rnd 12, break off. REPEAT FOR OTHER SLEEVE.
FRONT TRIM AND BUTTONHOLES:
Row 1: Join White in first st at lower left front, ch 1, then sc evenly spaced across left front edge, work (sc, ch and sc) in corner, sc across neck edge, work corner as before, sc across right front edge, end of lower edge. Ch 1, turn.
TO MARK FOR BUTTONS:
For girl, mark left front edge, for boy mark right front edge. With pins, mark edge for 4 buttons, the first one is 1″ from lower edge, the last one 2″ from neck edge, the rest are spaced evenly between.
Row 2 (buttonhole row): Sc in each sc of last row, working (sc, ch 1, sc) in each corner and at the same time, work a buttonhole opposite each pin. For each buttonhole, ch 1, sk 1 sc. At end of row, ch 1, turn.
Row 3: Sc in each sc and in each ch-1 sp of last row, inc at corner as before. At end of row, break off.
BERET STYLE CAP
With color of choice, ch 2.
Rnd 1: 6 sc in 2nd ch from hook. 6sc
Rnd 2: 2 sc in each sc around. 12 sc
Rnd 3: (Sc in next sc, 2 sc in next sc) around. 18 sc
Rnd 4: (Sc in next 2 sc, 2 sc in next sc) around. 24 sc
Rnd 5: (Sc in next 3 sc, 2 sc in next sc) around. 30sc
Rnd 6: (Sc in next 4 sc, 2 sc in next sc) around. 36sc
Rnd 7: (Sc in next 5 sc, 2 sc in next sc) around. 42sc
Rnd 8: (Sc in next 6 sc, 2 sc in next sc) around. 48sc
Rnd 9: (Sc in next 7 sc, 2 sc in next sc) around. 54sc
Rnd 10: (Sc in next 8 sc, 2 sc in next sc) around 60sc
Rnd 11: (Sc in next 9 sc, 2 sc in next sc) around 66sc
Rnd 12: (Sc in next 10 sc, 2 sc in next sc) around. 72sc
Rnd 13: (Sc in next sc, dec next 2 sc tog) around. 48sc
Rnd 14: Sc in each sc around. At end of Rnd 14, Break off.
BRIM
Join cap color with sc in any sc or Rnd 14, sc in next 14 sc, ch 1, turn. 15sc
Row 2: Dec first 2 sc tog, sc in next 11 sc, dec last 2 sc tog. Ch 1, turn. 13sc
Row 3: Dec first 2 sc tog, sc in next 9 sc, dec last 2 sc tog. Ch 1, turn. 11sc
Row 4: Dec first 2 sc tog, sc in next 7 sc, dec last 2 sc tog. Ch 1, turn. 9sc
Row 5: Dec first 2 sc tog, sc in next 5 sc, dec last 2 sc tog. Ch 1, turn. 7sc
Row 6: Dec first 2 sc tog, sc in next 3 sc, dec last 2 sc tog, Ch 1, turn 5sc.
At end of Row 6 Break off. Set cap on head and over one ear. Sew to head.
FINISHING
Weave in any additional ends. Sew buttons to shirt, dress bear.


Jasmin r says
Is there a video? It would be highly appreciated!
Jane Lake says
I’m sorry, Jasmin, but this is an older pattern so there is currently no video. However, I may be making this bear for my granddaughters soon, so I’ll “bear” your suggestion in mind for sure!
Marion Pella says
I am in the process of making that really cute bear. When you sew the limbs on do you close the openings or attach them not sewed?
Thanks so much, first attempt at this type of crochet..
stacee says
thank you for such a beautifully written and easy to follow pattern. this was my first time trying to crochet a stuffed animal. and thanks to you i have a quick and easy gift for a baby shower.
Jane Lake says
I’m so pleased that you are pleased. And the baby and mom-to-be will have a one-of-a-kind gift.