Last updated on September 24th, 2015 at 08:37 pm
Beginning the Magic Circle
Crocheted Magic Circle Directions
by Christen Haden of needlenoodles.com.
Christen is also the author of Creepy Cute Crochet.

Crocheted Ladybug Begins with a Magic Circle
Many crochet projects begin with a circle (such as our Little Ladybug pattern). The problem is that standard directions usually say to chain two, then crochet a given number of stitches in the first stitch (or for double crochet, chain four, then work as many dc in fourth chain from hook as stated in your pattern).
These methods will produce a crocheted circle, but may leave a large, unsightly hole in the center of the circle. For some patterns, especially smaller scale toys or amigurumi, this just isn’t good enough.
Welcome to the better mousetrap – a magic circle, or adjustable ring, that produces a well-shaped center for your patterns, with an adjustable hole in the middle of the circle. You can tighten the yarn to whatever diameter is pleasing to you, or close it entirely.
Magic Circle / Adjustable Ring Tutorial:
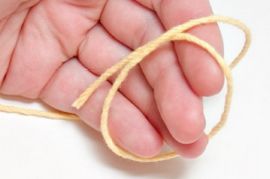
Magic Circle – Step One

» Make a loop with the stray end under the working end of the yarn.
»With the hook, pull the working end from behind the stray end under and back up to the top. Ch 1 or otherwise start as you would with any other type of ring.
Magic Circle – Step Two

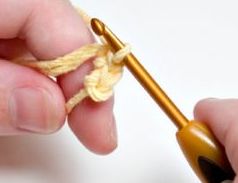

» Continue around, working as usual, with the sts worked directly over both cords.
» Once the desired number of stitches have been worked, hold work with one hand and pull the stray end taut with the other hand.
Magic Circle – Step Five
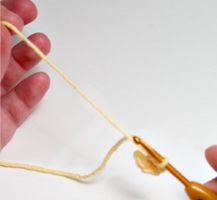
» Continue to pull the stray end until the ring is the desired size. Weave in end to keep ring from growing as piece is worked.
Published with generous permission from the author, under a Creative Commons Attribution-Share Alike 2.5 Generic license.


Lisa B says
I learned amigurumi from watching you tube videos. Seeing it actually done is so much easier to learn when you are a visual learner like me. There are a number of links on you tube but i like this one: http://www.planetjune.com/magicring. She has right and left handed versions.
Texchanchan says
I can’t tell what to do between 1 and 2. It’s just confusing. I’m sorry because the design and photos are good, and text is good,, but I can’t comprehend it. Or any of the other ones out there. Or I wouldn’t be reading this. This is embarrassing.
TCC
SharonAnn Maxwell says
TCC: I know exactly how you feel! I am 72 years old and in November of 2013, I learned how to crochet simple round coasters… took me 1/2 hour to chain 5…LOL!!! but I kept at it and now I’m doing granny squares!!! Keep trying and suddenly you will have an Aha! moment … you can do it! Blessings!!!
Jane Lake says
Thank you for leaving such an encouraging reply, SharonAnn. Support like that is priceless and very nice to see.
Dms says
Put hook thru opening, pull up strand still attached to skein, work desired number of sc in ring, making them over both strands. Then pull the loose strand to close circle. Hope that helps, friend.
Patty says
Thanks, Dms–your explanation did the trick!!