Last updated on February 21st, 2023 at 12:38 am
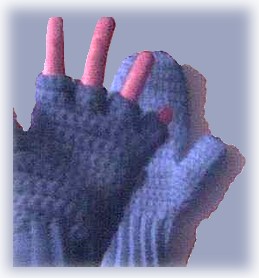 Free crochet pattern to make fingerless gloves with mitten tops for women or teens.
by Sue Norrad
These mittens convert to fingerless gloves by pulling back the mitten top.
MATERIALS
Worsted weight yarn. 3 1/2 oz (100 g)
A strip of velcro (which can be cut) or the hook & loop dots of velcro that look like buttons.
Hook: 5.00 mm (H-8)
Gauge: 3.5 sts per inch. 4 rows per inch.
Size: Women’s medium, or teens. For a larger size, use
a 5.50mm (I-9) or 6.00mm (J-10) hook. For a smaller size to fit pre-teens, use
a 4.50mm hook.
Abbreviations used:
st – stitch
ch – chain
ss – slip stitch
sc – single crochet
beg – beginning
tog – together
RIGHT MITTEN
CUFF (Ribbing)
Ch 13
ROW 1: 1 sc in 2nd ch from hook, 1 sc in next 13 chs, ch 1, turn. (12 sc) Next rows are through back loops only.
ROW 2: 1 sc in each sc of previous row, ch 1, turn. (12 sc)
ROWS 3 – 25: Same as Row 2
ROW 26: This is the joining row. Fold cuff so Row 1 is behind Row 25, ss to join Row 26 to Row 1.
Turn cuff inside out. This will be the right side.
RND 1: Ch 1, 1 sc at the base of ch 1, 1 sc at the end of each row of ribbing, ss to join to the first sc, ch 1, turn (26 sc)
(After you turn always skip the ss where you joined on previous RND and begin your work in the first sc.)
RND 2: 1 sc in each sc to end of rnd, ss to join, ch 1, turn. (26 sc)
RND 3: 1 sc in next 12 sc, 2 sc in next 2 sc, 1 sc in next 12 sc, ss to join, ch 1, turn.
(28 sc)
RND 4: 1 sc in next 12 sc, 2 sc in next sc, 1 sc in next 2 sc, 2 sc in next sc, 1 sc in next 12 sc, ss to join, ch 1, turn. (30 sc)
RND 5: 1 sc in next 12 sc, 2 sc in next sc, 1 sc in next 4 sc, 2 sc in next sc, 1 sc in next 12 sc, ss to join, ch 1, turn. (32 sc)
RND 6: 1 sc in next 12 sc, 2 sc in next sc, 1 sc in next 6 sc, 2 sc in next sc, 1 sc in next 12 sc, ss to join, ch 1, turn. (34 sc)
RND 7: 1 sc in next 12 sc, 2 sc in next sc, 1 sc in next 8 sc, 2 sc in next sc, 1 sc in next 12 sc, ss to join, ch 1, turn. (36 sc)
RND 8: 1 sc in next 12 sc, 2 sc in next sc, 1 sc in next 10 sc, 2 sc in next sc, 1 sc in next 12 sc, ss to join, ch 1, turn. (38 sc)
THUMB
1 sc in next 25 sc. Beginning at the last sc you just made, count back 12 sc, ss to join your last sc to this sc, ch 1, turn.
RND 1: 1 sc in the next 12 sc, ss to join, ch 1, turn. (12 sc)
RNDS 2 to 7: Same as RND 1.
RND 8: 2 sc tog 6 times, ss to join. (6 sc)
Cut yarn leaving end approx. 8″ long. Using darning needle thread yarn through the 7 sc and pull tight, fasten off.
PALM
(Helpful Hint: I have found it easier after attaching yarn for the palm and fingers to weave in the yarn ends as you go so you don’t have to turn the mitten inside out and do it after it’s finished.)
With the palm of mitten facing you, join yarn inside at the front of mitten by the base of
the thumb. In the first sc by base of thumb pull up a loop and ch 1 and 1 sc.
1 sc in next 12 sc, ss to join to the first sc of this RND which is the RND where you divided for the thumb, ch 1, turn. (13 sc)
If you are having problems with the above instructions, this will explain it further:
You join to the sc on the row where you made the thumb. Look back under “Thumb” and see where you made the “1 sc in next 25 sc”. Then you counted back 12 and joined to make the thumb opening. This left 13 sc worked on that row before the thumb opening, but the next 13 sc after the thumb opening was not worked.
What you are doing when you start the palm, is working those previously unworked 13 sc and joining to the first sc of the “25 sc” that you made when beginning the thumb.
RND 1: 1 sc in next 13 sc, pick up 2 sc at the base of thumb, 1 sc in next 13 sc, ss to join, ch 1, turn. (28 sc)
RND 2: 1 sc next 12 sc, 2sc tog twice, 1sc in next 12 sc, ss to join, ch 1, turn. (26 sc)
RND 3: 1 sc in each sc, ss to join, ch 1, turn. (26 sc)
RNDS 4 to 6: Same as RND 3.
(Add more rnds if necessary for length to base of wearer’s fingers)
INDEX FINGER
1 sc in next 17 sc, ch 2, beginning at the last sc you just made, count back 8 sc, ss to join to that sc, ch 1, turn.
RND 1: 1 sc in each of the next 2 chs, 1 sc in next 8 sc, ss to join, ch 1, turn. (10 sc)
RND 2: 1 sc in each sc, ss to join, ch 1, fasten off.. (10 sc)
MIDDLE FINGER
With palm of mitten facing you, join yarn at the front inside at the base of index finger. In the sc beside the base of index finger pull up a loop ch 1 and 1 sc. 1 sc in next 2 sc, ch 2. On the back of mitten count back 3 sc from index finger, 1 sc in that sc, 1 sc in the next 2 sc, 1 sc in next 2 sc at base of index finger, ss to join to first sc, ch 1, turn. (10 sc)
RND 1: 1 sc in next 5 sc, 1 sc in each of the next 2 chs, 1 sc in next 3 sc, ss to join, ch 1, turn. (10 sc)
RND 2: 1 sc in each sc, ss to join, ch 1, fasten off. (10 sc)
RING FINGER
With palm of mitten facing you, join yarn at the front inside at the base of middle finger. In the sc beside the base of middle finger pull up a loop ch 1 and 1 sc. 1 sc in next 2 sc, ch 2. On the back of mitten count back 3 sc from middle finger, 1 sc in that sc, 1 sc in the next 2 sc, 1 sc in next 2 sc at base of middle finger, ss to join to first sc, ch 1, turn. (10 sc)
RND 1: 1 sc in next 5 sc, 1 sc in each of the next 2 chs, 1 sc in next 3 sc, ss to join, ch 1, turn. (10 sc)
RND 2: 1 sc in each sc, ss to join, ch 1, fasten off. (10 sc)
LITTLE FINGER
With palm of mitten facing you, join yarn at the front inside at the base of ring finger. In the sc beside the base of ring finger pull up a loop ch 1 and 1 sc. 1 sc in next 5 sc, 1 sc in next 2 sc at base of ring finger, ss to join, ch 1, turn. (8 sc)
RND 1: 1 sc in each sc, ss to join, ch 1, turn. (8 sc)
RND 2: 1 sc in each sc, ss to join, fasten off. (8 sc)
MITTEN TOP
On the back of mitten, find the RND that is midway between the thumb and the base of fingers. (I used the third RND up from the thumb). Begin at the thumb end with finger ends toward you. On that rnd you can see the top loops fo the scs. Attach yarn and through those loops place 13 sc evenly across the back of mitten. To begin after attaching yarn, pull up a loop and make 1 ch and 1 sc. Then make 12 more sc across the back of mitten.
Next: ch 15, ss to join to the first sc, ch 1, turn.
RND 1: 1 sc in each of the 15 chs, 1 sc in next 13 sc, ss to join, ch 1, turn. (28 sc)
RND 2: 1 sc in each sc, ss to join, ch 1, turn. (28 sc)
RNDS 3 to 9: Same as RND 2.
RND 10: 2 sc tog, 1 sc in next 12 sc, 2 sc tog, 1 sc in next 12 sc, ss to join, ch 1, turn (26 sc)
RND 11: 1 sc in each sc, ss to join, ch 1, turn. (26 sc)
RND 12: 2 sc tog, 1 sc in next 11 sc, 2 sc tog, 1 sc in next 11 sc, ss to join, ch 1, turn (24 sc)
RND 13: 1 sc in each sc, ss to join, ch 1, turn. (24 sc)
RND 14: 2 sc tog, 1 sc in next 10 sc, 2 sc tog, 1 sc in next 10 sc, ss to join, ch 1, turn (22 sc)
RND 15: 2 sc tog, 1 sc in next 9 sc, 2 sc tog, 1 sc in next 9 sc, ss to join, ch 1, turn (20 sc)
RND 16: 2 sc tog 10 times, ss to join, ch 1, turn. (10 sc)
RND 17: 2 sc tog 5 times, ss to join, fasten off.
With darning needle, weave in all ends.
Sew velcro into place. To hold back mitten top when using the fingerless gloves, sew a small piece of velcro or a velcro dot (button) hook piece on the outside of each mitten top back about 1 inch down from the tip. Fold mitten top flat against mitten back and position one loop velcro piece under the hook piece, sew to mitten back. (Optional, to keep mitten top down when using only as mittens, sew one or two velcro pieces or velcro dots (buttons) under mitten top and to the palm. However, most people tell me that you do not need anything to hold them down as they will stay in place.)
LEFT MITTEN
Work exactly as for the Right Mitten up until you complete the fingers. Now turn the mitten over, it will also fit the left hand. What was the palm side for the Right Mitten will now be the back side for the Left Mitten.
With that in mind, work mitten top the same as for the Right Mitten by beginning on the back of mitten, except this time with the finger ends towards you, you will begin at the little finger end, instead of the thumb end.
Contributed by Sue’s Crochet and Knitting site, which offers Free Crochet and Knit Patterns, a Craft Discussion Board, Craft Supplies and much more.


Renee says
Where it says ” next rows are through BLO” , that means just for the cuff part right?
Samantha says
Hi! I’m new to crochet and I am having some trouble making the middle finger, I come up with 6 sc instead of 10 at the beginning and I’m not sure what I am doing wrong. Any explanations would be great. Thank you!
Jane Lake says
My apologies for not replying sooner. And, unfortunately, I don’t have an answer to explain the error that you have. I’ve had similar things happen when following a pattern and I know it’s frustrating. But I haven’t done this pattern myself. If anyone else can help us, please chime in!