Last updated on December 25th, 2020 at 08:28 pm
If you like to decorate with upscale Victorian flair, then this Christmas wreath craft project is for you.
The Victorian ornaments are beaded and beribboned, entirely in keeping with your theme, and the wreath itself is full and luxurious.
Material:
- Artificial Wreath/wreaths (mixed evergreen is the best, approximately 26 inches), I used 2 wreaths wired together, the largest being about 26 inches
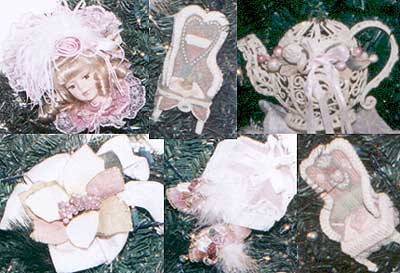
- Victorian Ornaments of choice (ornaments used are shown below)
- Cream colour wired velvet ribbon (approximately 16 yards of ribbon)
- Clear Mini Lights (set of 50 was used here)
- Floral Wire
- Angel for center of wreath
How to:
There are additional photos below to help you with assembling this wreath.
This is a wreath that I have wanted to make for about 3 years. The ornaments were quite expensive, so I began accumulating them, at discounted after Christmas sales. I finally managed to collect all that were needed, including a fabulous wreath at less than half the regular price. I was not able to find a reasonably priced wreath that had several different evergreens attached and was very full, so I purchased a large wreath that was made of inexpensive standard garland and another smaller wreath that had the mixture of different evergreens. I then wired the two wreaths together, to create a very full and large wreath. To wire the wreaths together, simply attach a strand of wire to the frame of each wreath, in about 4 or 5 different locations and secure the wire well.
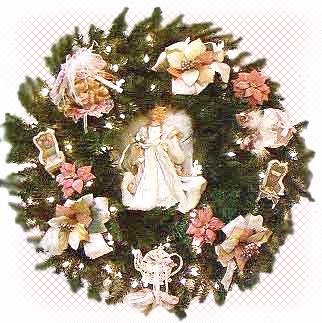
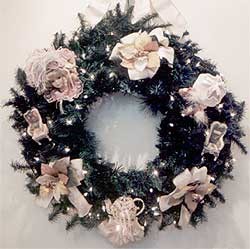
I completed this wreath in less than an hour and though the photo can’t show how truly pretty it is, it really is magnificent!
All of the ornaments are attached using wire. The flowers are wired on top of a 4 loop bow (instructions below for making the bow). The doll face was intentionally placed off-center, as it looks much nicer that way. The only ornament placed center on the wreath is the teapot at the bottom center. A small 4 loop bow is also placed behind the teapot.
The best way to make this wreath is to place all your ornaments first and then secure them with wire. The lights are added after all the ornaments are in place and secure. This will make them easier to remove later, if they should fail.
To make the bows to be placed on the wreath, simply wrap ribbon around and around, creating as many loops as desired (I used 4 loops). The length will depend on the desired size of bow. Once you have created all the loops (of equal length), twist a wire around the center of all the loops and secure the wire well. Pull gently at the loops to create the desired shape of the bow.
Finally place an angel in the center of the wreath and secure with a little wire to the wreath.
Ornament placement – from doll face, moving clockwise: ribbon-poinsettia, umbrella and shoes together, chair, ribbon-poinsettia, teapot and ribbon, ribbon-poinsettia, chair. I added three additional velvet poinsettia flower buds (refer to top photo)
Copyright © 1999-2020 Susan Spatone All rights reserved.
Published with permission from CraftAtHome.com


Leave a Reply