Last updated on November 25th, 2024 at 11:38 pm
Recycle a plastic coffee creamer container to make a seasonal snowman ornament. You can still open the lid, so this is a nice way to package coffee or cocoa mixes for Christmas gift giving.
by Jane Lake

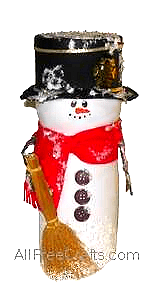
Recycle a coffee creamer container and a salt box, if you have one, to make this cute snowman decoration for Christmas. His top hat is glued over the lid of the coffee creamer container, so you can use the container to hold Christmas goodies or candies.
This decorated snowman container is also perfect to hold a hot chocolate jar mix or spiced tea mix for easy homemade gift giving.
Supplies:

- Carnation Coffee-Mate coffee creamer container
- salt box container, marginally larger than the diameter of the coffee creamer container lid. If you don’t have an empty salt box, just cut a 2″ cardboard strip to fit around the lid and top it with a circle of cardboard cut to fit.
- black felt or black construction paper for hat brim, red felt or fleece for scarf
- two small twigs
- straw broom, about 5″ long
- 3 buttons
- black permanent marker
- orange acrylic or dimensional paint
- gold ribbon and snowflake confetti, or other seasonal decorations, to decorate hat
- artificial snow or white glitter
- tacky glue and hot glue
- scissors

Project Instructions:
1. Clean the coffee creamer container, inside and out, with dish soap and water. Dry completely.
2. Face: There are two faint seam lines down the sides of the coffee creamer container, presumably where the two halves of the container are joined. Paint the snowman’s face in the middle of the upper section, between these two seam lines, following the close-up face detail shown at left.
You can use black permanent marker or black acrylic paint for the eyes and the snowman’s smile. Use orange acrylic craft paint, or dimensional paint, for the nose.
3. Hat: If you are using a salt box (or any other circular cardboard box) for the hat, make sure that it will fit snugly around the coffee creamer container lid. If it does, cut off the bottom 2 inches of the box and paint it black.
If you don’t have a salt box, cut a 2″ inch strip of thin cardboard to encircle the lid and glue together. Cut a circle of cardboard the same size as the coffee creamer lid and glue this on top of the cardboard circle to make the top of the hat.
4. Hat Brim: Draw a circle on black felt or construction paper, about ¾ inch larger than the hat diameter, and cut out this circle. Place the coffee creamer lid in the middle of the hat brim circle, trace around it and cut out.
Glue the hat brim to the bottom of the hat, making sure that you don’t glue any fabric on the inside of the screw top lid. Screw the lid in place.
5. Scarf: The scarf is a 1½ inch wide piece of felt or fleece, approximately 24″ long. If you don’t have a piece that long, cut two 12″ pieces of red felt and glue them together in a one inch overlap. Cut a fringe on each end of the scart, then tie it around the neck of the snowman, placing the knot to one side of the neck, as shown in our photo.
6. Arms: Make the arms from small, slightly curved twigs, approximately 4 inches long, with a “V” shape at the ends, to serve as hands. Choosing a curved twig enables you to easily position the arms at the front to hold the broom or a gift tag.
With small, sharp scissors, cut a small slit on each side of the scarf and insert a twig in each side as the arms. Secure in place with tacky glue or hot glue.
7. Broom: The broom should fit in the “hand” of one of the twigs. Glue in place with tacky glue or hot glue. We cut the bottom of the broom on a slant, so it looked like the snowman was brushing away the snow.
8. Buttons: Attach three buttons in a line down the middle of the snowman, using tacky glue or hot glue.
9. Decorations: Glue a few decorations on the hat – we used a gold snowflake, but any small Christmas symbol will work – why not try a small gold bell or holly leaves?
10. Snow: Have some fun with this step! Place some newspaper on your work surface, then dab on tacky glue wherever you want the snow to stick. Tap the snowman to release any extra snow, then set the snowman aside to dry completely. Fold the newspaper in half and use the crease to funnel the extra artificial snow back into the bag or container, ready for other Christmas crafts.
Pease check out our new Tall, Skinny Plunger Snowman for something a little different.


Leave a Reply