Last updated on October 9th, 2015 at 11:53 pm
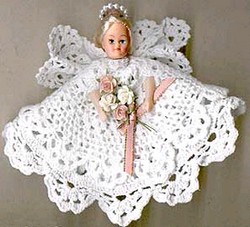
Pretty Doily Angel
Inexpensive, fabric doilies are usually very lacey, feminine and pretty. Here’s how to use those pretty doilies to make angel decorations that can be displayed in two different ways.
Craft Supplies:
- 3 Doilies (Each slightly smaller than the last – I used an 8 inch, 6 inch and 5 inch doily)
- Doll face and hands
- Ribbon
- Paper or silk flowers
- Hot glue
- small wooden knob or doll pin
- String pearls for halo
- decorative trim or lace scrap
Craft Project Instructions:
The photo can’t show how adorable these angels are, but displayed flat, they are very pretty!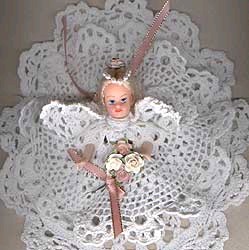
Refer to the photo often while assembling your angel. Glue a small piece of decorative trim or lace around the doll head neck, gluing the ends of the trim at the back. Glue a little strand of pearls around her neck on top of the lace or trim.
Glue the centre of the middle size doily to the bottom of the doll head. Glue the largest doily to the medium size doily, matching the centres. You have now created a double layer skirt for your angel. You can use only one doily for this, but two looks nicer.
Fan fold your smallest doily to create wings. Wrap a piece of ribbon around the centre of your fan fold and tie securely in a knot. Tie a bow and trim the ribbon length to extend just to the end of the doily.
Glue your wing doily just below the neck of the doll on the doily. Glue at the centre of the wing and at the bottom centre of each wing.
Lay your doily out flat and decide where the hands should be placed. Try to find a whole in the doily that the ends of the arms can be inserted in. Glue the hands in place.
Glue a small strand of pearls to the head for a halo. Add a single flower to the back of the head top. Tie together a little bunch of paper or silk flowers with a piece of ribbon and glue to the doily, placing the bouquet between the angel’s hands.
The wooden knob or doll pin raises the angel centre slightly and looks much nicer if this is added, though it is not absolutely necessary. Glue your wooden knob (flat side up) to the underside of the largest doily directly under the doll head.


Susan Miller says
I was idly looking through Pinterest ..and found this great idea for the doll/angel. ( I have to say that the pinner had made some snarky remarks .. but your photo intrigued me!) I am 60 yrs old, have crocheted most of my life, and have this sweet dolly that belonged to my parents when they got married .. so she is pretty ancient. My mother used to make beautiful dresses for her .. every other year as she was our ‘angel’ or fairy on top of the tree! Since Mum died, and seeing as I cannot sew to save my life, she has been getting more and more … dusty and looking down on her luck! lol! Your pattern has given me a GREAT idea to make her beautiful again … and I can’t think for the life of me why I never thought of crocheting her a dress before !!!!! Thank you SO much for the inspiration !!
Jane Lake says
Hi, Susan,
I enjoyed reading your story so much. I would love to see a picture of your fairy doll when she gets her new dress, but even I don’t, I just know it will be beautiful. The memories you describe are priceless, and I hope that whoever inherits this little fairy doll after you will know the story. May I suggest that you write it down, and pack it with the doll when you put her away each Christmas. That’s the magic of fairies, and of angels, come to that: the love they carry with them and sprinkle all around. Methinks this little angel has lots more love to share.
Thank you so much,
Jane
Sandy says
where did you buy the angel head and hands, i woulld love to make this
Jane Lake says
I think this one may have come from Michaels, so you could try there. Or you can browse through the selection of Doll’s Head and Hands at Amazon.