Last updated on April 7th, 2021 at 11:26 pm
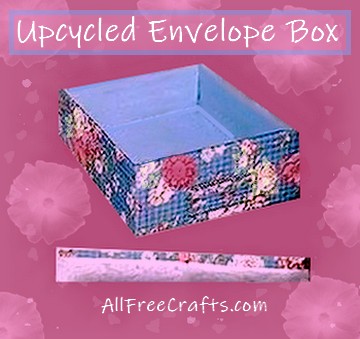
This paper craft makes use of a sturdy cardboard box that originally held a supply of business-sized envelopes. If you have similar boxes left over in your home office, give them new purpose as fabric-covered storage holders for all sorts of small, but hard-to-stash items.
Craft Supplies:
- Fabric
- Envelope Box (or a cardboard box of sturdy construction with similar dimensions
- Cardboard scrap
- Decorative cording
- Ribbon
- Tassel
- Button
- Hot glue and glue sticks
- Fabric pencil
Craft Instructions:
This is a box that originally held regular #10 envelopes, but you can use other boxes of similar dimensions. Custom printing orders come in these types of boxes and are usually tossed out to the trash regularly. My recycled box now holds my glue gun and sticks, but there are so many possible uses – several of these storage boxes, stacked in your closet, add a little extra touch to an otherwise dreary closet and give you that extra storage space that most of us need.
These boxes can be opened to lay flat. Measure a fabric piece to fit around entire outside box surface, including the bottom and leaving the inside of the box uncovered. You will cover this later with a contrasting fabric. You will end up with no seams if covered in this fashion. Repeat for the lid. Glue fabric to box surface (I used hot glue, it dries quicker and is much easier than craft glue to work with). Don’t worry about a little fabric overhanging on the inside of the box, this can be covered with your contrasting fabric before re-assembling your box.
For the lid, you will need to make a couple of slits at the four corners to fold your lid in shape. Allow your glue to dry completely before assembling your box. Re-assemble your box.
To cover the interior of your box (I used an inexpensive broadcloth for this), measure you box from the top edge to bottom at the side and then measure around all sides of the box beginning at the inside corner and ending at the same corner. Add one inch to both your measurements and cut your fabric. Place your box on top of your fabric and draw a line around the bottom of the box to make your piece of fabric to cover the interior bottom of your box, repeat these same steps for the lid. Cut this piece approximately 1/2 inch outside of the line you traced on the fabric.
With an iron, press a 1/2 seam in (wrong sides together) on all edges of the fabric pieces you have cut. This will prevent any raw fabric edges from showing on your finished box. Beginning with the side pieces, glue them in place starting at the top of the box and then randomly at the bottom edge. Check to make sure your bottom piece of fabric fits well at the bottom of the box and glue this piece of fabric in place along all the edges.
Using a 1/4 inch ribbon (or any size of choice), begin gluing ribbon along the top interior of your box and then to the interior of the lid to cover the seam between to two fabrics.
To add a little extra to the outside of the box, glue a ribbon trim around the top outside of your (refer to photo) lid only.
From a piece of cardboard, cut a square about 4 inches by 2 inches and then cut another square out of the inside of that square (about 1/4 inch inside of the outside cut). This will be your card holder for the front or side of box. Using a scrap piece of fabric, cover this square with fabric, turning edges to one side of the cardboard piece and glue securely. Clip the corners of the fabric on the inside square to full the fabric through the inside square cut-out and glue in place. Don’t worry about how messy the back of this cardboard piece is as it will be glued to the front or side of your box with all the mess covered up.
Glue a piece of cording along the edge of the outside of your square covered piece of cardboard and then glue your card holder to the front or side of the box centre (see photo). When you glue this holder in place, be sure to leave the top free of glue so that you can insert new cards as needed from the top.
Glue a small tassel to the front centre of your lid and glue a pretty button on top of the tassel top to add a little extra flare to your box.
Cut a piece of paper about 4″ x 2″ and write the contents of your box on this paper. Fold the edges of your paper to fit into the card holder and slide from the top into place
Copyright © 1999-2021 Susan Spatone All rights reserved.


Leave a Reply